Quick start - Support SDK for iOS
This hands-on tutorial shows you how to build a functioning iOS application in 30 minutes that lets users access your help center directly from the mobile app. The app also lets users submit support requests to your agents in Zendesk Support.
The tutorial uses the Support SDK for iOS, a shared code library that lets you easily incorporate different Zendesk customer support features in iOS applications.
Zendesk gives you other options for providing customer support in mobile apps:
-
You can use the Chat SDK to let users chat with support agents. To learn how, see Quick start - Chat SDK for iOS.
-
You can use the Unified SDK to incorporate Zendesk bots with Support to create a unified messaging experience.
You need macOS and Xcode to build iOS applications. You can download the current version of Xcode from the Mac App Store.
You'll also need a Zendesk Support account or a trial account. You can request a sponsored test account that doesn't expire after 14 days like the trial account.
Make sure the help center is enabled in your Zendesk Support account. See Getting started with Guide in Zendesk help.
Though this quick start guide provides step-by-step instructions to build a simple application, it's not an iOS app tutorial, If you're new to iOS development, I highly recommend working through the lessons in Start Developing iOS Apps (Swift) on the Apple website.
The guide walks you through the following basic steps for adding Zendesk Support features to an iOS application:
- Creating a sample project
- Adding the Support SDK with CocoaPods
- Initializing the Support SDK
- Creating a navigation controller for the SDK features
- Making the controller customizable
- Adding the help center
- Next steps
The tutorial uses version 5.5.0 of the Support SDK. It was tested in version 13.4.1 of Xcode.
Disclaimer: Zendesk provides this article for instructional purposes only. Zendesk can't provide support for third-party technologies such as Swift, iOS, and Xcode. Please post any issue in the Zendesk SDKs community, or search for a solution online.
Creating a sample project
This section shows you how to create a quick sample project in Xcode. You'll use the project to try out the Support SDK.
-
In Xcode, select File > New > Project.
If you're at the Welcome to Xcode window, choose Create a new Xcode project.
-
Make sure iOS is selected on the top bar, select App, and click Next.

-
Set the following options for the project:
- Product Name - Enter My Sample App or something similar
- Organization Identifier - Enter something like com.sample
- Interface - Select Storyboard (not the default SwiftUI)
- Language - Select Swift
- Include Tests - Uncheck this checkbox
Use the default values for the other options.
-
Click Next, choose where you want to save the project, and click Create.
Xcode creates all the files and basic settings for your project. You can view the files in the Project navigator on the left side of the screen. If you don't see the files, click the first icon (the folder icon) on the upper side of the panel.

Adding the Support SDK with CocoaPods
CocoaPods is a dependency manager that lets you add third-party frameworks and libraries to projects.
Step 1 - Install CocoaPods
If not already done, install CocoaPods by running the following command in Terminal:
$ sudo gem install cocoapods
If you are on macOS and are having problems installing CocoaPods using gem, try using brew.
$ brew install cocoapods
See Getting started on the CocoaPods site.
Step 2 - Create a Podfile
A Podfile specifies the dependencies of an Xcode project. The file is simply named Podfile with no file extension.
To create a Podfile
-
In Terminal, navigate to the top-level folder of your project (the one with the .xcodeproj file).
-
Create a Podfile with the following command:
$ pod init -
Open the file in Xcode with the following command:
$ open -a Xcode PodfileThe content should look as follows:
# Uncomment the next line to define a global platform for your project# platform :ios, '9.0'target 'My Sample Support App' do# Comment the next line if you don't want to use dynamic frameworksuse_frameworks!# Pods for My Sample Support Append -
Add
pod 'ZendeskSupportSDK'to thedoblock:target 'My Sample App' do...pod 'ZendeskSupportSDK'end -
Save the Podfile.
Step 3 - Adding the SDK in your project
-
If you installed the 'ZendeskSupportSDK' pod in your project directory for a previous version of the Support SDK, run the following command first:
$ pod update ZendeskSupportSDKCocoaPods updates the SDK pod on your system.
Skip this step if you never added the Support SDK in the project directory with CocoaPods before.
-
Run the following command:
$ pod installCocoaPods adds the latest version of the SDK to your project.
If you encounter errors, you'll have to manually install the SDK. For instructions, see Adding the Support SDK.
-
Close your project in Xcode, then reopen it by double-clicking the .xcworkspace file located in the project's root folder.
If you can't locate your .xcworkspace file, right click the .xcodeproj file located in the project's root folder and select Show Package Contents.
Important: Because your project now contains a dependency managed by CocoaPods, from now on you must open the project in Xcode by double-clicking the .xcworkspace file.
Running a test build
Before going any further, make sure you successfully added the Support SDK to your project. One way is to run a test build. The application doesn't do much yet, but if you don't get any build errors you know you're on the right path.
You can use the Simulator app that’s included in Xcode to run your application. As the name implies, Simulator simulates running an iOS app on your Mac.
-
Make sure you opened the project by double-clicking the .xcworkspace file in the project's root folder (see Adding the Support SDK with CocoaPods).
-
In the Scheme pop-up menu on the Xcode toolbar, choose iPhone 13 Pro Max.

-
Click the Run button (the play icon) on the left side of the Xcode toolbar.
Xcode displays messages about the build process in the middle of the toolbar.
Simulator starts automatically after the build is finished. Look for it on the Dock. Be patient. Simulator can take a while to get going the first time it starts. It's much faster with subsequent builds.
Eventually, the application opens in Simulator:

Consider the test a success if you don't get any build errors. You might get some build warnings but you can ignore them for now.
Initializing the Support SDK
Before a user can use any Zendesk feature on their device, the application has to initialize the Zendesk product SDKs you want to use. The initialization process involves setting initial values and performing other setup tasks.
In this section, you'll update the sample application to initialize the Support SDK dependencies and make them ready for use. The task consists of the following steps:
- Getting the initialization code from your Zendesk Support account
- Adding the initialization code to the application delegate
- Adding a user identity
Getting the initialization code from your Zendesk Support account
You get the initialization code from your Zendesk Admin Center interface. The code is generated when an Zendesk Support admin registers a mobile app in Zendesk Support.
You'll need to sign in as a Zendesk Support admin, or ask an admin to complete the following steps for you.
In Admin Center, click Channels in the sidebar, then select Mobile SDK.
-
Click Add app.
-
In the Setup tab, enter a name for your app.
The name is for your reference only and is not shown to your users.
-
Under iOS code snippet, copy and save the Swift version of the initialization code, not the Objective-C one. The Swift version is the second snippet.
It should look as follows, but with different argument values:
Zendesk.initialize(appId: "1e41a02a5f85d58e009ed4fa",clientId: "mobile_sdk_client_e1c4e6262f1d02f43496",zendeskUrl: "https://omniwear.zendesk.com")Support.initialize(withZendesk: Zendesk.instance)The initialization code is unique to your app and your instance of Zendesk Support. Save the snippet from your account -- not the one in the example -- in a text file for now.
-
For Authentication method, select Anonymous.
When the application accesses Zendesk Support, it needs to be able to authenticate as a user. You can use anonymous access or JWT authentication. For simplicity, you'll use anonymous access for the sample app.
-
Click Save.
Adding the initialization code to the application delegate
Your application can delegate certain tasks to another object named appropriately enough the application delegate. The AppDelegate.swift file in your project defines this delegate. It contains a UIApplicationDelegate object with methods that run in response to important events in the lifetime of the application. For example, one method runs on application launch. You can add your own code to these event handlers.
-
In Xcode, select AppDelegate.swift in the Project navigator.
-
Add the following import statements after the
import UIKitstatement:import SupportSDKimport ZendeskCoreSDK -
Add the initialization code snippet you copied to the
application()method that has thedidFinishLaunchingWithOptionsargument. Make sure to paste the snippet before thereturnstatement.The method should look as follows with the initialization code:
func application(_ application: UIApplication, didFinishLaunchingWithOptions launchOptions: [UIApplication.LaunchOptionsKey: Any]?) -> Bool {Zendesk.initialize(appId: "1e41a02a5f85d58e009ed4fa",clientId: "mobile_sdk_client_e1c4e6262f1d02f43496",zendeskUrl: "https://omniwear.zendesk.com")Support.initialize(withZendesk: Zendesk.instance)return true}Applications are event driven, so you need to initialize the framework in an event handler like the
application()method. The method runs just before the application moves to the active state. -
Run a build to make sure you don't get any error messages.
Adding a user identity
When the application accesses Zendesk, it needs to be able to authenticate as a user. You can use anonymous access or JWT authentication. For simplicity's sake, you selected anonymous access when you registered your app in Zendesk Support above.
-
In AppDelegate.swift, add the following code (in bold) after the
Zendesk.initialize()statement but before theSupport.initialize(...)statement:...let identity = Identity.createAnonymous()Zendesk.instance?.setIdentity(identity)Support.initialize(withZendesk: Zendesk.instance)The completed method should look as follows:
func application(_ application: UIApplication, didFinishLaunchingWithOptions launchOptions: [UIApplication.LaunchOptionsKey: Any]?) -> Bool {Zendesk.initialize(appId: "1e41a02a5f85d58e009ed4fa",clientId: "mobile_sdk_client_e1c4e6262f1d02f43496",zendeskUrl: "https://omniwear.zendesk.com")let identity = Identity.createAnonymous()Zendesk.instance?.setIdentity(identity)Support.initialize(withZendesk: Zendesk.instance)return true} -
Save, then run a build to make sure you don't get any error messages.
If everything checks out, you can start adding support features to your application.
Creating a navigation controller for the SDK features
The help center feature is designed to work with a navigation controller. A navigation controller manages a stack of views, each with its own view controller. Among other things, the controller provides a back button that lets users go back to the previous view in the stack.
Your sample project consists of a tab bar controller with two connected view controllers:

Assume the first view controller is reserved for the main features of your fictional app. You won't worry about it here.
You'll create the second view controller with a navigation controller to display your help center. One approach is to embed the view controller in a navigation controller and then delete the view controller. The approach has the added benefit of preserving the tabbed interface connectors.
-
In the Project navigator, select the Main.storyboard file to open it in Interface Builder, Xcode's visual UI editor.

-
Click the controller to give it focus and press the Delete key. You'll be left with a blank storyboard.
-
In the Xcode menu, select View > Show Library.
-
Search for Tab Bar Controller and drag it to your storyboard.
The storyboard displays the application's views and their relationships:

To get this bird's-eye view, right-click the storyboard and choose Zoom to Fit.
-
Select the Tab Bar Controller, then open the Simulated Metrics in the Utilities panel on the upper-right side of the window.

-
Check Is Initial View Controller.
An arrow appears to the left of the Tab Bar Controller. The arrow indicates that this is the screen users see first when they launch the app. Without the initial view controller, the app doesn't know which view to display and just shows a white screen.

-
Zoom in on the "Item 2" controller and click it to give it focus.
-
Select the round yellow icon on the view's top bar.

The icon represents the view controller for the view.
-
In the Xcode menu, select Editor > Embed In > Navigation Controller.
Xcode rearranges the app for you, moving the second view as the root view in the navigation controller's stack.

Tip: If your storyboard gets too congested, right-click and choose a zoom level.
-
In the document outline to the left of the storyboard (not the Project navigator), select View Controller Scene and press the Delete key. You don't need it anymore.

You should be left with just the tab bar controller, item 1 controller, and the navigation controller.
Making the controller customizable
Before you can add the Zendesk Support features to the navigation controller, you need to make the controller customizable. You make controllers customizable by subclassing them, as described in this section.
-
Select File > New > File, then choose Swift File, and click Next.
-
Name the file SupportNavController and click Create.
-
Open the SupportNavController file in the code editor, delete everything in it, and add the following lines:
import UIKitclass SupportNavController: UINavigationController {}This creates a customizable subclass of the UINavigationController class. The subclass name should be the same as the file name.
-
Make sure to save the file.
-
Switch to the storyboard, select the navigation controller, then open the Identity inspector in the Utitilies panel on the upper-right side of the window.

-
In the Custom Class section at the top, enter SupportNavController as the Class.
This associates the navigation controller to your SupportNavController subclass.
Build and run the application to make sure everything is working. After clicking the second tab (labeled Item 2) on the home screen in Simulator, you should see the following screen elements:
- a black screen, which indicates that the navigation controller currently doesn't have a root view
- a gray header, which is the navigation controller's Navigation view
Adding the help center
-
In the SupportNavController.swift file, replace the
import UIKitstatement with the following import statement:import SupportSDKUIKit is a framework that defines many UI elements and other iOS-specific classes. You don't need to import it because it's imported by the ZendeskSDK framework.
-
Add the
viewDidLoad()override function to your SupportNavController subclass:class SupportNavController: UINavigationController {override func viewDidLoad() {super.viewDidLoad()}}Applications are event driven, so you need to start the help center in an event handler like
viewDidLoad(). TheviewDidLoad()override function always runs after the support view is loaded in memory. -
Add the following statements in the
viewDidLoad()function to start the help center:let helpCenter = HelpCenterUi.buildHelpCenterOverviewUi(withConfigs: [])pushViewController(helpCenter, animated: true)The first statement builds a view controller named helpCenter. The second statement pushes the helpCenter view controller on the current navigation controller.
That's it. The completed SupportNavController.swift file should look as follows:
import SupportSDKclass SupportNavController: UINavigationController {override func viewDidLoad() {super.viewDidLoad()let helpCenter = HelpCenterUi.buildHelpCenterOverviewUi(withConfigs: [])pushViewController(helpCenter, animated: true)}}
Build and test the application in Simulator. After tapping the second tab on the starting view, your help center should open in the app and let you browse and search the content.
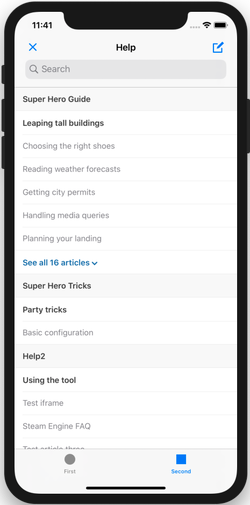
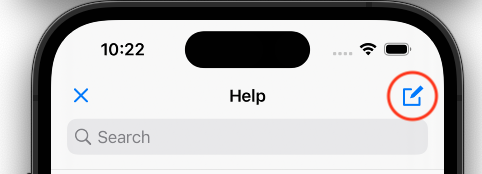
The help center also lets users submit support requests (tickets) and view their open requests. Tap the note icon on the top-right to try it out.
Next steps
At this point you should have a working iOS application that lets users open your help center and submit support requests. Use this sample application to experiment with the rest of the framework.
For example, you can limit the number of articles displayed by specifying a list of section or category ids. You can also scope the content by supplying a list of labels. See Adding your help center in the Support SDK documentation.
Put your project under git and create branches to try out different things. You can always reset if something goes horribly wrong.