Quickstart - Suppressing Web Widget (Classic) channels on specific web pages
The Web Widget (Classic) supports a number of channels, including Contact Form, Chat, Talk, Help Center, and Answer Bot, that are enabled in the Zendesk Support admin. The channels are enabled globally on all web pages that contain the widget. However, there may be instances where you want to provide specific widget channels on particular pages of your website.
This hands-on tutorial demonstrates how to use the suppress API setting to suppress channels and configure the widget for some common web page types.
Though not necessary to work through this tutorial, a general understanding of HTML and JavaScript is recommended to use the Web Widget (Classic) API in your organization's website. For more information, see HTML Introduction and JavaScript MDN.
Related articles:
- Quickstart – Web Widget (Classic) APIs
- Providing omnichannel support using Web Widget (Classic) for Zendesk Suite
- Configuring components in the Web Widget (Classic)
- Advanced customization of the Web Widget (Classic)
Requirements
-
CodePen, a free online code editor. While this tutorial uses CodePen, you can use other code editors such as JSFiddle and JS Bin.
-
A Zendesk Support account or a trial account. You can request a sponsored test account that doesn't expire after 14 days like the trial account.
-
Supported web browsers for Web Widget (Classic), as described in Using Web Widget to embed customer service in your website.
Getting started
To demonstrate the suppress setting, a generic “Hello, World!” page will be used and only the Contact Form, Chat, and Help Center search channels will be enabled in the widget.
To set up Web Widget (Classic) channels for specific web pages, you must first enable all the components for the widget, then add the suppress API setting to each page where the widget is implemented.
To set up a web page and Web Widget
-
In Admin Center, go to Channels > Classic > Web Widget, select the Customization tab, and turn on the Contact Form, Chat, and Help Center.

-
Click the Setup tab, and turn on the Add to Help Center toggle button to add the Web Widget to your help center page.
-
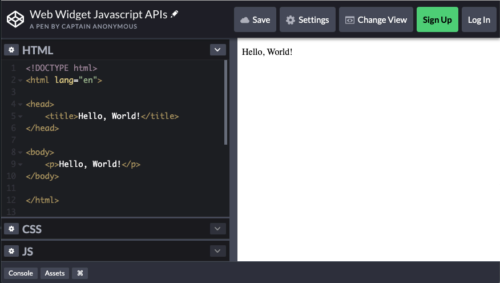
In CodePen, create a “Hello, World!” webpage and add the Web Widget (Classic) as described in Quickstart – Web Widget JavaScript APIs sections “Creating a sample web page” and “Adding the Web Widget (Classic) on your web page”.
Your HTML source code should look something like this:
<!DOCTYPE html><html lang="en"><head><title>Hello, World!</title></head><body><p>Hello, World!</p><!-- Start of Zendesk Widget script --><script id="ze-snippet" src="https://static.zdassets.com/ekr/snippet.js?key=YOUR_SNIPPET_KEY"></script><!-- End of Zendesk Widget script --></body></html>
Configuring the widget for a home page
The home page usually contains information that attracts traffic, educates visitors, and invites conversions. In this scenario, you can prioritize customer self-service by allowing help center search and Contact Form channels in the widget, and deflect agent support by suppressing Chat.
To suppress Chat, insert the following code snippet (highlighted) in your HTML in CodePen. You must add any Web Widget (Classic) API setting before the widget snippet in a web page, so the setting can be applied before the widget is loaded.
<!DOCTYPE html><html lang="en"><head><title>Hello, World!</title></head><body><p>Hello, World!</p><script type="text/javascript">window.zESettings = {webWidget: {chat: {suppress: true},contactForm: {suppress: false},helpCenter: {suppress: false}}}</script><!-- Start of z3n2671 Zendesk Widget script --><script id="ze-snippet" src="https://static.zdassets.com/ekr/snippet.js?key=YOUR_SNIPPET_KEY"></script><!-- End of z3n2671 Zendesk Widget script --></body></html>
In the pasted script, the suppress setting is set for each channel you enabled in Support Admin. You set the suppress setting to false for Contact Form and Help Center so they are available when the widget launcher is opened on the page. You set Chat to true so they are not available.
When using the suppress API setting, it’s important to include all the widget channels enabled in the Support admin, and define whether they are suppressed or not.

Configuring the widget for a shopping cart page
For a shopping cart page, it’s important to provide customer assistance to answer any questions and help complete the sale. In this instance, you can prioritize agent support by using the suppress API setting to suppress all channels except Chat. In addition, you can set up a department in Chat so only the sales department will manage chat messages on this page.
To configure Chat and suppress the other channels
-
In Chat, go to Settings > Departments.
-
Click Add department.
-
Create department with the name “sales”, and add agents.
-
Click Create department.
-
In your HTML in CodePen, remove any suppress setting script that you might have added when trying out the other examples.
-
Add the following script before the widget code snippet in the HTML editor.
<script type="text/javascript">var department = 'sales'window.zESettings = {webWidget: {contactForm: {suppress: true},helpCenter: {suppress: true},chat: {suppress: false,departments: {select: department}}}}</script>
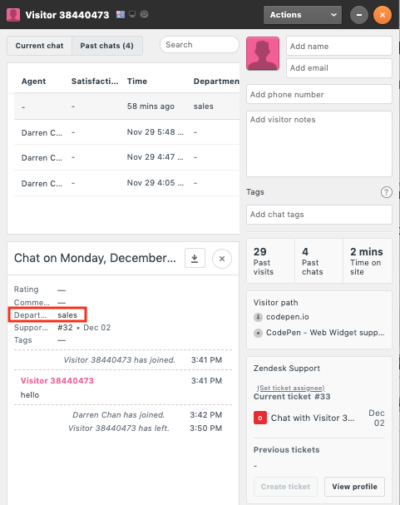
In the script, you set the suppress setting to true for Contact Form and Help Center so they’re not available in the widget. For Chat, you used the select property to set the department name. sales is the value you assigned to the department variable, which is the department you set up in the Chat settings.
Go ahead and test the widget. Only the chat channel is available, and agents in the sales department can view and respond to messages on the page. Note that the chat widget button on the web page only appears when there’s an agent available online in Chat.