Voice API in messaging quick start
In this 10-minute quick start, you'll embed a button on your website to start a voice call inside the messaging Web Widget.
Note: The messaging Web Widget lets you embed messaging functionality in your website and is not the same as Web Widget (Classic). See Comparing the Zendesk Web Widgets for more information.
This tutorial uses JSFiddle, a free online code editor with live page previews. You can, however, use other preview code editors such as CodePen and JS Bin.
What you'll need
-
If you don't already have a Zendesk Support account, register to start a free trial at https://www.zendesk.com/register/.
-
A Zendesk admin has configured messaging Web Widget. See Creating a messaging Web Widget.
-
A Zendesk admin has added a Talk digital line. See Adding a Talk digital line.
Creating a sample page
Create a "Hello World" page using JSFiddle. Later, you'll embed the widget and add the call button to the page.
-
In your web browser, go to https://jsfiddle.net/.
-
Copy and paste the following HTML code into the HTML editor located in the upper left UI panel of JSFiddle.
<!DOCTYPE html><html lang="en"><head><title>Hello World!</title></head><body><p>Hello, World!</p></body></html>
Adding the widget to your web page
To add the widget to your web page, you need to copy the Web Widget script located in Admin Center.
-
In Admin Center, click Channels in the sidebar, then select Messaging and social > Messaging.
-
Click your Web Widget channel and then click the Installation tab.
-
Click the Copy code icon to copy the Web Widget code snippet.
-
In JSFiddle, paste the code snippet before the closing body tag in the HTML panel. Your HTML should look similar to this:
<!DOCTYPE html><html lang="en"><head><title>Hello World!</title></head><body><p>Hello, World!</p><!-- Start of Zendesk Widget script --><script id="ze-snippet" src="https://static.zdassets.com/ekr/snippet.js?key=123abc456def789ghi"> </script><!-- End of Zendesk Widget script --></body></html>
Identifying your digital line
The next step is to add a call button. However, first you must identify your digital line so the widget knows what line to call when the user clicks the button. You do this by adding a line_id property to the API call. No configuration in Admin Center is needed.
Note: To avoid any security risk associated with exposing the ids of your digital lines, the widget uses a line_id property to configure the Voice API call. line_id is a 32-character alphanumeric string that's automatically generated for each digital line. line_id is not the same as the line id. The line id is a unique identifier that's also automatically generated, but it's a shorter integer-only string. For the Voice API to work, you must use the line_id, not line id.
There are two ways to retrieve the line_id:
Using the browser developer console
The browser developer console logs information associated with a web application, such as performance, network requests, and errors. Each browser has a different method for opening the developer console. To access the developer console in different browsers:
- Chrome: Open Chrome DevTools
- Firefox: Web Console
- Safari: Use the developer tools in the Develop menu in Safari on Mac
- Microsoft Edge: Open Microsoft Edge DevTools
To use the developer console to retrieve line_id:
-
In Admin Center, click Channels in the sidebar, then select Talk and email > Talk.
-
Open the browser developer console and position it so you can see both the Admin Center UI and the console. You might have to expand your browser window.
-
In Admin Center, click the Lines tab.
-
In the developer console, click the Network tab and then click the Preview tab.
-
Select the lines.json line associated with your digital line.
-
Expand the lines object and search for
line_id.
-
Copy the
line_idvalue.
Using the Lines API
The line_id property can also be retrieved using the Lines API. You must be a Zendesk admin to call the API. If you don't have permission to use this API, contact your Zendesk admin.
-
Open a basic text editor and paste this curl statement:
curl https://{subdomain}.zendesk.com/api/v2/channels/voice/lines.json \-v -u {email_address}:{password} -
Replace the generic fields with your Zendesk Support info.
-
Next, open up your computer's command line interface.
On a Mac, press Cmd + Space Bar, then type 'terminal'.
-
Paste the edited curl statement on the command line and hit Enter.
Your response will look like this:
{"lines":[{"id":11906798209047,"nickname":"MyTestDigital","priority":0,"default_group_id":1500003172542,"line_type":"digital","brand_id":1500000615802,"line_id":"53425f6ca3b02dd719ad9654af3fce38",Note: The lines API returns only 25 lines at a time. If the line you want is not in the initial response object, check if there is a
next_pagefield.You can parse the JSON response using curl and jq to make it easier to read.
-
Search for
line_idand copy its value.
Adding a call button
Now add a button element to the web page with the following properties:
- An id of call-us-button and a button label of Call us now.
- An
onClickcallback that triggers the call flow within the Web Widget.
-
In JSFiddle, copy and paste the following code snippet before the closing body tag in the HTML panel.
<button id='call-us-button'>Call us now</button>Your HTML should look similar to this:
<!DOCTYPE html><html lang="en"><head><title>Hello World!</title></head><body><p>Hello, World!</p><!-- Start of z3nabcd Zendesk Widget script --><script id="ze-snippet" src="https://static.zdassets.com/ekr/snippet.js?key=123abc456def789ghi"> </script><!-- End of z3nabcd Zendesk Widget script --><button id='call-us-button'>Call us now</button></body></html> -
In JSFiddle, paste the following code into the JavaScript panel to add the
onClickcallback to the button you just created. Replaceline_id_stringwith the value you retrieved earlier.const callUsButton = document.querySelector('#call-us-button')callUsButton.onclick = () => {zE('messenger:open', 'voice', 'line_id_string')}This opens both the widget and the call flow in one step through the Web Widget API. If an end user already has the widget open to chat, it will overlay the call flow on top of the chat window.
Optional: Customize your button style and format
Here is an example CSS rule to customize your call button. Feel free to change or add any style you want, then add it to the CSS window in JSFiddle.
#call-us-button {background: #6699CC;color: white;width: 200px;height: 40px;border-radius: 5px;border-color: #6699CC;display: flex;justify-content: center;font-family: Arial, Helvetica, sans-serif;padding: 10px 30px;cursor: pointer;}
Designing for accessibility
When designing for accessibility, buttons should either have an accessible name (<button type="button">Click Me!</button>) or a descriptive aria-label attribute (<button aria-label="Close" onclick="myDialog.close()">), but not both. If both are present, it is read twice by screenreaders.
The accessible name is used by Assistive Technologies to identify the element. By default, a button’s accessible name is the content between the opening and closing <button> tags, an image’s accessible name is the content of its alt attribute, and a form input’s accessible name is the content of the associated <label> element. If none of these options are available, or if the default accessible name is not appropriate, use the aria-label attribute to define the accessible name of an element.
For accessibility good practices, see HTML: A good basis for accessibility.
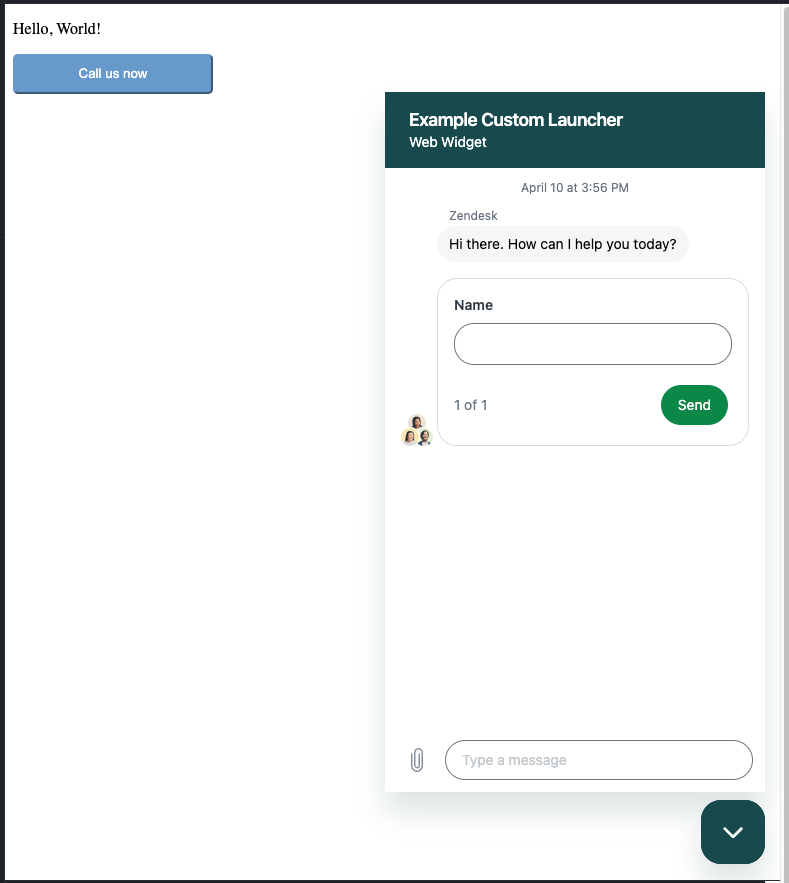
Try it out
You should now be able to launch the call flow in the widget. In JSFiddle, click the Run button located in the upper left corner to run the code and render your sample page. Then click the Call us now button to see the call flow in action.