Using conversation extensions
Conversation extensions are custom interactive interfaces that overlay the conversation display. They are designed to enrich conversations by enabling more than just simple question-and-answer interactions. Users can now interact with web content, carry out purchases, or fill a custom Customer Satisfaction (CSAT) survey, all within the confines of the ongoing conversation, eliminating the need to navigate away or being transferred to an agent.
Note: Conversation extensions are supported in the Zendesk Web Widget, Zendesk iOS SDK (v2.19.0 and later), and Android (v2.19.0 and later). It is also supported on some social channels, such as Facebook Messenger. When used on channels that don't support conversation extensions, the content will be launched in a web browser.
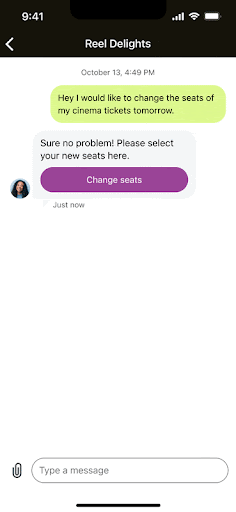
Conversation extensions are powered by web technologies and are implemented using JavaScript, CSS, and HTML. They are delivered to end users by including a Webview action when sending a message. A Webview acts as an embeddable browser to display web content inside an app.
Note: To view the Webview action, under Request body schema expand content, expand actions, and then select webview from the type property.
Example:
const apiInstance = new SunshineConversationsApi.MessagesApi();const data = new SunshineConversationsApi.MessagePost();data.author = {type: 'business'};data.content = {type: 'text',text: 'Pick a date for your delivery:',actions: [{type: 'webview',text: 'Pick date',uri: 'https://pick-a-date.com'fallback: 'https://pick-a-date-fallback.com',}]};apiInstance.postMessage(appId, conversationId, data).then(response => /* success */).catch(error => /* failure */);
Using the Webview SDK
The Webview SDK library extends the functionality of conversation extensions to allow you to perform additional actions like setting the extension header title and closing it programmatically.
To use the Webview SDK, add the following script tag into your HTML page:
<script>(function(d, s, id) {var js,fjs = d.getElementsByTagName(s)[0];if (d.getElementById(id)) {return;}js = d.createElement(s);js.id = id;js.src = 'https://static.zdassets.com/conversation-extensions/latest/sdk.js';fjs.parentNode.insertBefore(js, fjs);})(document, 'script', 'WebviewSdkScript');</script>
To determine when the library is completely loaded, define a webviewSdkInit function in your HTML body. Example:
<script>window.webviewSdkInit = function(WebviewSdk){" "}{// the SDK is passed in parameter to this callback// and is also available at `window.WebviewSdk` for convenience}</script>
Once loaded, the library is available in the global scope as WebviewSdk.
Available APIs
Here are some core APIs when using conversation extensions and Webview actions.
hasFeature
hasFeature(name) lets you verify if a particular feature is implemented or available for the platform on which the SDK is currently operating. For example, you could call WebviewSdk.hasFeature('close') prior to calling WebviewSdk.close() to adjust your Webview's behavior if the feature isn't supported. This method is important as it accommodates the fact that as features are added, they may not be supported across all platforms.
close
close() instructs the platform to close the current Webview.
setTitle
setTitle(title) refreshes the header title of the container. Generally, there's no need for you to call this command since the title of your document is automatically deployed as the title of the webview. However, if you wish to customize the webview's title further, you can use setTitle.
Webview customization
You can only customize the web version of Webview.
Open automatically
You can configure the Webview to open automatically afer sending by setting the openOnReceive parameter to true. When this is true, the user doesn't have to click the button to open Webview. Note the following:
- If multiple Webview actions with
openOnReceiveare sent, only the first is opened. - If a Webview is already opened and an
openOnReceiveis sent, theopenOnReceiveis ignored. - If an end user has scrolled up in the conversation when a Webview action with
openOnReceiveis sent, the Webview is not opened.
Example
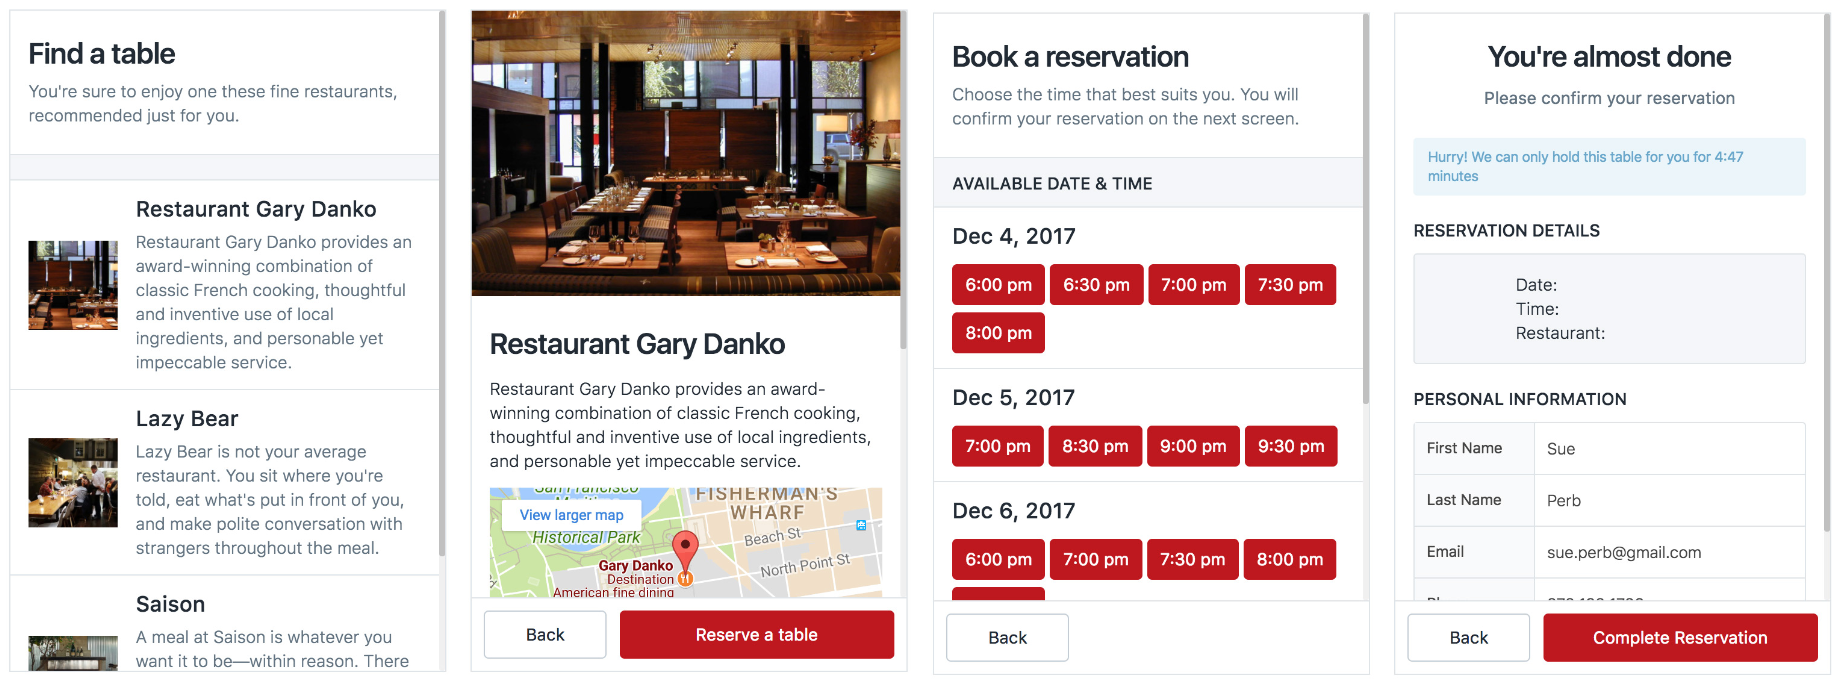
This example shows the high-level steps for using Conversation extensions to let users pick a restaurant, select a date and time, and finalize their booking all within their current conversation. Once the user completes their reservation, a confirmation message is sent.
-
Identify the page that will act as the Conversation extension. In our example, it's the user interface for selecting a restaurant and time for the reservation.
-
Create your node server and listen for webhook calls.
// server/app.jsconst path = require("path")const express = require("express")const bodyParser = require("body-parser")const SunshineConversationsApi = require("sunshine-conversations-client")const app = express()app.use("*", bodyParser.json())app.post("/user-message", (req, res) => {console.log("received user message")})module.exports = app -
In your front-end code, initialize messaging with your
integrationId.// src/components/App.jsSmooch.init({integrationId: "<your_integration_id>"}).then(function () {// Your code after init is complete}) -
Configure your webhook through Admin Center or an API call.
-
Include the Webview SDK script in your HTML page. See Using the Webview SDK.
-
Reply to messages by initiating a Webview action and appending a
userIdto the query string. In this step, you will configure the outgoing message, create a Webview button, and create options to adjust the size and set the extension to launch automatically when the message is received. Additionally, this step gives you the option to determine which context data to transmit to the extension.// server/app.jsconst defaultClient = SunshineConversationsApi.ApiClient.instanceconst basicAuth = defaultClient.authentications["basicAuth"]basicAuth.username = KEY_IDbasicAuth.password = SECRETapp.post("/user-message", (req, res) => {let messagePost = new SunshineConversationsApi.MessagePost()messagePost.setAuthor({ type: "business" })messagePost.setContent({type: "text",text: "Pick from our top restaurants",actions: [{type: "webview",text: "Make a reservation",size: "tall",uri: `http://localhost:3000/webview?userId=${userId}&conversationId=${conversationId}`,fallback: "https://smooch.io"}]})await messagesApiInstance.postMessage(appId, conversationId, messagePost)res.end()}) -
Within your extension, prompt the user to perform the necessary action and then notify the server. This step guarantees the submission of data and automatically closes Webview after the user provides the required information.
// src/components/DatePicker.jsfetch("/date-selected", {method: "POST",headers: {"Content-Type": "application/json"},body: JSON.stringify({date: this.state.date.toString(),userId: qs.parse(window.location.search.replace("?", "")).userId,conversationId: qs.parse(window.location.search.replace("?", "")).conversationId})}).then(() => {window.WebviewSdk.close(() => console.log("success!"),e => console.log("failure", e))}) -
Monitor the server for the notification triggered by the extension and respond accordingly. This action sends a confirmation message to the conversation once the user completes the necessary action(s) within the extension.
// server/app.jsapp.post("/date-selected", async (req, res) => {const { date, userId, conversationId } = req.bodylet messagePost = new SunshineConversationsApi.MessagePost()messagePost.setAuthor({ type: "business", userId })messagePost.setContent({type: "text",text: `You have selected ${restraunt}. Enjoy your meal!`})await messagesApiInstance.postMessage(appId, conversationId, messagePost)res.end()})