Building a marketplace bot
Becoming a Zendesk Technology Partner
As an official Zendesk Technology Partner, you will be able to offer an OAuth flow in your application allowing your customers to provision you with access to their Zendesk messaging data. The first step in becoming a partner is to list your app, integration, or bot on the Zendesk Marketplace. See Publishing your bot on the Zendesk Marketplace for more information on the steps required.
API requirements
Marketplace bots must include the X-Zendesk-Marketplace-Name, X-Zendesk-Marketplace-Organization-Id, and X-Zendesk-Marketplace-Bot-Id headers on all API requests. These values can be obtained when you register your organization and submit your bot to the Zendesk Marketplace. See Request header requirements for Marketplace apps for more details.
Implementing the OAuth flow
Once accepted as a Zendesk Technology Partner, you will be provisioned with a client_id and client_secret which you can use to implement an OAuth flow allowing your customers to grant you limited access to their Zendesk account's messaging data. The content below assumes that you are already familiar with the OAuth 2.0 standard. To learn more, see the OAuth getting started guide.
Marketplace bot integrations must use the OAuth authentication process described in this section to make API calls. They must not use a customer’s own Sunshine Conversations API credentials.
Initiating the OAuth flow
To begin the OAuth flow, redirect the customer's browser to the following URL:
https://oauth-bridge.zendesk.com/sc/oauth/authorize?response_type=code&client_id={client_id}
The customer will need to select their Zendesk subdomain and accept the prompt to grant access to their data. For more options and details, such as how to specify a custom state parameter or redirect url, see Authorize in the API reference.
Redirect and acquiring an OAuth token
Once authorized, the browser will be redirected to one of your OAuth client's configured redirect URLs, including a code query parameter. Use the Get Token API to exchange the code for a bearer token. You will also need to supply the client_id and client_secret provided to you after the Request OAuth credentials for your bot step of your Zendesk Markeplace bot listing has been submitted and processed.
curl https://oauth-bridge.zendesk.com/sc/oauth/token \-X POST \-H 'Content-Type: application/json' \-H 'X-Zendesk-Marketplace-Name: {your bot name}' \-H 'X-Zendesk-Marketplace-Organization-Id: {your marketplace org id}' \-H 'X-Zendesk-Marketplace-Bot-Id: {your marketplace bot id}' \-d '{"grant_type": "authorization_code","code": "{code}","client_id": "{client_id}","client_secret": "{client_secret}"}'
The response to this call will include your bearer token (in the form of an integration-scoped JWT), which can be used to call the API. For more information on how to use this JWT, see API authentication.
Sample app
As a demonstration of a working OAuth flow, we've built a simple sample app called Shoplifter. You can try it out on the Shoplifter demo site.
Once you've run through the demo, take a look at the Shoplifter source code to see how it works under the hood.
Token info
After you've acquired a bearer token, the Get Token Info endpoint can be used to retrieve information about the app where the new integration was created:
curl https://oauth-bridge.zendesk.com/sc/v2/tokenInfo \-X GET \-H 'Content-Type: application/json' \-H 'Authorization: Bearer {token}' \-H 'X-Zendesk-Marketplace-Name: {your bot name}' \-H 'X-Zendesk-Marketplace-Organization-Id: {your marketplace org id}' \-H 'X-Zendesk-Marketplace-Bot-Id: {your marketplace bot id}'
Take note of the returned app.id, which will be needed for most calls your integration will make. If a subdomain property is returned, you should also use this value for future API calls.
Webhook setup
Using the app id and subdomain obtained from the token info endpoint, you can now create webhooks to subscribe for incoming events as explained in receiving messages. Use the Create Webhook API endpoint to subscribe to the desired set of triggers, supplying the special me alias for the required integrationId path parameter:
curl https://{subdomain}.zendesk.com/sc/v2/apps/{appId}/integrations/me/webhooks \-X POST \-H 'Content-type: application/json' \-H 'Authorization: Bearer {token}' \-H 'X-Zendesk-Marketplace-Name: {your bot name}' \-H 'X-Zendesk-Marketplace-Organization-Id: {your marketplace org id}' \-H 'X-Zendesk-Marketplace-Bot-Id: {your marketplace bot id}' \-d '{"target": "http://example.com/callback","triggers": ["conversation:message"]}'
As an OAuth integration, you can create up to 3 such webhooks. Typically, only one should be necessary. You can check what is already configured for your integration using the List Webhooks API.
Sending messages
The conversation:message webhook event will include a conversationId that you can use for sending responses like so:
curl https://{subdomain}/zendesk.com/sc/v2/apps/{appId}/conversations/{conversationId}/messages-X POST \-H 'Content-Type: application/json' \-H 'Authorization: Bearer {token}' \-H 'X-Zendesk-Marketplace-Name: {your bot name}' \-H 'X-Zendesk-Marketplace-Organization-Id: {your marketplace org id}' \-H 'X-Zendesk-Marketplace-Bot-Id: {your marketplace bot id}' \-d '{"author": {"type": "business"},"content": {"type": "text","text": "Hello!"}}'
Zendesk messaging channels support a wide variety of message types, and marketplace bots are encouraged to take advantage of these.
Uninstall callback
When registering as a Zendesk Technology Partner, a remove URL can be supplied as part of the process, which will be used to notify your backend whenever one of your marketplace bots is uninstalled by the admin from Admin Center. Zendesk will send a POST request to the configured URL including the appId and integrationId of the now-deleted integration in the request body:
{"appId": "{appId}","integrationId": "{integrationId}"}
You can use this callback to perform any required cleanup on your end.
Configuring marketplace bots in the Admin Center
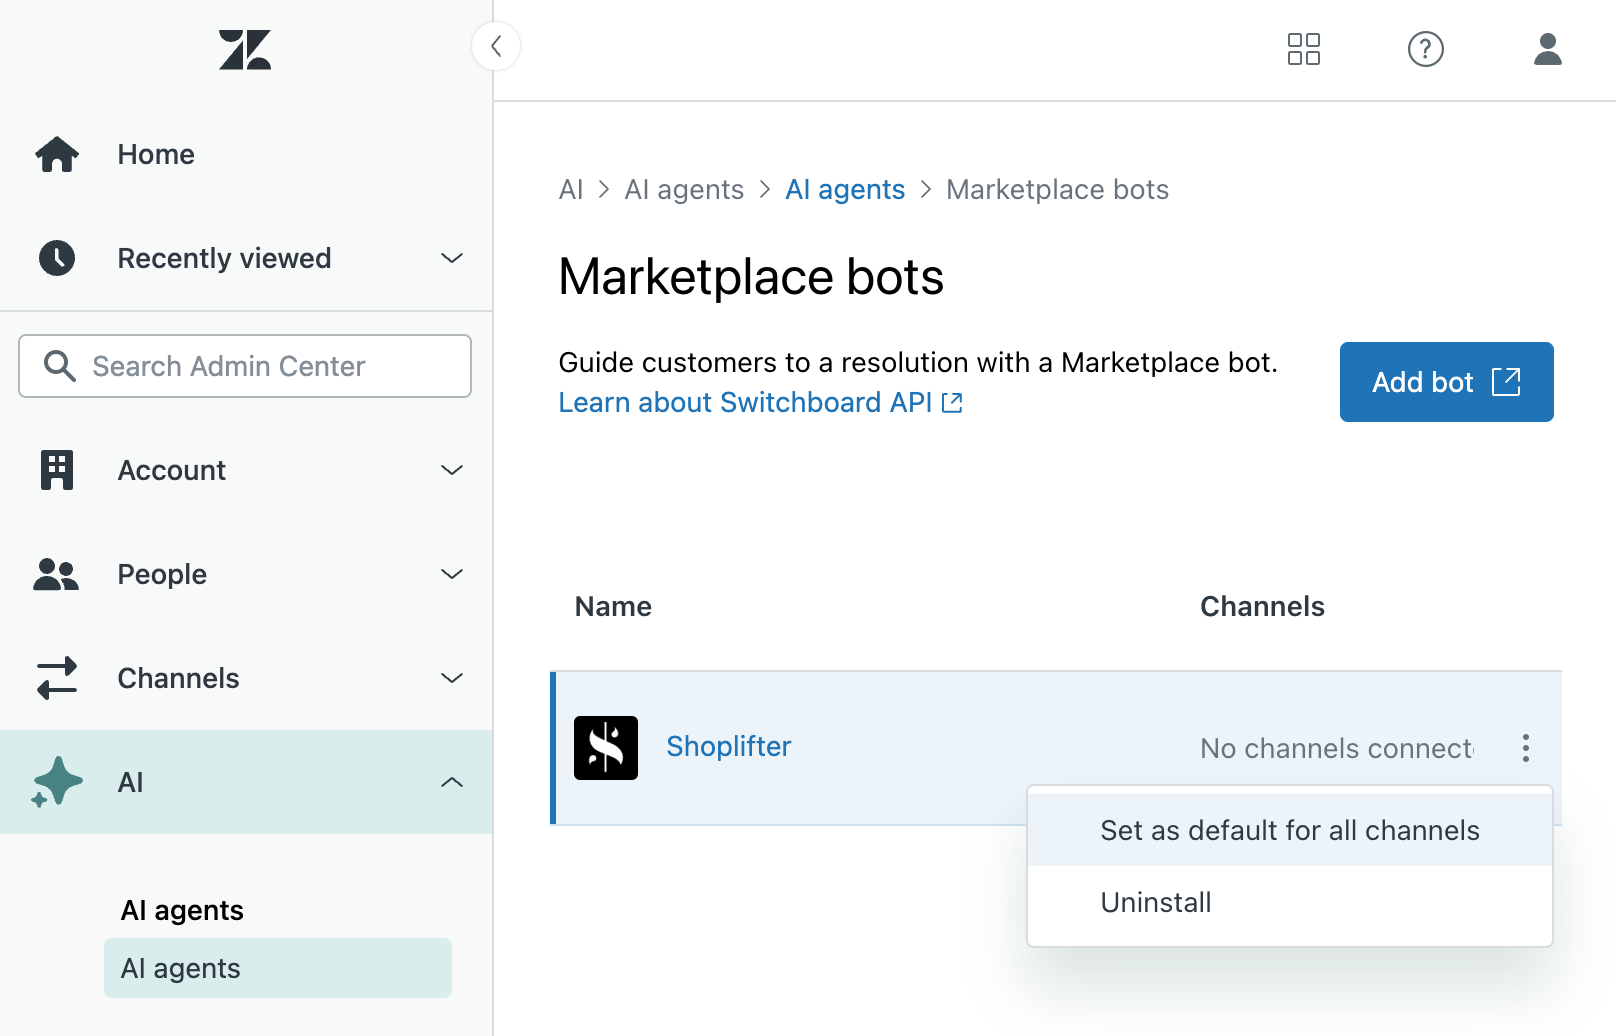
Once a Zendesk admin has installed a marketplace bot, they can then connect it to their messaging channels in Admin Center. The newly integrated bot will be listed under the Marketplace bots section of AI agents. The admin can set the marketplace bot as the default for all messaging channels, or they can configure it to respond only on individual channels.
The switchboard controls which system handles an end user’s conversation. In a default Zendesk account configuration, conversations are initially handled by Zendesk’s first-party AI agents. AI agents use the switchboard to escalate a conversation to a human agent in Agent Workspace.
The same is possible for marketplace bots as well. When the admin assigns their marketplace bots to channels in Admin Center, they are modifying the configuration of their switchboard so that the marketplace bot becomes the default responder, instead of the Zendesk AI agent.
If the admin uninstalls the bot from Admin Center, the integration removed callback will be invoked. See Managing third-party bots in Admin Center for more details.
Switchboard requirements
Marketplace bots are required to support switchboard control semantics in the following ways:
-
Marketplace bots SHOULD respond to conversation:create and conversation:referral webhook events. These are the right moments to send a greeting message at the start of a conversation, to introduce the bot or to offer a list of suggested actions.
-
To provide the best end user experience, marketplace bots SHOULD examine the
creationReasoncontained inside of the conversation:create webhook payload in order to guide bot behavior. The full set ofcreationReasonvalues can be found here, but some key examples are:creationReason: "startConversation"indicates that the user has started a new conversation on a Web Widget or SDK channel, and it is a good time to send an initial bot greeting.creationReason: "message"indicates that the user has already sent their first message and the bot should instead process and respond to a forthcomingconversation:messagewebhook. With some messaging channels, conversation creation and the user's first message happen simultaneously.creationReason: "proactiveMessaging"indicates that the user has engaged with a proactive message. The bot should examine thesource.campaign.idto determine which flow to execute.- For other
creationReasonvalues (linkRequest,notification,none) the bot is not expected to send any greeting at all.
-
Marketplace bots MUST only respond to messages when they are in control of the conversation. Webhook messages sent to marketplace bots will include an
activeSwitchboardIntegrationobject that indicates which system is currently in control of the conversation. Thetypewill contain the client_id when the marketplace bot is currently in control. -
Marketplace bots MUST perform a releaseControl action when the interaction has reached a conclusion. An interaction is deemed concluded when it has been resolved by the bot, or if the user has simply not responded for a period of at most 24 hours. The marketplace bot MAY make this timeout period configurable. Releasing control ensures that the end user has a fresh new journey if they return to the conversation later on. This also ensures that any switchboard configuration changes that an admin has made in the meantime will properly take effect when the end user returns. When releasing control, additional metadata MAY be included, which can be used to set additional fields on the AI agent ticket.
-
Marketplace bots MAY perform a passControl action in order to escalate the conversation to a human agent. When passing control, additional metadata MAY optionally be included, which can be used to set additional fields on the resulting ticket. When passing control, marketplace bots may need to perform some housekeeping, so that a fresh interaction will begin if the end user returns to the conversation after their ticket has been resolved.
-
Marketplace bots MAY respond to a switchboard:passControl webhook event in order to greet the end user when the bot has been placed in control of the conversation. In more complex configurations, control of a conversation can be explicitly passed to a third-party bot. When this happens, the bot is encouraged to send a greeting to the end user to indicate the start of a new bot flow.
-
Marketplace bots SHOULD react to releaseControl events. When a messaging ticket is closed, or when an agent chooses End session, a switchboard:releaseControl webhook event is produced, which indicates that the switchboard state of the conversation has been reset. Marketplace bots may wish to subscribe to this event in order to perform some housekeeping, so that a fresh interaction begins when the user returns. Marketplace bots MAY also react to the
switchboard:passControlwebhook event indicating that control has been removed from the bot's control in order to perform the same type of housekeeping.
Bring-your-own-channel (BYOC) requirements
BYOC is an integration method that allows customers to deploy a third party messaging experience for their end users instead of using the Zendesk Web Widget or Mobile SDK. Many marketplace bot offerings also offer their own Web Widget, which can be integrated with Zendesk by relaying end user messages using the Zendesk messaging APIs. This method of integrating bots with Zendesk comes with numerous caveats, but it is allowed as long as these further conditions are met:
- Conversation synchronization
- Support for native Zendesk messaging channels
Conversation synchronization
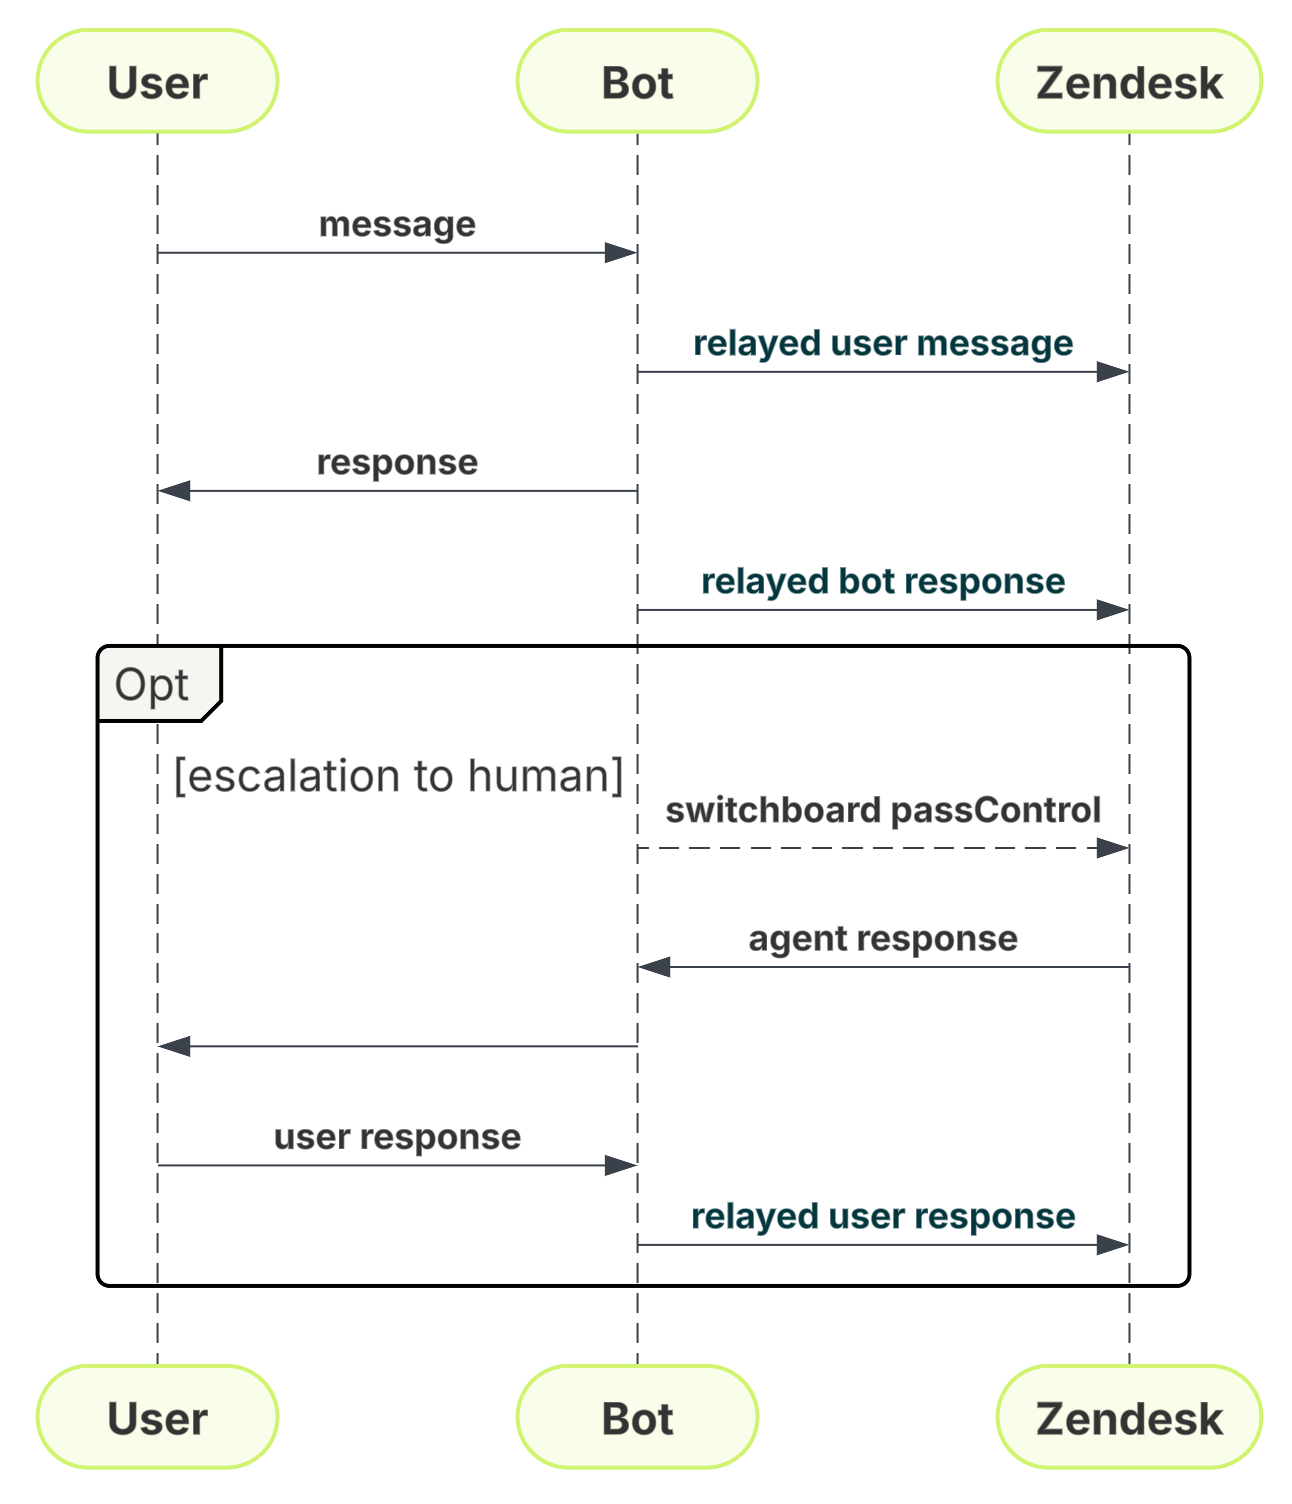
With BYOC, a third party widget might be deployed in order to carry on a conversation between an end user and the marketplace bot. In this scenario, if a bot has the capability to escalate the conversation to Zendesk then it must synchronize every message with Zendesk. This is done by creating a conversation and relaying messages using the Zendesk messaging APIs. This must happen during the entire length of the conversation from start to finish, and it must happen even if the marketplace bot does not escalate the conversation. It is not acceptable for bots to delay the creation of the conversation in Zendesk until it has been escalated to a human agent.
For example, do this:
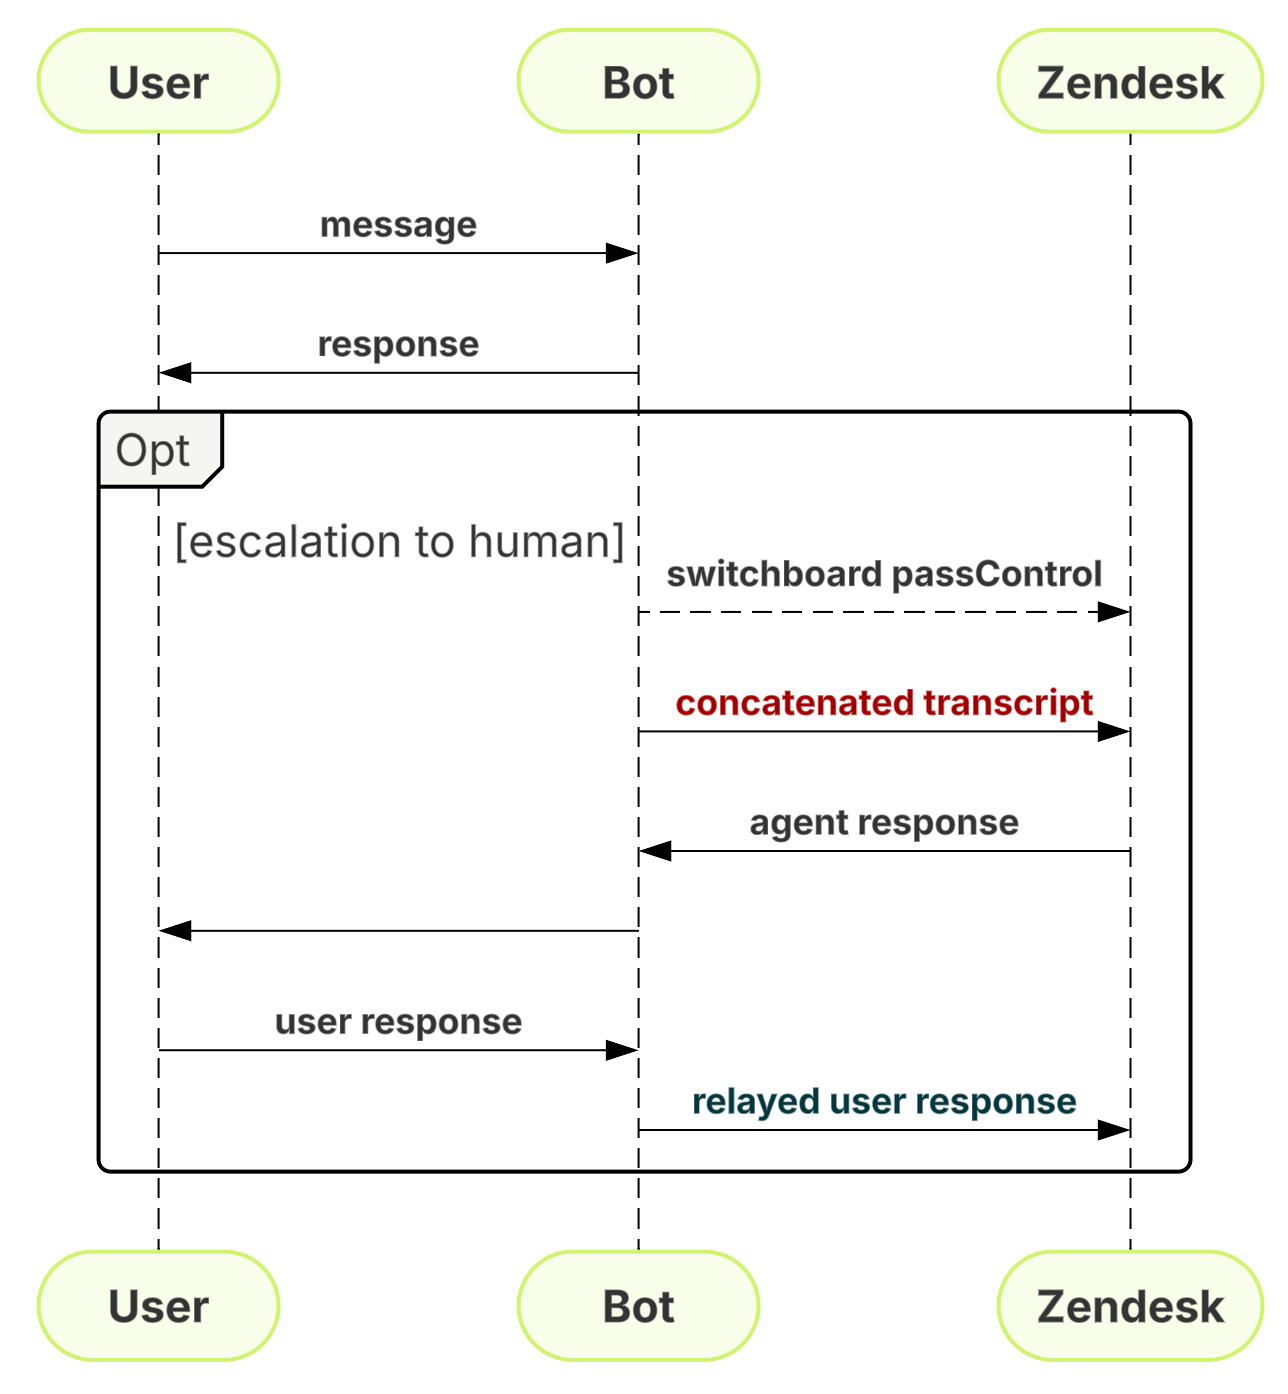
Don't do this:
Following this requirement provides some key benefits:
- All interactions between bots and human agents can be monitored live from Agent Workspace
- The admin has a unified view for analytics and reporting across AI agent, marketplace bot, and human tickets
- When a bot conversation is handed off to a human agent, the agent receives a full transcript with properly delimited messages and timestamps.
- Gives administrators centralized control over data permissions and lifecycle (deletion, redaction, etc.)
Failing to follow this requirement forces the customer into a degraded experience, and limits their access to these key Zendesk product capabilities.
Support for native Zendesk messaging channels
Marketplace bots may be deployed using a third party widget, however all marketplace bots must also offer support for Zendesk native channels, which includes the Zendesk Web Widget, mobile SDKs, as well as all supported social messaging channels such as WhatsApp and Facebook Messenger. This means that a marketplace bot must be capable of receiving end user messages through Zendesk messaging webhooks, and it must also be capable of providing bot responses through Zendesk messaging APIs. Zendesk customers must always have the option to deploy the Zendesk Web Widget and mobile SDKs, regardless of which bot they integrate. If a marketplace bot does not meet this requirement then the customer would lose out on capabilities that might be exclusively supported on native Zendesk channels.
Next steps
- Now that you can request bearer tokens from your customers and make API calls on their behalf, see receiving messages and sending messages for more details on how to build the rest of your integration.
- Take advantage of the many kinds of structured messages that are supported by Zendesk messaging channels.
- Learn more about how the switchboard works.
- Learn more about Zendesk messaging capabilities in the Web Widget, iOS, Android and Unity.