Step 1: Migrating the object types of legacy custom objects
This article describes in detail how to migrate the object types of your legacy custom objects to the new custom objects experience.
Topics covered in this article:
- Understanding how legacy custom objects map to custom objects
- Migrating the object types of legacy custom objects
- Cleaning up the migrated custom objects
- Next steps
This is the first article in a series on migrating legacy custom objects:
- Step 1: Migrating the object types of legacy custom objects
- Step 2: Migrating the schemas of legacy custom objects
- Step 3: Migrating the relationship types of legacy custom objects
- Step 4: Migrating the records of legacy custom objects
- Step 5: Migrating the relationship records of legacy custom objects
Disclaimer: Zendesk provides this article for informational purposes only. Zendesk doesn't provide support for the code in this article, nor does Zendesk support third-party technologies such as Python.
Understanding how legacy custom objects map to custom objects
Legacy custom object types have only two writeable properties:
keyschema
The schema property, which defines the properties of the legacy object, can only be migrated after you've migrated the object to the new experience. See Migrating the schemas of legacy custom objects.
In effect, you only have the data of one property to migrate: key.
Custom objects in the new experience have more writeable properties, but only the following properties are mandatory when creating a custom object:
keytitletitle_pluralized
You can use the legacy key property as the basis of the values for all three properties:
key- Use the legacykeyvalue as istitle- Capitalize the first character of thekeystring and remove any other unneeded characters such as underscores or dashestitle_pluralized- Make thetitlestring plural
You can make the edits programmatically when creating the objects. Another option is to assign the same legacy key value to all three properties when creating the object. Then in a follow-up clean-up phase, edit the title and title_pluralized values in the user interface in the Zendesk Admin Center.
Example mapping <!-- omit in toc -->
Suppose the type of your legacy custom object is as follows:
{"key": "dog","schema": {...}}
After migrating the legacy custom object to the new custom object experience, it should look as follows:
{"custom_object": {"key": "dog","title": "Dog","title_pluralized": "Dogs"}}
The schema property of the legacy custom object is migrated separately after creating the custom object. See Migrating the schemas of legacy custom objects.
Migrating the object types of legacy custom objects
Migrating the object types consists of exporting them from your account and then using them to create custom objects in the new experience.
The following example main() function shows the general logic of migrating object types to the new custom objects experience. The called functions are explained in the follow-up sections.
def main():object_types = get_object_types()for object_type in object_types:create_custom_object(object_type)
Example function for exporting object types <!-- omit in toc -->
Use the List Legacy Object Types endpoint to export a list of all your legacy objects:
GET /api/sunshine/objects/types
The following example Python function returns all the objects types in an account.
import requestsdef get_object_types():endpoint = f'api/sunshine/objects/types'url = f'https://{ZENDESK_SUBDOMAIN}.zendesk.com/{endpoint}'auth = f'{ZENDESK_USER_EMAIL}/token', ZENDESK_API_TOKENresponse = requests.get(url, auth=auth)if response.status_code != 200:print(f'{response.status_code}: {response.text}')return []object_types = response.json()['data']return object_types
This example uses the requests library for Python.
Example function for creating new custom objects <!-- omit in toc -->
Use the Create Custom Object endpoint to migrate each legacy custom object to the new experience:
POST /api/v2/custom_objects
The following example Python function creates a custom object based on an exported legacy object type.
import inflectimport requestsdef create_custom_object(object_type):p = inflect.engine() # to pluralize words# set values of mandatory propertieskey = object_type['key']title = key.replace('_', ' ').capitalize()title_pluralized = p.plural(title)data = {'custom_object': {'key': key,'title': title,'title_pluralized': title_pluralized}}endpoint = 'api/v2/custom_objects'url = f'https://{ZENDESK_SUBDOMAIN}.zendesk.com/{endpoint}'response = requests.post(url, json=data, auth=AUTH)if response.status_code != 201:print(f'{response.status_code}: {response.text}')return {}custom_object = response.json()['custom_object']print(f'Created a custom object named {custom_object["key"]}')return custom_object
This example uses the requests and inflect libraries for Python.
Cleaning up the migrated custom objects
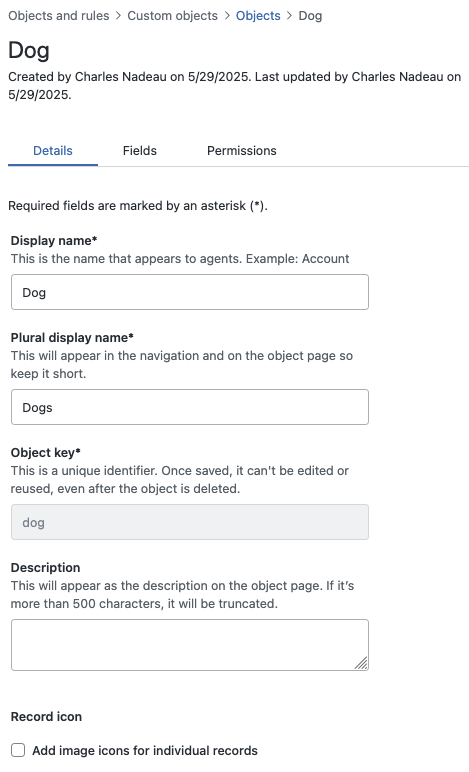
After migrating your custom object types, use the user interface in the Zendesk Admin Center to clean up the title or pluralized title of each custom object you migrated. You can also add a description to each custom object.
-
In Admin Center, click Objects and rules in the sidebar, then select Custom objects > Objects.
-
Click the name of new object.
-
On the Details tab, clean up the title or pluralized title, or add a description.
-
Click Save.
Next steps
After migrating the object types of your legacy custom objects, you can migrate the schema of each legacy custom object. See Step 2: Migrating the schemas of legacy custom objects.