Building an employee service catalog with Zendesk - Part 2: Building a custom catalog browser
This tutorial shows how to build a simple custom service catalog browser using the Service Catalog Items API. Your app will list service catalog items, search items by keyword, and display item details.
Topics covered in this article:
- Plan the employee experience
- Build the service catalog browser
- Run the app
- How it works
- Make enhancements
- Next part in the series
This tutorial is the second part of a series on building an employee service catalog with Zendesk:
- Part 1 - Laying the groundwork
- Part 2 - Building a custom service catalog browser - YOU ARE HERE
- Part 3 - Letting employees submit requests
Because the tutorials build on each other, tackle them in order and finish each tutorial before moving on to the next one.
Plan the employee experience
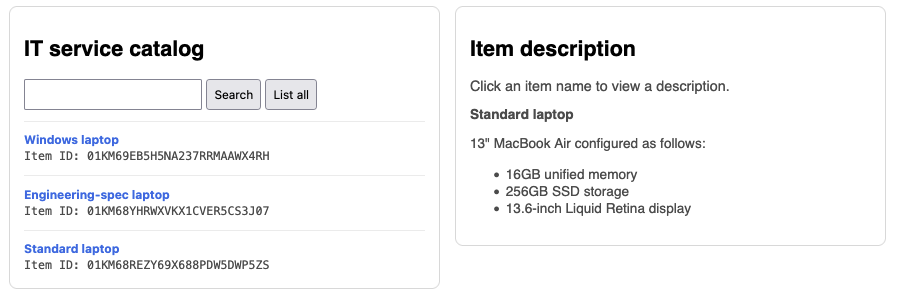
This tutorial builds a small web application to create the following employee experience:
-
An employee clicks a link to open an IT service catalog, which lists available work laptops.
-
The employee can filter the list by searching by keyword.
Currently the catalog only contains three laptops but an IT catalog could include keyboards, mice, external monitors, cables, adapters, and more.
-
When the employee clicks a laptop in the list, a description of the laptop appears in a side panel.
Example:
To create this experience, you’ll build a Flask web application that performs the following tasks:
- Provides a minimal HTML UI for listing and searching service catalog items
- Makes requests to the Zendesk API to list items, search items, and show item details
Building the service catalog browser
The service catalog application consists of four files:
- an application file named app.py
- two HTML templates called index.html and catalog_browser.html
- a CSS stylesheet named main.css
The following sections describe how to create the files.
Add the application file
In your service_catalog project folder, create a file named app.py and paste the following Python code into it. Inline comments in the code explain what each function does at runtime.
import osimport requestsfrom dotenv import load_dotenvfrom flask import Flask, jsonify, request, render_template, redirect# Load configuration values (subdomain, email, token) from a .env file in this folderload_dotenv()# Set global variablesZENDESK_SUBDOMAIN = os.environ.get("ZENDESK_SUBDOMAIN")ZENDESK_EMAIL = os.environ.get("ZENDESK_EMAIL")ZENDESK_API_TOKEN = os.environ.get("ZENDESK_API_TOKEN")BASE_URL = f"https://{ZENDESK_SUBDOMAIN}.zendesk.com"# Create a simple Zendesk API clientdef zendesk_get(api_path, params=None):url = f"{BASE_URL}{api_path}"auth = f"{ZENDESK_EMAIL}/token", ZENDESK_API_TOKENresponse = requests.get(url, params=params, auth=auth)response.raise_for_status()return response.json()# Create the local web server (Flask app)app = Flask(__name__)@app.route("/")def index():"""Opens the IT home page"""return render_template('index.html')@app.route("/service_catalog", methods=('GET', 'POST'))def list_items():"""Opens the service catalog browser."""# POST request (a search request)if request.method == 'POST':query = request.form.get('query')params = {"query": query}response = zendesk_get("/api/v2/help_center/service_catalog/items/search", params=params)catalog_items = response['service_catalog_items']return render_template('catalog_browser.html', catalog_items=catalog_items)# GET requestresponse = zendesk_get("/api/v2/help_center/service_catalog/items")catalog_items = response['service_catalog_items']return render_template( 'catalog_browser.html', catalog_items=catalog_items)@app.get("/api/items/<item_id>")def show_item(item_id):"""Custom API endpoint to fetch a service catalog item by id."""response = zendesk_get(f"/api/v2/help_center/service_catalog/items/{item_id}")item = response['service_catalog_item']return jsonify(item)if __name__ == "__main__":# Start the local serverapp.run(port=8000, debug=True)
Add the templates
Create a templates subfolder in your project folder and create the following files in the subfolder:
- index.html
- catalog_browser.html
The index.html file is the IT department's home page. Paste the following HTML and templating code into the file:
<!DOCTYPE html><html lang="en"><head><meta charset="UTF-8" /><title>IT home</title><linkrel="stylesheet"href="{{ url_for('static', filename='css/main.css') }}"/></head><body><h2>IT home</h2><ul><li><a href="{{ url_for('list_items') }}">Browse the service catalog</a></li></ul></body></html>
The second template, catalog_browser.html, displays the service catalog. Paste the following HTML and templating code into the file:
<!DOCTYPE html><html lang="en"><head><meta charset="UTF-8" /><title>Service catalog browser</title><linkrel="stylesheet"href="{{ url_for('static', filename='css/main.css') }}"/></head><body><div class="row"><div class="panel"><h2>IT service catalog</h2><div><formid="searchItems"action="{{ url_for('list_items') }}"method="POST"><input type="text" id="query" name="query" /><button type="submit" id="searchBtn">Search</button><buttonid="listBtn"onclick="location.href('{{ url_for('list_items') }}')">List all</button></form></div>{% if not catalog_items %}<p>No results.</p>{% else %} {% for item in catalog_items %}<div class="item"><button class="link" onclick="showDetails('{{item.id}}')"><strong>{{ item.name }}</strong></button><div class="muted"><code>Item ID: {{item.id}}</code></div></div>{% endfor %} {% endif %}</div><div class="panel"><h2>Item description</h2><div class="muted">Click an item name to view a description.</div><div id="description"></div></div></div><script>// Requests the description of a catalog item and displays it in the right panelasync function showDetails(itemId) {const url = `/api/items/${encodeURIComponent(itemId)}`const response = await fetch(url)const data = await response.json()let description = `<p><strong>${data.name}</strong></p>`description += data.descriptiondocument.getElementById("description").innerHTML = description}</script></body></html>
Add a CSS stylesheet
-
In your project folder, create a /static/css folder and create a file named main.css in the css folder.
-
Paste the following styles into the main.css file and save the file.
body {font-family: Helvetica, Arial, sans-serif;margin: 2rem;max-width: 980px;}input,button {padding: 0.5rem;}.row {display: flex;gap: 1rem;align-items: flex-start;}.panel {flex: 1;border: 1px solid #ddd;border-radius: 8px;padding: 1rem;}.item {border-top: 1px solid #eee;padding-top: 0.75rem;margin-top: 0.75rem;}.muted {color: #555;}#description {font-size: 95%;color: #555;}pre {background: #f6f8fa;padding: 1rem;border-radius: 8px;overflow-x: auto;}button.link {background: none;border: none;color: #1a73e8;padding: 0;cursor: pointer;text-align: left;}
The file structure of your app should look as follows:
service_catalog/.envstatic/css/main.csstemplates/catalog_browser.htmlindex.htmlapp.py
Run the app
-
In a terminal, navigate to your project folder and run:
python3 app.pyIf you're working in a virtual environment, you can run
python app.py. -
Open a browser and go to
http://127.0.0.1:8000. -
Click an item name to view the description returned by the Show Service Catalog Item endpoint.
How it works
-
When a user requests the catalog page, the app.py file starts by requesting a list of catalog items using the List Service Catalog Items endpoint. The app adds the items to the catalog_browser.html template and serves the page to the user's browser.
app.py:
response = zendesk_get("/api/v2/help_center/service_catalog/items")catalog_items = response['service_catalog_items']return render_template( 'catalog_browser.html', catalog_items=catalog_items)catalog_browser.html:
{% for item in catalog_items %}<div class="item"><button class="link" onclick="showDetails('{{item.id}}')"><strong>{{ item.name }}</strong></button><div class="muted"><code>Item ID: {{item.id}}</code></div></div>{% endfor %} -
If the user enters search terms and clicks Search, the search terms are submitted to the app.py file, which requests an updated list of catalog items using the Search Service Catalog Items endpoint. The app inserts the items into the catalog_browser.html template and serves the page to the user's browser.
catalog_browser.html:
<form id="searchItems" action="{{ url_for('list_items') }}" method="POST"><input type="text" id="query" name="query" /><button type="submit" id="searchBtn">Search</button>...</form>app.py:
if request.method == 'POST':query = request.form.get('query')params = {"query": query}response = zendesk_get("/api/v2/help_center/service_catalog/items/search", params=params)catalog_items = response['service_catalog_items']return render_template('catalog_browser.html', catalog_items=catalog_items) -
If the user clicks an item in the catalog to view the details, the JavaScript on the catalog page makes a request to the
/api/items/<item_id>endpoint you created in the app.py file.catalog_browser.html:
async function showDetails(itemId) {const base_app_url = "http://127.0.0.1:8000"const url = `${base_app_url}/api/items/${encodeURIComponent(itemId)}`const response = await fetch(url)const data = await response.json()let description = `<p><strong>${data.name}</strong></p>`description += data.descriptiondocument.getElementById("description").innerHTML = description}The endpoint in app.py in turn calls the Show Service Catalog Item endpoint in Zendesk:
app.py:
@app.get("/api/items/<item_id>")def show_item(item_id):"""Custom API endpoint to fetch a service catalog item by id."""response = zendesk_get(f"/api/v2/help_center/service_catalog/items/{item_id}")item = response['service_catalog_item']return jsonify(item)The custom endpoint returns the Zendesk response to the JavaScript on the page, which displays the item's
descriptionproperty in the details panel.The app.py file makes the Zendesk API call instead of the JavaScript in the browser because your API token is more secure on the server than on the browser.
Make enhancements
If you start adding many items in your catalog, consider making the following enhancements to the app:
- Add cursor-based pagination to your
zendesk_get()API client - Break up long lists of catalog items in the user interface with pages of items where the user can click a Next or Back button to see the next or previous page of catalog items.
Next part in the series
In the next part in the series, you'll update the catalog browser to let employees submit requests for laptops. Submitting a request automatically creates and assigns a Zendesk ticket to the IT team for review and fulfillment.