Building an employee service catalog with Zendesk - Part 3: Letting employees submit requests
This tutorial shows you how to update the custom catalog browser to let employees submit laptop requests. Submitting a request creates and assigns a Zendesk ticket to the IT team for review and fulfillment.
Topics covered in this article:
- Plan the employee experience
- About service catalog ticket forms
- Add a button to request an item in the catalog
- Create a route to display the request web form
- Create the request web form
- Create the ticket
- Run the app
- Make enhancements
This tutorial is the third part of a series on building an employee service catalog with Zendesk:
- Part 1 - Laying the groundwork
- Part 2 - Building a custom catalog browser
- Part 3 - Letting employees request a catalog item - YOU ARE HERE
Because the tutorials build on each other, tackle them in order and finish each tutorial before moving on to the next one.
Disclaimer: Zendesk provides this tutorial for instructional purposes only. Zendesk does not support or guarantee the code and can’t provide support for third-party technologies such as Python or Flask.
Plan the employee experience
This tutorial updates the catalog browser you created in part 2 to let employees submit requests for laptops to the IT team. The employee experience should consist of the following steps:
- When an employee selects an item in the catalog, the item description now includes a Request this item button.
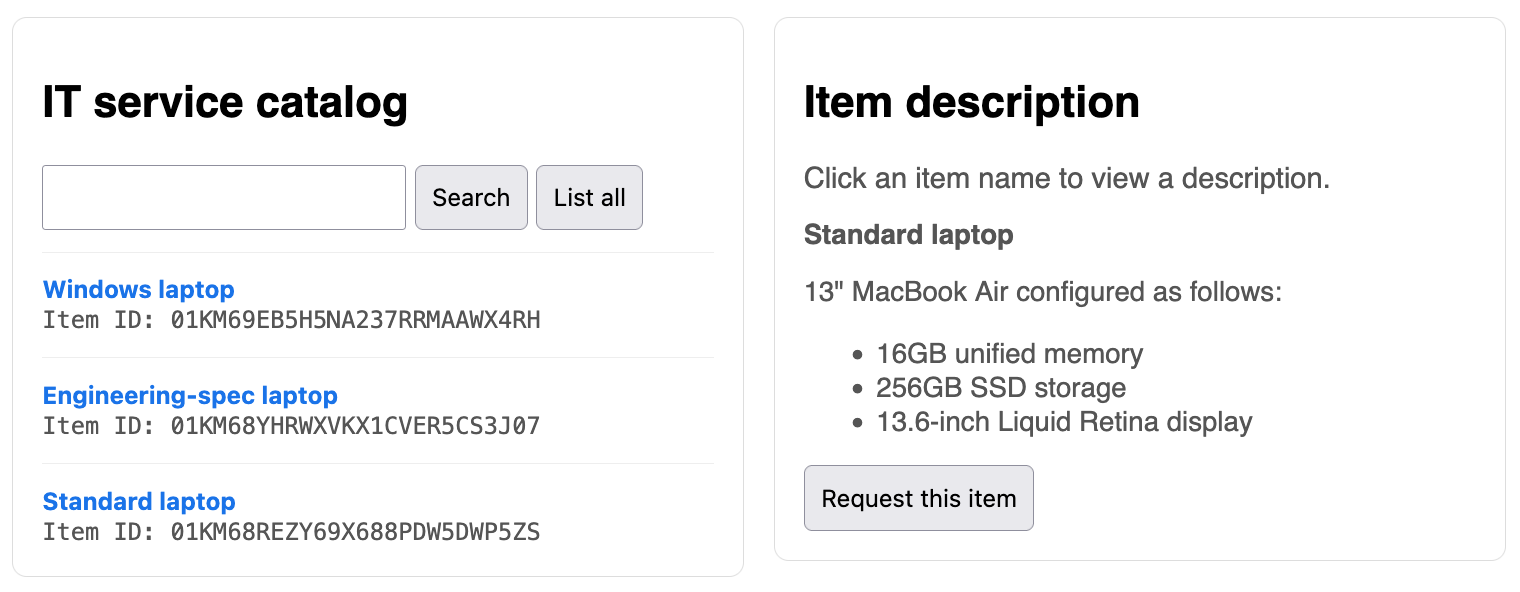
-
After clicking the button, a web form appears to let them enter their name, email, and the justification for the request.
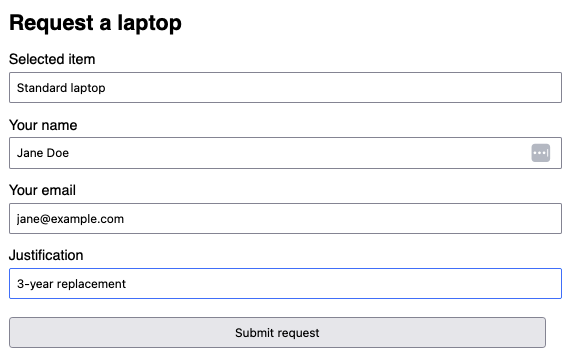
-
After completing the web form, the employee then clicks Submit request.
A ticket is created and assigned to the IT team to review and fulfill.
To create this experience, you plan to make the following updates to the catalog browser you built in part 2 of the tutorial:
-
Add a Request this item button to the description panel.
-
Create a separate web form with a name, email, and justification field.
-
Add a function to submit the web form data to the Tickets API to create a ticket in Zendesk.
Creating the ticket will fire a trigger in Zendesk that assigns the ticket to the IT team.
About service catalog ticket forms
Before creating tickets to request items in the service catalog, you should understand how ticket forms work in the service catalog.
When you add items to the service catalog in Zendesk, a separate ticket form is created for each item. These separate ticket forms are designed to give you maximum flexibility. For example, you might require a justification field for high-value items like work laptops. However, your IT catalog might also include hardware like keyboards and external monitors. These items might not need a justification field, or the keyboard item might need an ergonomic field while the external monitor would not.
Accordingly, all three laptops in the example catalog have their own separate ticket forms.
As well, the same custom ticket field has been added to all three ticket forms in the catalog. The field lets employees enter a justification for the laptop request such as "New hire", "3-year refresh", or "Replacement for stolen or damaged". For details, see Adding a custom ticket field to the laptop request forms in Zendesk help.
Finally, a ticket trigger has been created in Zendesk to assign the ticket to the IT team when a ticket is created with any one of these three ticket forms. For details, see Assigning laptop requests to the IT team in the Zendesk help tutorial.
Getting the form ids
To satisfy the conditions of the Zendesk ticket trigger, you'll need the ids of the three laptop ticket forms. The ids are specified by the form_id property in the response from the List Service Catalog Items endpoint, which you're already using for the catalog browser.
Example response:
"service_catalog_items": [{"id": "01KM69EB5H5NA237RRMAAWX4RH","name": "Windows laptop","description": "16" Dell XPS laptop configured as follows:32 GB RAM1 TB SSD storage16.3-inch 2K display","form_id": 50118663719443},{"id": "01KM68YHRWXVKX1CVER5CS3J07","name": "Engineering-spec laptop","description": "16" MacBook Pro configured as follows:32GB unified memory1 TB SSD storage16-inch Liquid Retina XDR display","form_id": 50118626928147},{"id": "01KM68REZY69X688PDW5DWP5ZS","name": "Standard laptop","description": "13" MacBook Air configured as follows:16GB unified memory 256GB SSD storage 13.6-inch Liquid Retina display","form_id": 50118640648083}
Getting the id of the custom ticket field
Each form in the example catalog contains a custom ticket field for the employee to enter a justification for a new laptop. You'll need the id of the custom ticket field to be able to set its value in the ticket. For example, to set the values of custom fields in a ticket, you have to specify an array of objects consisting of id and value properties:
"custom_fields": [{"id": 25356371, "value": "New hire"}]
You can get the id of the justification custom field by using the List Ticket Fields endpoint and looking for a field with a title property of "Justification". Example response:
{"url": "https://example.zendesk.com/api/v2/ticket_fields/50117026214931.json","id": 50117026214931,"type": "text","title": "Justification","raw_title": "Justification","description": "Enter the reason for the request","agent_description": "Reason for the request",...}
In the example, the field id is 50117026214931.
You can also get the field id from the Admin Center in Zendesk:
-
In Admin Center, click
 Objects and rules in the sidebar, then select Tickets > Fields.
 -
Locate the field named Justification in the list.
-
Note the ID in the Field ID column.
Add a button to request an item in the catalog
The first step is to add a Request this item button to your catalog_browser.html template.
To add a button to request an item in the catalog browser
-
In the catalog_browser.html template, locate the
divtag containing the item description. It should look like this:<div class="panel"><h2>Item description</h2><div class="muted">Click an item name to view a description.</div><div id="description"></div></div> -
Insert the following new
divtag after thediv id="description"></div>element:<div id="requestItem" style="display: none;"><formid="requestItemForm"action="{{ url_for('show_request_form') }}"method="POST"><input type="hidden" id="itemId" name="itemId" /><button type="submit" id="requestItemBtn">Request this item</button></form></div>This
divtag adds a form with a Request this item submit button. When the employee clicks the button, the form submits the value of the hiddenitemIdfield to theshow_request_form()function in the app.py file. You'll add this function later.The updated
divtag containing the item description should look as follows:<div class="panel"><h2>Item description</h2><div class="muted">Click an item name to view a description.</div><div id="description"></div><div id="requestItem" style="display: none;"><formid="requestItemForm"action="{{ url_for('show_request_form') }}"method="POST"><input type="hidden" id="itemId" name="itemId" /><button type="submit" id="requestItemBtn">Request this item</button></form></div></div> -
Add the following two statements at the end of the
async function showDetails(itemId)function at the bottom of the template:...document.getElementById("itemId").value = data.id;document.getElementById("requestItem").style.display = "block";The first statement assigns the ID of the selected item to the hidden
itemIdinput field.The second statement displays the Request this item button, which remains hidden until the employee selects an item.
The updated function should look as follows:
async function showDetails(itemId) {const url = `/api/items/${encodeURIComponent(itemId)}`const response = await fetch(url)const data = await response.json()let description = `<p><strong>${data.name}</strong></p>`description += data.descriptiondocument.getElementById("description").innerHTML = descriptiondocument.getElementById("itemId").value = data.id // newdocument.getElementById("requestItem").style.display = "block" // new}
Create a route to display the request web form
In the previous section, you added a HTML form that submits the value of the hidden itemId field to the show_request_form() function when the employee clicks the Request this item button. In turn, the show_request_form() function should display a web form to let the employee enter their name, email, and laptop justification.
In this step, you create a route in your Flask application to display the web form.
To create a route to display the request web form
-
In the app.py file, insert the following "/service_catalog/request_form" route after the "/service_catalog" route:
@app.route("/service_catalog/request_form", methods=['POST'])def show_request_form():"""Shows the request form for the selected catalog item."""item_id = request.form.get('itemId')response = zendesk_get(f"/api/v2/help_center/service_catalog/items/{item_id}")item = response['service_catalog_item']return render_template('request_form.html', item=item)
How it works
When the employee clicks the Request this item button in the catalog_browser.html template, the value of the hidden itemId field is submitted to the show_request_form() function in your new route.
The function uses the value to make an API request to the Show Service Catalog Item endpoint to get the item details.
The function then renders a template called request_form.html with the item's details. This template shows the web request form. The next section describes how to create the template.
Create the request web form
The next step is to create a template that contains a web form for employees to enter their name, email, and laptop justification.
To create the request web form
-
In your templates folder, create a file named request_form.html.
-
Paste the following HTML and templating code into the file:
<!DOCTYPE html><html lang="en"><head><meta charset="UTF-8" /><title>Request a laptop</title><linkrel="stylesheet"href="{{ url_for('static', filename='css/request_form.css') }}"/></head><body><div class="col"><h2>Request a laptop</h2><formid="requestForm"action="{{ url_for('create_ticket') }}"method="POST"><label for="itemName">Selected item</label><input id="itemName" name="itemName" value="{{ item.name }}" /><inputtype="hidden"id="itemId"name="itemId"value="{{ item.id }}"/><inputtype="hidden"id="formId"name="formId"value="{{ item.form_id }}"/><label for="requesterName">Your name</label><input id="requesterName" name="requesterName" required /><label for="requesterEmail">Your email</label><input id="requesterEmail" name="requesterEmail" required /><label for="justification">Justification</label><input id="justification" name="justification" required /><button type="submit">Submit request</button></form></div></body></html>This form submits the employee's information to the
create_ticket()function in the app.py file. It also submits the item ID and form ID from the hidden input fields. The next section describes how to add a route with thecreate_ticket()function. -
In your static/css sub folder, create a stylesheet named request_form.css.
-
Paste the following CSS into the file:
body {font-family: Helvetica, Arial, sans-serif;margin: 2rem;max-width: 600px;}.row {display: flex;gap: 1rem;}.col {flex: 1;}input,select,button {padding: 0.5rem;width: 100%;margin: 0.25rem 0 1rem 0;}.items {border: 1px solid #ddd;padding: 1rem;border-radius: 8px;}.items button {width: auto;}pre {background: #f6f8fa;padding: 1rem;border-radius: 8px;overflow-x: auto;}.muted {color: #555;font-size: 0.95rem;}.item {border-top: 1px solid #eee;padding-top: 0.75rem;margin-top: 0.75rem;}.ids {display: none;margin-top: 0.5rem;}.ids code {word-break: break-all;}.inline {display: flex;gap: 0.5rem;align-items: center;margin-top: 0.5rem;}.inline button {width: auto;margin: 0;}.selectedBox {background: #f6f8fa;padding: 0.75rem;border-radius: 8px;margin-bottom: 1rem;}
Create the ticket
The next step is to add a route that creates a Zendesk ticket using the information the employee submitted with the web request form.
To add a route that creates a ticket
- In the app.py file, insert the following /service_catalog/request route after the /service_catalog/request_form route:
@app.route("/service_catalog/request", methods=['POST'])def create_ticket():# Retrieve the request form's valuesitem_id = request.form.get('itemId')form_id = request.form.get('formId')item_name = request.form.get('itemName')requester_name = request.form.get('requesterName')requester_email = request.form.get('requesterEmail')justification = request.form.get('justification')# Specify the custom field idcustom_field_id = 50117026214931# Create the ticket commentcomment_lines = ["New laptop request",f"- Requester: {requester_name} ({requester_email})",f"- Catalog item: {item_name} ({item_id})"]# Create the ticket payloadticket_payload = {"ticket": {"subject": f"New laptop request - {requester_name}","ticket_form_id": int(form_id),"custom_fields": [{"id": custom_field_id, "value": justification}],"requester": {"name": requester_name, "email": requester_email},"comment": {"body": "\n".join(comment_lines)}}}# Make the API request and show the ticketurl = f"{BASE_URL}/api/v2/tickets"auth = f"{ZENDESK_EMAIL}/token", ZENDESK_API_TOKENresponse = requests.post(url, json=ticket_payload, auth=auth)response.raise_for_status()data = response.json()ticket_id = data['ticket']['id']return redirect(f"{BASE_URL}/hc/en-us/requests/{ticket_id}")
-
Replace the value of the
custom_field_idvariable with your own value.
How it works
The route performs the following tasks:
- Retrieves the form data.
- Creates a text comment to add to the ticket.
- Builds the ticket payload.
- Make a POST request to the Create Ticket endpoint.
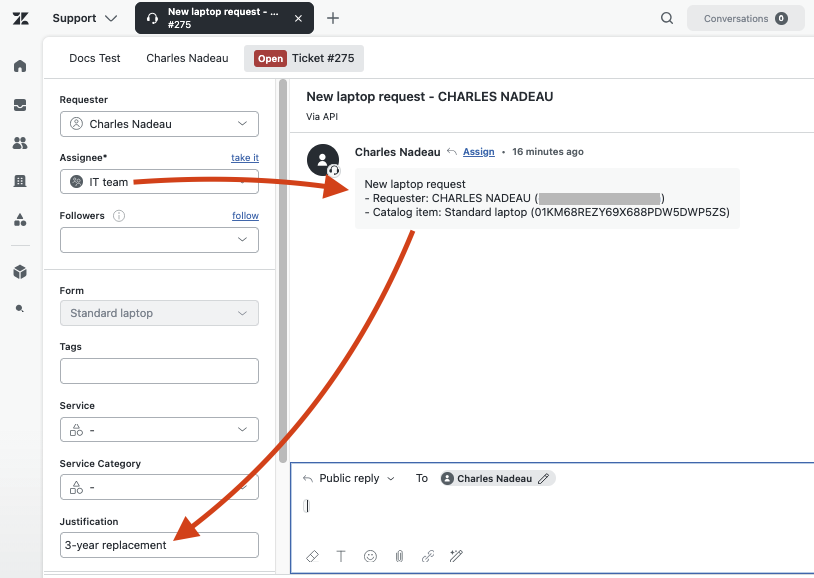
- After the ticket is created, redirects the employee to the ticket in Zendesk.
Meanwhile, a trigger in Zendesk automatically assigns the ticket to the IT team for review and fulfillment:
Running the app
To run the app
-
In a terminal, navigate to your project folder and run:
python3 app.pyIf you're working in a virtual environment, you can run
python app.py. -
Open a browser and go to
http://127.0.0.1:8000. -
Go to the catalog browser, select an item, and click Request this item.
-
Fill out the request form and click Submit request.
The app will create a ticket and then redirect you to the ticket in Zendesk.
Make enhancements
For simplicity, the application currently has only one request web form because all three laptops share the same custom field. However, catalog items could have different custom fields.
If you start adding more catalog items with different custom fields, you'll need to create request web forms for each type of item. After creating the forms, you can create a function to route the employee to the correct web form depending on the form id. Example:
form_id = request.form.get(form_id)if form_id in [342, 343, 345]:# render form template Aelif form_id in [232, 233]:# render form template B