Conversation extensions
Conversation extensions are custom interactive interfaces that overlay the conversation display. They are designed to enrich conversations by enabling more than just simple question-and-answer interactions. Users can now interact with web content, carry out purchases, or fill a custom Customer Satisfaction (CSAT) survey, all within the confines of the ongoing conversation, eliminating the need to navigate away or being transferred to an agent.
Note: Conversation extensions are supported in the Zendesk Web Widget, Zendesk iOS SDK (v2.19.0 and later), and Android (v2.19.0 and later). It is also supported on some social channels, such as Facebook Messenger. When used on channels that don't support conversation extensions, the content will be launched in a web browser.
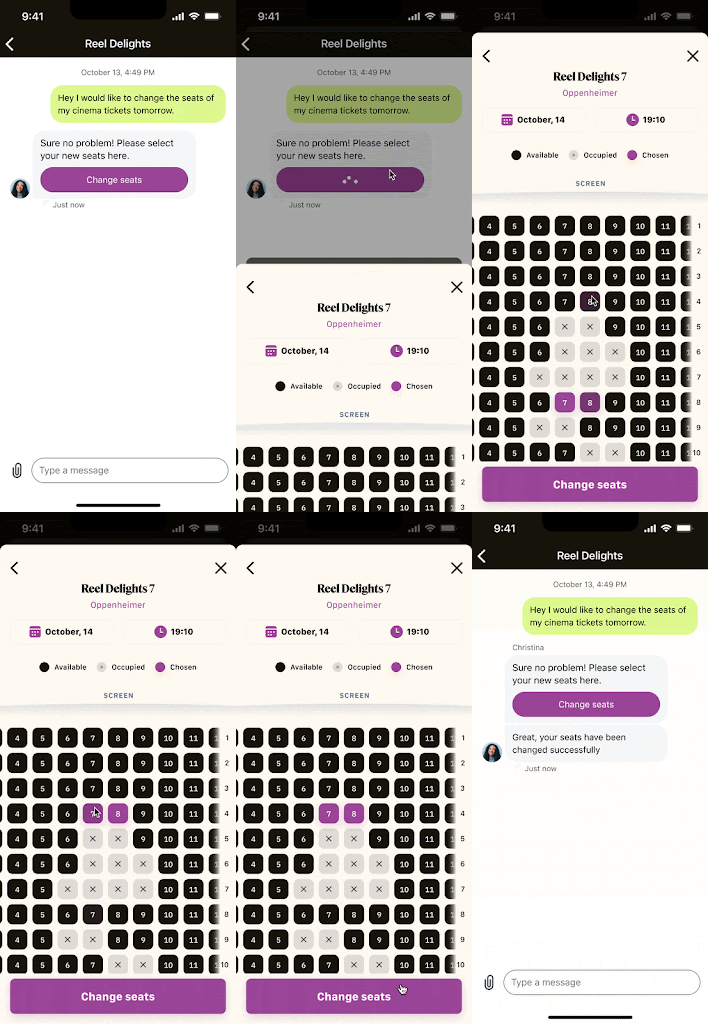
Conversation extensions are powered by web technologies and are implemented using JavaScript, CSS, and HTML. They are delivered to end users by including a Webview action when sending a message. A Webview acts as an embeddable browser to display web content inside an app.
Note: To view the Webview action, under Request body schema expand content, expand actions, and then select webview from the type property.
Example:
curl https://{subdomain}.zendesk.com/sc/v2/apps/{app_id}/conversations/{conversation_id}/messages \-X POST \--user '{key_id}:{secret}' \-H 'content-type: application/json' \-d '{"author": {"type": "business"},"content": {"type": "text","text": "Pick a date for your delivery:","actions": [{"type": "webview","text": "Pick date","uri": "https://pick-a-date.com","fallback": "https://pick-a-date-fallback.com"}]}}'
Using the Webview SDK
The Webview SDK library extends the functionality of conversation extensions to allow you to perform additional actions like setting the extension header title and closing it programmatically.
To use the Webview SDK, add the following script tag into your HTML page:
<script>;(function (d, s, id) {var js,fjs = d.getElementsByTagName(s)[0]if (d.getElementById(id)) {return}js = d.createElement(s)js.id = idjs.src = "https://static.zdassets.com/conversation-extensions/latest/sdk.js"fjs.parentNode.insertBefore(js, fjs)})(document, "script", "WebviewSdkScript")</script>
To determine when the library is completely loaded, define a webviewSdkInit function in your HTML body. Example:
window.webviewSdkInit = function (WebviewSdk) {// the SDK is passed in parameter to this callback// and is also available at `window.WebviewSdk` for convenience}
Once loaded, the library is available in the global scope as WebviewSdk.
Before any of the SDK's methods can be used, the SDK performs a handshake with the container (the Web Widget, iOS SDK, or Android SDK) to negotiate which features are supported. Facebook Messenger doesn't participate in this handshake, so it's always limited to a fixed set of features. This handshake happens automatically during SDK initialization, so you don't need to trigger it yourself, but it's why feature availability is determined at runtime rather than being fixed ahead of time. Always confirm a feature is supported with hasFeature before calling it, since the negotiated set can vary by platform and platform version.
Platform support
Feature availability isn't consistent across containers. Use hasFeature at runtime rather than assuming a feature works everywhere:
| Feature | Web | iOS | Android | Facebook Messenger |
|---|---|---|---|---|
close | Yes | Yes | Yes | Yes |
setTitle | Yes | Yes | Yes | No |
getContext | Yes | Depends on app version | Depends on app version | No |
Platform-specific considerations
- Web: Runs the latest widget code on every load, so
getContextis always available. - iOS and Android: Support for
getContextdepends on the version of the native app the end user has installed. If the handshake with the native container succeeds, it negotiates the protocol version and enablesgetContextaccordingly. If the handshake fails or the app doesn't support it, the SDK falls back to a base capability set that excludesgetContexton both platforms. Don't assume it's available just because it's iOS or Android. - Facebook Messenger: Opts out of handshake negotiation entirely, so
getContextis never available andsetTitleis not supported. Onlyclosecan be relied on.
Available APIs
Here are some core APIs when using conversation extensions and Webview actions.
hasFeature
hasFeature(name) lets you verify if a particular feature is implemented or available for the platform on which the SDK is currently operating. For example, you could call WebviewSdk.hasFeature('close') prior to calling WebviewSdk.close() to adjust your Webview's behavior if the feature isn't supported. This method is important as it accommodates the fact that as features are added, they may not be supported across all platforms.
Supported feature names are 'close', 'setTitle', and 'getContext'.
close
close() instructs the platform to close the current Webview. If you want to specify a callback function to be executed after the Webview is closed, you can pass it as an argument, like this: WebviewSdk.close(() => console.log('Webview closed!')).
setTitle
setTitle(title) refreshes the header title of the container. Generally, there's no need for you to call this command since the title of your document is automatically deployed as the title of the webview. However, if you wish to customize the webview's title further, you can use setTitle.
getContext
getContext(resolve, reject) asks the container for secure context about the current message and resolves with an object containing a signed token:
window.WebviewSdk.getContext(context => {console.log(context.token)},error => console.error("Failed to get context:", error))
token is an asymmetrically signed JWT containing information about the conversation, including the appuserId, subdomain, appId, integrationId, conversationId, messageId, and messageMetadata. Verify the JWT's signature on your server before trusting its claims — don't decode and trust it directly in the Webview.
getContext isn't supported on every platform, so check for it first:
if (window.WebviewSdk.hasFeature("getContext")) {window.WebviewSdk.getContext(context => {// send context.token to your server for verification},error => console.error("Failed to get context:", error))}
Verifying the token
The token is signed with an asymmetric key, so your server can verify it without sharing a secret with Zendesk. Zendesk publishes the public signing keys as a JSON Web Key Set (JWKS) at a well-known endpoint on its login service:
https://{subdomain}.zendesk.com/.well-known/jwks.json
Replace {subdomain} with the Zendesk subdomain from the token's subdomain claim. The endpoint is unauthenticated and returns a keys array of JWK objects:
{"keys": [{"kty": "RSA","alg": "RS256","n": "...","e": "AQAB","kid": "..."}]}
To verify the token:
- Decode the JWT header (without verifying) and read its
kid. - Fetch the JWKS from the well-known endpoint and find the JWK whose
kidmatches. - Construct the public signing key from the JWK and verify the JWT's
RS256signature andexpclaim. - Only after verification succeeds, trust the payload's claims.
The following Node.js snippet uses the jsonwebtoken and jwks-rsa libraries to fetch the JWKS, match the kid, and verify the signature and expiration:
const jwt = require("jsonwebtoken")const jwksClient = require("jwks-rsa")// Be sure to create a single instance of the jwksClient and reuse it, to leverage the caching mechanismconst jwksClientInstance = jwksClient({jwksUri: "https://{subdomain}.zendesk.com/.well-known/jwks.json"})// Token to verify. In production, retrieve this from the request your Webview sends to your server.const token = "eyJ0eXAi..."const verifyToken = async token => {const publicKey = await getPublicKeyFromJwks(jwt.decode(token, { complete: true }))return jwt.verify(token, publicKey, { algorithms: ["RS256"] })}const getPublicKeyFromJwks = async decodedToken => {const kid = decodedToken.header.kidconst signingKey = await jwksClientInstance.getSigningKey(kid)return signingKey.rsaPublicKey}verifyToken(token).then(payload => console.log(payload))
Caching the public keys
The well-known JWKS endpoint is rate-limited to 5 requests per minute. Don't fetch it on every token verification. Fetch it once, cache the keys on your server, and reuse the cached keys for subsequent verifications. Use a JWKS client that caches keys and refreshes them on a set interval or when an unknown kid appears — Zendesk may rotate the signing keys periodically, and the cache needs to pick up the new keys after a rotation. Don't cache the token itself on your server beyond its short lifetime — request a fresh one from getContext when needed.
Webview customization
Webview sizing
A Webview action can be displayed in different sizes using the size parameter. The size can be set to compact, tall, or full.
Example:
{"content": {"type": "text","text": "Pick from our top restaurants:","actions": [{"type": "webview","text": "Make a reservation","size": "tall","uri": "https://pick-a-date.com","fallback": "https://pick-a-date-fallback.com"}]}}
Open automatically
You can configure the Webview to open automatically afer sending by setting the openOnReceive parameter to true. When this is true, the user doesn't have to click the button to open Webview. Note the following:
- If multiple Webview actions with
openOnReceiveare sent, only the first is opened. - If a Webview is already opened and an
openOnReceiveis sent, theopenOnReceiveis ignored. - If an end user has scrolled up in the conversation when a Webview action with
openOnReceiveis sent, the Webview is not opened.
Example
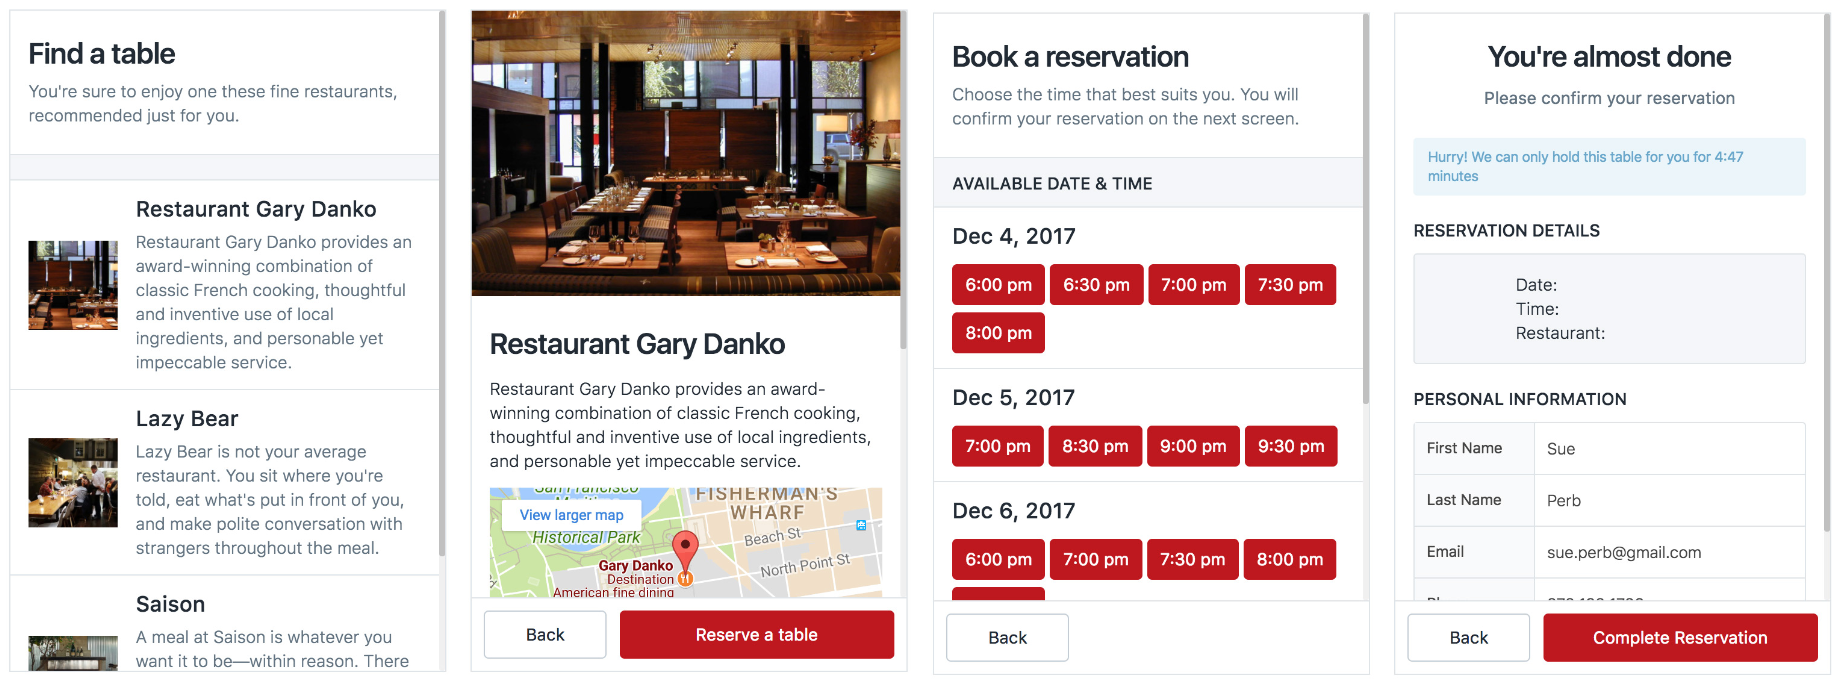
This example shows the high-level steps for using Conversation extensions to let users pick a restaurant, select a date and time, and finalize their booking all within their current conversation. Once the user completes their reservation, a confirmation message is sent.
Note: This example uses a Sunshine Conversations messagePost API which incurs a Sunshine Conversations Monthly Active User (MAU) cost.
-
Identify the page that will act as the Conversation extension. In our example, it's the user interface for selecting a restaurant and time for the reservation.
-
Create your node server and listen for webhook calls.
// server/app.jsconst path = require("path")const express = require("express")const bodyParser = require("body-parser")const axios = require("axios")const app = express()app.use("*", bodyParser.json())app.post("/user-message", (req, res) => {console.log("received user message")})module.exports = app -
Configure the Web Widget for messaging. See Setting up Web Widget to add messaging to your website or help center.
-
Configure your webhook through Admin Center or an API call.
-
Create an API key to identify and authenticate the application or user. See Adding an API key.
-
Include the Webview SDK script in your HTML page. See Using the Webview SDK.
-
Reply to messages by initiating a Webview action and appending a
conversationIdto the query string. In this step, you will configure the outgoing message, create a Webview button, and create options to adjust the size and set the extension to launch automatically when the message is received. Additionally, this step gives you the option to determine which context data to transmit to the extension.// server/app.jsapp.post("/user-message", async (req, res) => {await axios.post(`https://{subdomain}.zendesk.com/sc/v2/apps/${appId}/conversations/${conversationId}/messages`,{author: { type: "business" },content: {type: "text",text: "Pick from our top restaurants",actions: [{type: "webview",text: "Make a reservation",size: "tall",uri: `http://localhost:3000/webview?conversationId=${conversationId}`,fallback: "https://smooch.io"}]}},{auth: {username: KEY_ID,password: SECRET}})res.end()}) -
Within your extension, prompt the user to perform the necessary action and then notify the server. This step guarantees the submission of data and automatically closes Webview after the user provides the required information.
// src/components/DatePicker.jsfetch("/date-selected", {method: "POST",headers: {"Content-Type": "application/json"},body: JSON.stringify({date: this.state.date.toString(),conversationId: qs.parse(window.location.search.replace("?", "")).conversationId})}).then(() => {window.WebviewSdk.close(() => console.log("success!"),e => console.log("failure", e))}) -
Monitor the server for the notification triggered by the extension and respond accordingly. This action sends a confirmation message to the conversation once the user completes the necessary action(s) within the extension.
// server/app.jsapp.post("/date-selected", async (req, res) => {const { date, conversationId } = req.bodyawait axios.post(`https://{subdomain}.zendesk.com/sc/v2/apps/${appId}/conversations/${conversationId}/messages`,{author: { type: "business" },content: {type: "text",text: `You have selected ${date}. Enjoy your meal!`}},{auth: {username: KEY_ID,password: SECRET}})res.end()})