Sending messages
In Zendesk messaging, most messages are generated automatically as actions are taken by an end user, agent or AI agent. The agent might craft a message by hand using the composer in the Agent Workspace UI, or the end user might send a message using a third-party messaging channel such as WhatsApp. However, for more advanced use cases, messages can also be sent programmatically using the messaging platform APIs. In this guide, we'll explain the various ways your software can send messages on behalf of users or on behalf of your business.
Replying to an existing conversation
Most conversations are initiated by an end user reaching out to your business. For example, the user might start a conversation by sending a message to your Facebook page, or by launching one of the messaging SDKs embedded in your website or mobile app. When receiving messages over webhooks, the conversation id is included as part of the payload. This id can then be stored and reused to send messages back to the user.
Regardless of how the conversation id was obtained, the Post Message API will allow you to send a message in a specific conversation:
curl https://{subdomain}.zendesk.com/sc/v2/apps/{app_id}/conversations/{conversation_id}/messages \-X POST \--user '{key_id}:{secret}' \-H 'content-type: application/json' \-d '{"author": {"type": "business"},"content": {"type": "text","text": "Hello world"}}'
In the code above, content contains the message payload, while the author object is used to identify the "sender" of the message. To learn more about the various parameters of this API, see Post Message.
Initiating a new conversation
Conversations can be initiated by the business in order to proactively reach out to a user who may not have contacted you before. Before sending a message, you will need to create a conversation for the interaction, and link a channel to determine how the message should be delivered to the user. The notification API can also be used to perform all of these operations with a single API call. Learn more about this use case in the outbound messaging guide.
Users on multiple channels
In most cases, a conversation will only be linked to a single channel, making it obvious to know where messages will go when the business replies. In general, you should not need to worry about which channel(s) messages will be sent to. The messaging platform will make a best effort to ensure the user will see the message. This section explains in detail how channels are selected for delivery, but you may also skip ahead to sending typing activities if this information is not important for your integration.
Automatic message delivery
There are a number of ways in which a conversation can be linked to more than one channel at a time. For example, if a user on the Web Widget opts to continue their conversation on a social messaging channel, the result will be a conversation with two or more channels connected. The linked channels for a given conversation are stored on the participant object, specifically in the clientAssociations array. The first entry in the clientAssociations array is the user's "preferred channel" (explained below). You can retrieve the list of participants for a conversation using the List Participants API.
Business messages are delivered according to an order of priority determined by the user's most recent activity on each channel. The user's "preferred channel" will be the channel where they were most recently active. In the previous example of a user on the Web Widget continuing their conversation on WhatsApp, the preferred channel might change as time goes on:
- When the user and conversation are initially created by the Web Widget, there is only one client linked. The preferred channel at this point is the user's
sdkclient, specifically theirwebdevice. - When the user completes the flow to link their conversation to WhatsApp, a new client of type
whatsappis added, andwhatsappnow becomes the preferred channel. - As the user continues sending and receiving messages over WhatsApp, it remains the preferred channel.
- Some time later, the user might go back to the Web Widget and send another message in the conversation. If this happens, the preferred channel will be updated once again to
sdk. Note that just viewing a conversation will not update the preferred channel - the user must perform a write operation on the conversation.
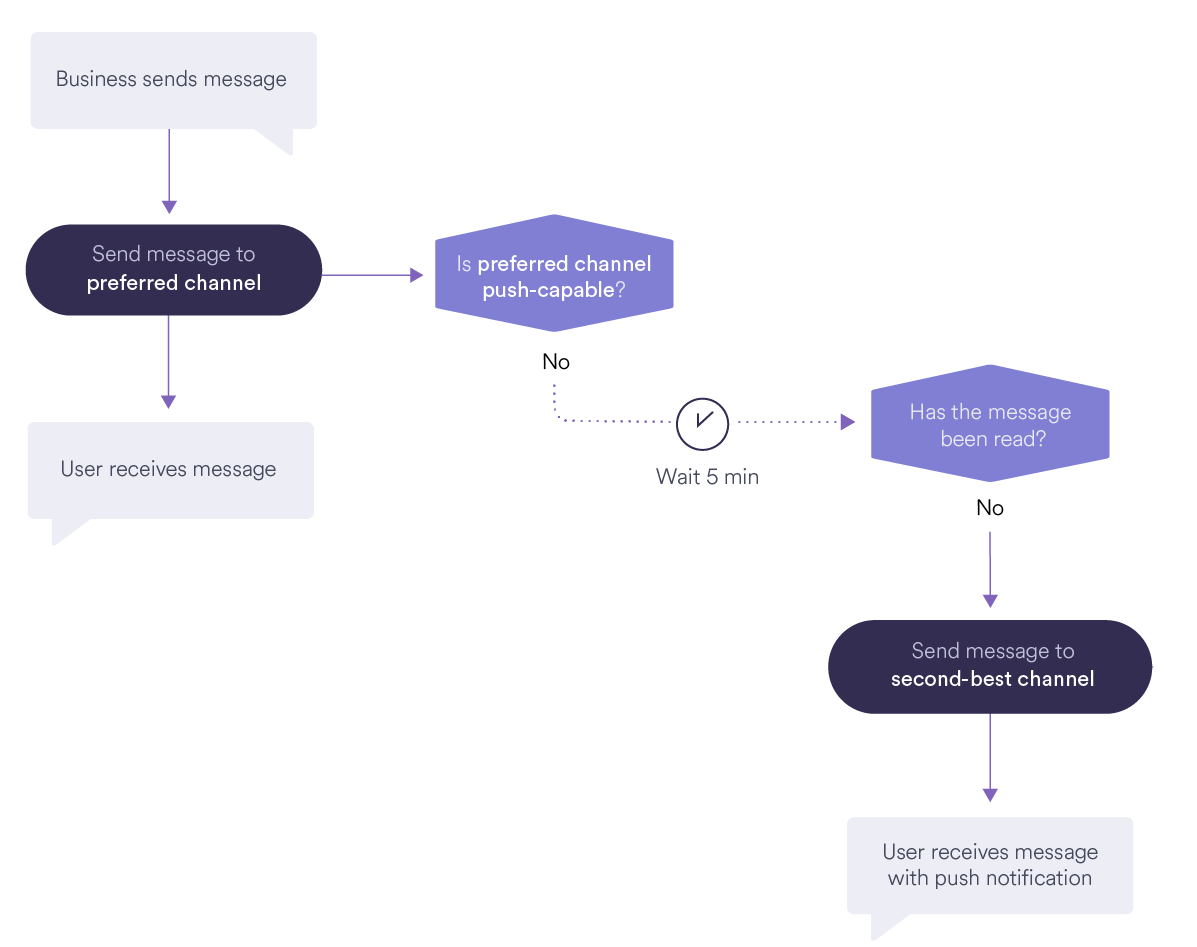
The following decision tree is used to determine where business messages should go. The goal of this flow is to give the best chance of the user seeing the message, while avoiding sending push notifications when it's not necessary:
- First, send the message to the user's preferred channel.
- Depending on the capabilities of the channel, this may or may not trigger a push notification for the user.
- Social messaging channels all support sending a push notification to the end user when a new message is received, so these channels are considered to be "push capable".
- Zendesk's iOS and Android SDKs are also considered to be "push capable". You can configure push credentials for your mobile app in the Admin Center.
- The Web Widget and Unity SDKs do not support configuring push notifications, so these channels are considered to be "not push capable".
- If the preferred channel was push capable, then no further delivery is attempted.
- If the preferred channel was not push capable, a 5 minute time window is allowed for the user to read the message.
- If the message is still unread after 5 minutes, delivery will be re-attempted using the second-best channel. This means the second most recently used channel that is push capable.
Here's a visual representation of the automatic message delivery logic:
Targeting a specific channel
To bypass the automatic delivery logic, you may target a specific channel when sending a message instead. The Post Message API accepts a destination object which can be used to target a channel with either an integrationType or integrationId. The conversation must be linked to a client matching the supplied destination criteria, otherwise an error is returned.
curl https://{subdomain}.zendesk.com/sc/v2/apps/{app_id}/conversations/{conversation_id}/messages \-X POST \--user '{key_id}:{secret}' \-H 'content-type: application/json' \-d '{"author": {"type": "business"},"content": {"type": "text","text": "Hello world"},"destination": {"integrationType": "whatsapp"}}'
Note: For the Zendesk Web Widget and SDKs, the conversation history is used directly as the source of truth for messages. All messages will be visible by the user, regardless of where they were "delivered". Targeting a social channel for delivery will not prevent the message from being displayed on any linked SDKs, but it will suppress the dispatching of push notifications.
Silent Messages
In some cases the conversation with a user might proceed through an external channel, outside of Zendesk messaging. You can backfill messages into a conversation without triggering any further message delivery by marking the message as "silent". To send a silent message, provide a destination object with integrationType of none.
curl https://{subdomain}.zendesk.com/sc/v2/apps/{app_id}/conversations/{conversation_id}/messages \-X POST \--user '{key_id}:{secret}' \-H 'content-type: application/json' \-d '{"author": {"type": "business"},"content": {"type": "text","text": "Hello world"},"destination": {"integrationType": "none"}}'
Sending typing activities
User experience in a conversation can be improved by letting the user know that "typing" is in progress and that a message will soon be on its way. The Post Activity API can be used to signal these events to messaging channels that support this feature.
curl https://{subdomain}.zendesk.com/sc/v2/apps/{app_id}/conversations/{conversation_id}/activity \-X POST \--user '{key_id}:{secret}' \-H 'content-type: application/json' \-d '{"author": {"type": "business"},"type": "typing:start"}'
When you call this function with typing:start, a typing activity indicator will be displayed on the supported channel. On most platforms, the indicator will automatically time out. It can also be canceled by sending typing:stop. Alternatively, the indicator will be stopped the moment you send another message on the channel.
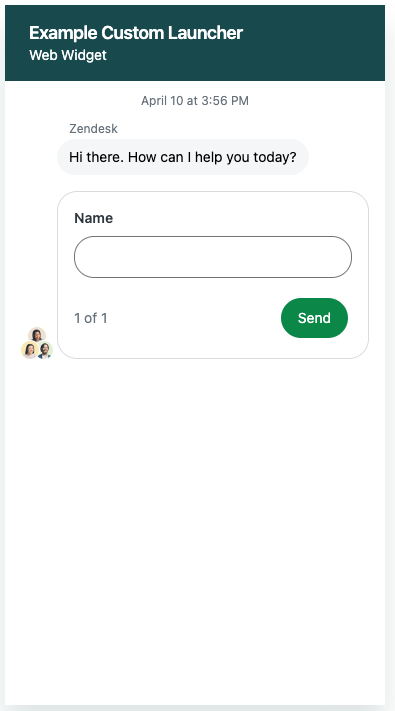
Hiding the messaging composer
The messaging composer is where users type messages in a chat application. In some cases, such as when you want users to select from a form instead of typing freeform responses, you may want to hide the composer. To do this, include the blockChatInput: true parameter in your Post Message API workflow. The composer will stay hidden until you send a subsequent message without blockChatInput, or explicitly set blockChatInput: false.
The blockChatInput property is supported for all message types (Text, Carousel, File, Form, Image, List, Location, and Template) except FormResponse messages. In Sunshine Conversations SDKs, blockChatInput is supported only for form messages.
You can use blockChatInput in the Web Widget and in chat applications built with Zendesk SDKs. This property is not compatible with third-party messaging channels.
Example: Disabling the composer with blockChatInput
By setting blockChatInput: true on a form message, the composer is hidden while the form is displayed. Users can only fill out the form fields. They cannot type custom responses.
{"author": {"type": "business"},"content": {"type": "form","blockChatInput": true,"fields": [{"type": "text","name": "name","label": "Name","placeholder": "Bob"},{"type": "email","name": "email","label": "Email","placeholder": "[email protected]"}]}}
With AI Agents Advanced, you can also enable Block chat input when creating a form in Admin Center.
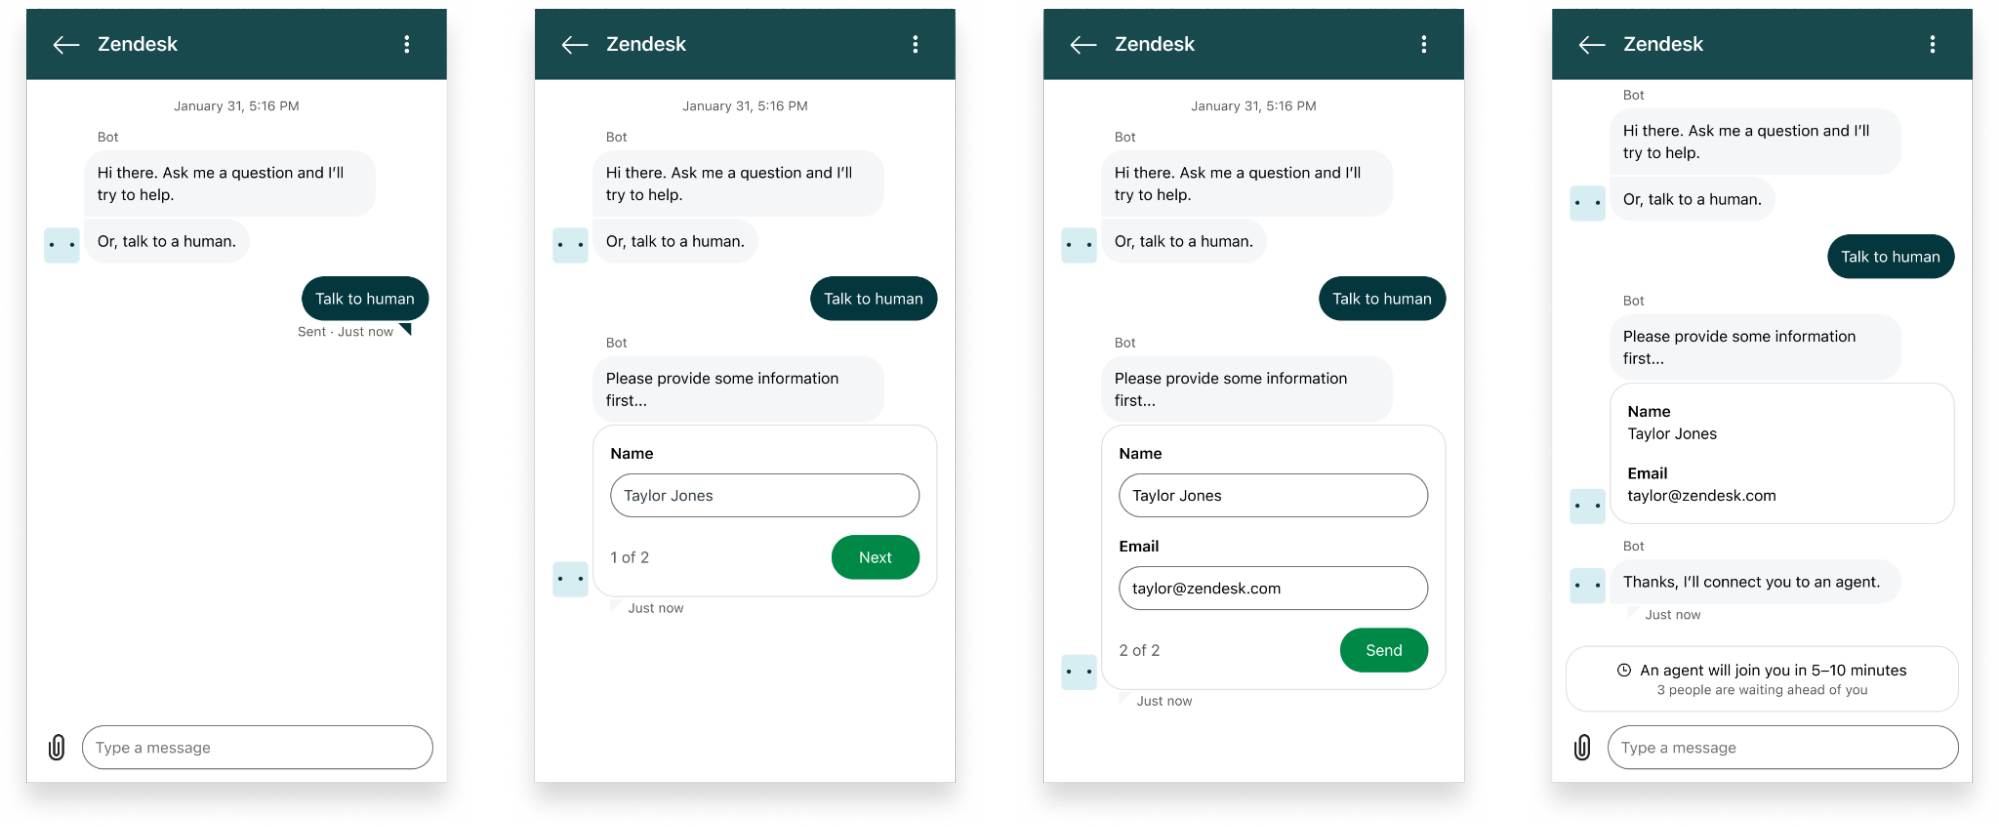
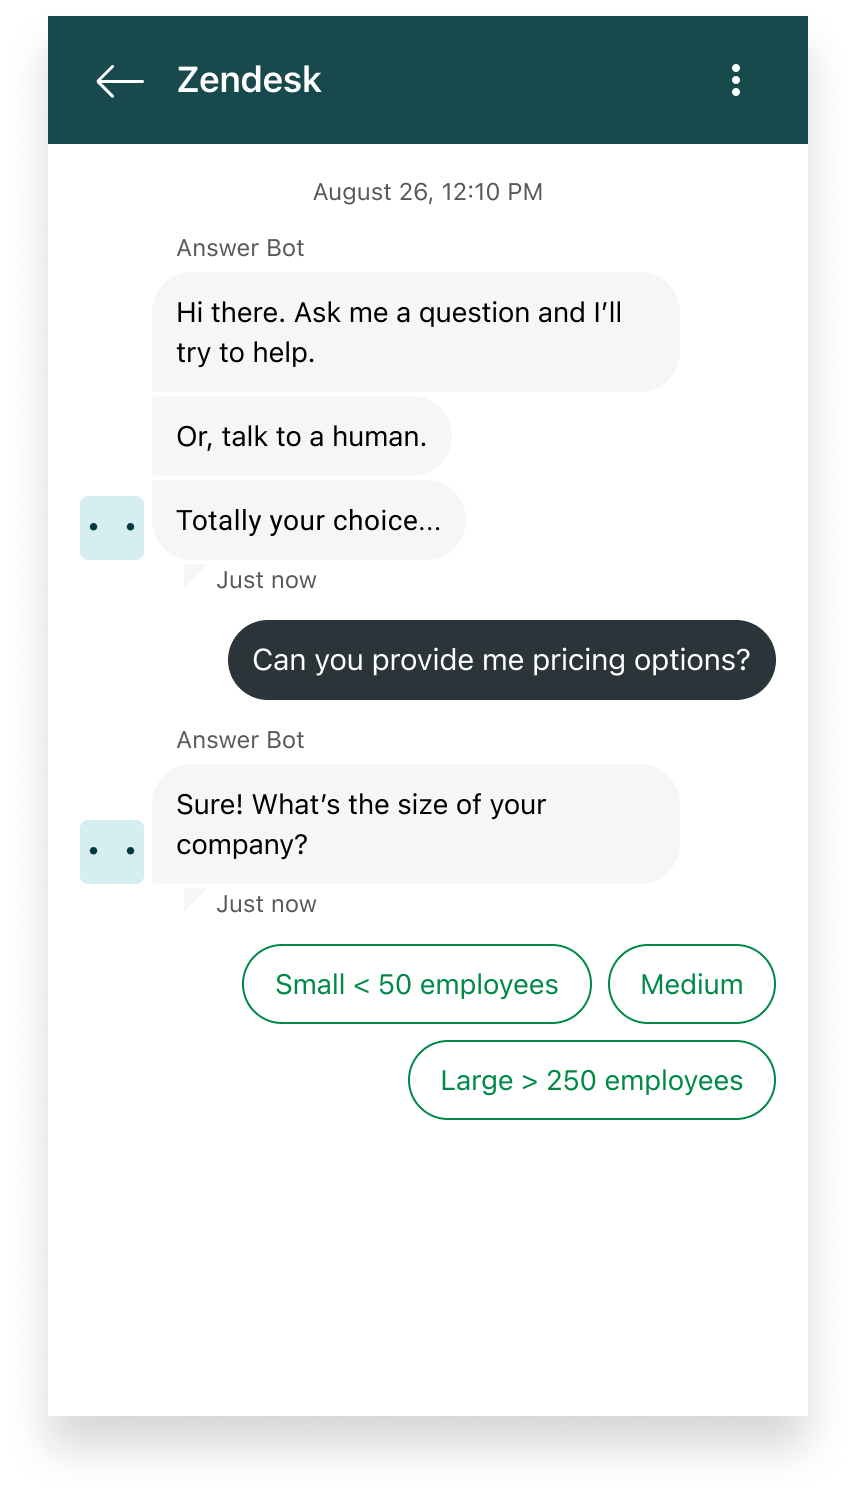
Example: Hiding the composer with quick reply options
By setting blockChatInput: true on a message with quick reply actions, the composer is hidden while the quick replies are displayed. Users can only respond by selecting one of the provided options and cannot type custom messages until another message is sent without blockChatInput.
{"author": {"type": "business"},"content": {"text": "Please select an option below:","type": "text","blockChatInput": true,"actions": [{"type": "reply","text": "Tacos","iconUrl": "http://example.org/taco.png","payload": "TACOS"},{"type": "reply","text": "Burritos","iconUrl": "http://example.org/burrito.png","payload": "BURRITOS"}]}}
Example: Hiding the composer when a ticket is on hold
By setting blockChatInput: true on a status message, the composer is hidden while the user is waiting to be connected with a human agent. Users cannot enter messages during this time.
-
Create an API key in Admin Center.
Use basic auth with an API token as your authentication method. For more information, see API token.
-
Send a POST request to create a new template message that disables the composer for users when their ticket is on hold.
POST https://api.smooch.io/v1.1/apps/{app_id}/templatesRequest body:
{"name": "block_text_input_ticket_hold","message": {"type": "text","role": "appMaker","blockChatInput": true,"text": "Your case is now on hold"}} -
Set up a ticket trigger in Zendesk that sends the template message when a ticket’s status is changed to "on hold." Use the following template syntax:
%((block_text_input_ticket_hold))%
Be sure to use the template name specified in the previous step.
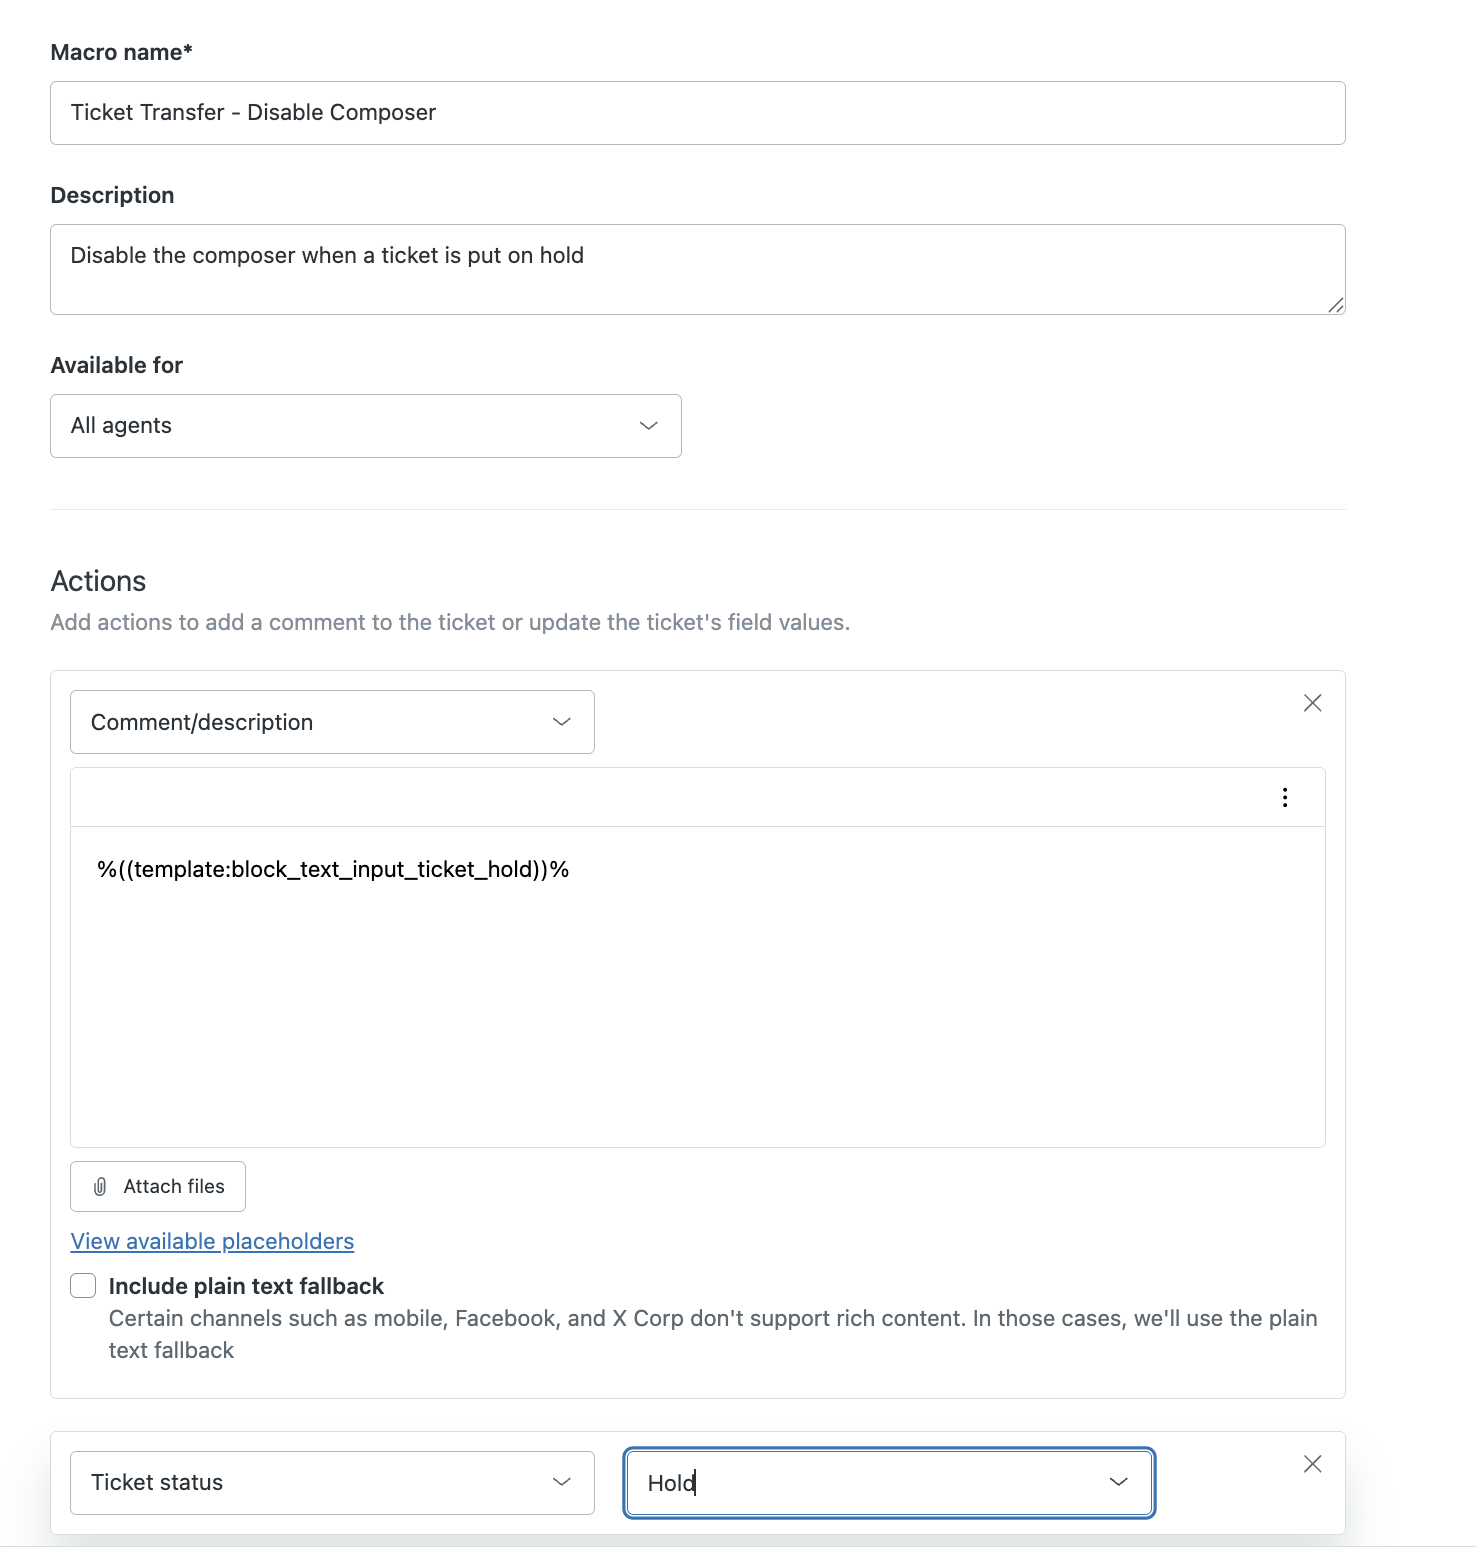
When the trigger triggers, the user receives a message such as “Your case is now on hold,” and the messaging composer is disabled for that conversation. The composer stays hidden as long as the most recent message in the conversation includes blockChatInput: true. To show the composer again, send a new message that does not include this parameter.
Example: Hiding the composer while a user is waiting for an agent to join the conversation
By setting blockChatInput: true on a status message, the composer is hidden while the user waits to be connected with a human agent. Users cannot type messages during this period.
Send a POST request to create a template message that will display a status notification, such as “Connecting you now”, and disable the composer.
POST https://api.smooch.io/v1.1//apps/{app_id}/templates
Request body:
{"name": "block_text_input_ticket_transfer","message": {"type": "text","role": "appMaker","blockChatInput": true,"text": "Connecting you now"}}
When configuring the AI agent’s escalation logic, update the escalation reply to use this template. Reference the template using the following syntax:
%((template:block_text_input_ticket_transfer))%
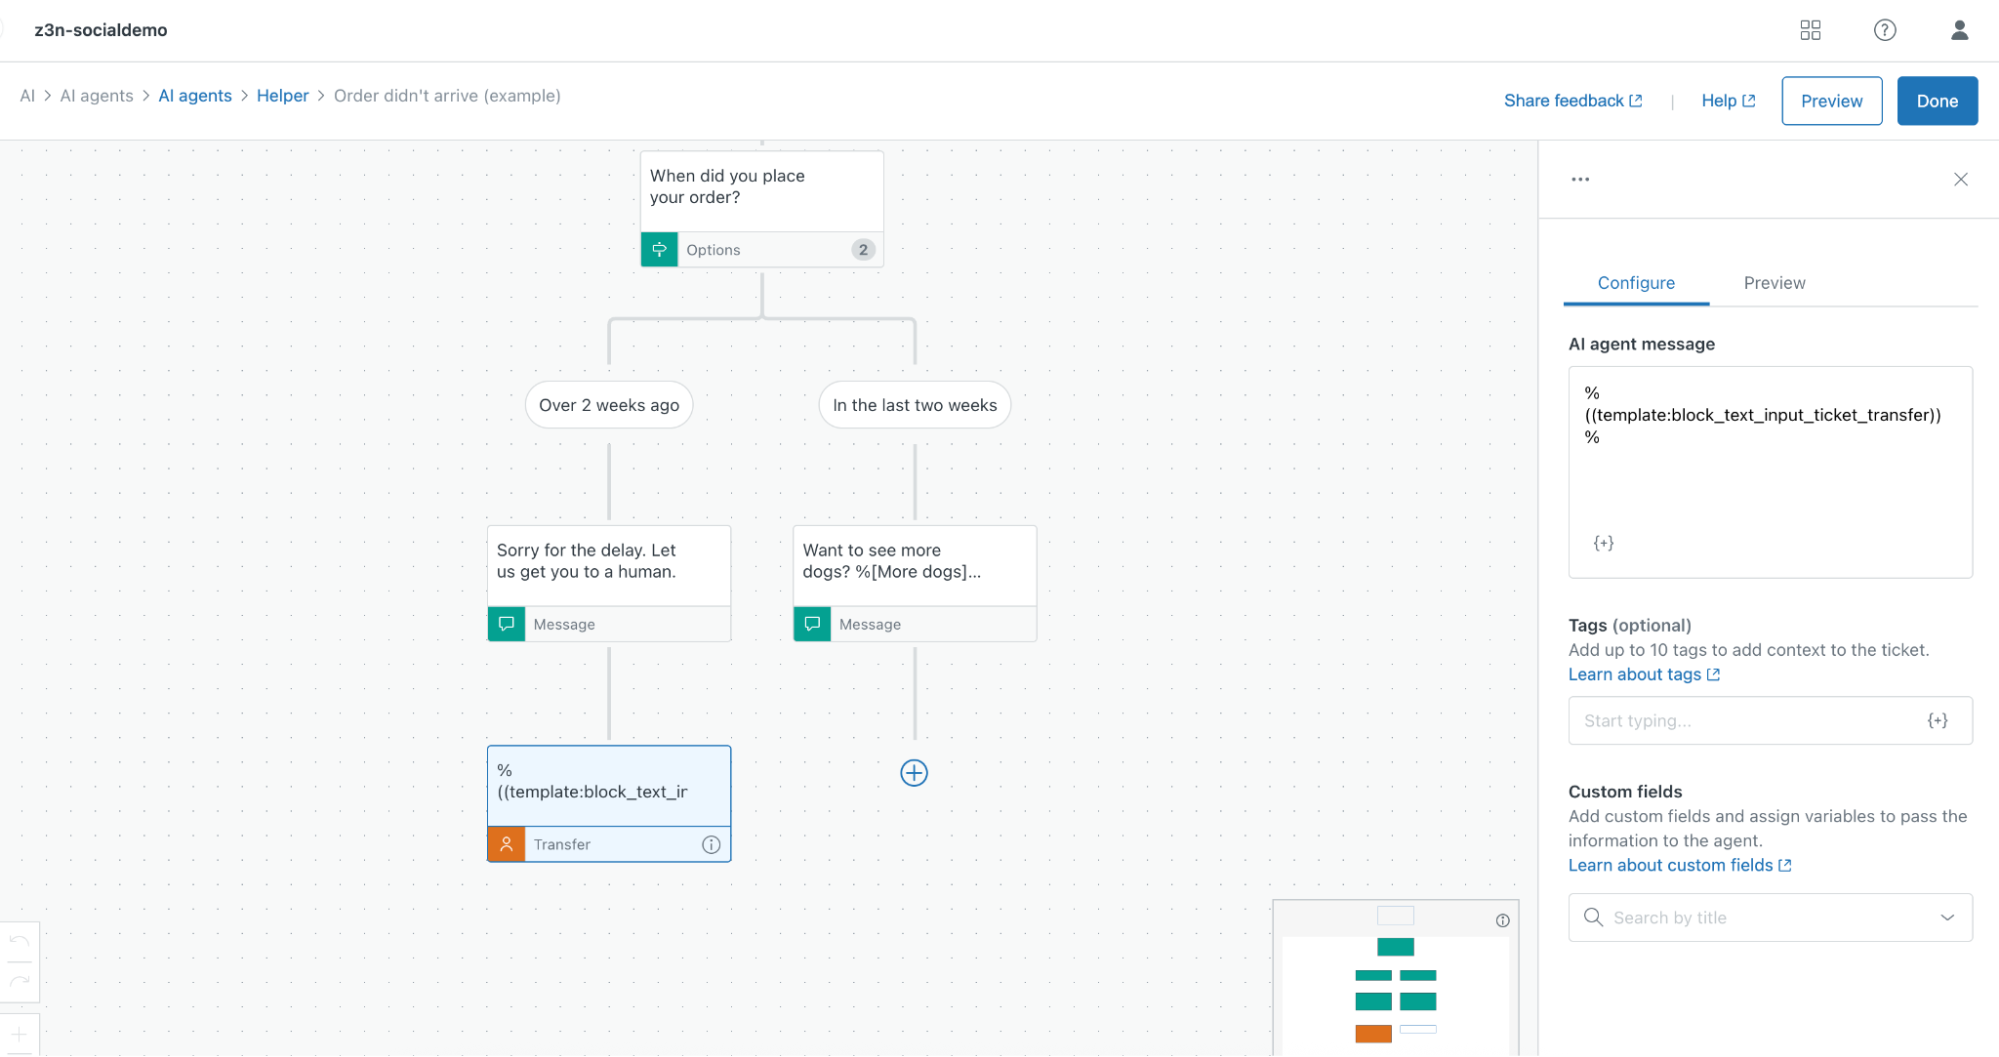
Whenever this message is sent to the user, the composer is disabled in the chat interface. The composer remains hidden as long as this message is the most recent in the conversation history. It is re-enabled when a new message is sent without blockChatInput: true.
Large messages
The Post Message API has a maximum request body limit of 100kb. However, when crafting message overrides for the Apple Messages for Business channel, the payloads can often be much larger than that. For instance, when sending a list picker, the image contents must be directly embedded in the JSON payload (using base64 encoding). To send message payloads larger than 100kb, use the large message API instead, which supports payloads up to 10mb.
The large message API accepts the same request schema as the v1 Post Message API, but with the following path instead:
POST /v1.1/apps/{app_id}/appusers/{user_id}/messages/large
To reduce network latency, we recommend using template messages to store reusable large message payloads whenever possible. When crafting templates, the following endpoints can be used to create or update a template with a large message payload:
POST /v1.1/apps/{app_id}/templates/large
PUT /v1.1/apps/{app_id}/templates/{template_id}/large
Key differences
The large message and large template APIs behave similar to their conventional equivalents, with a few key differences:
override.apple.payload(ormessage.override.apple.payloadfor templates) is a required field in the request body- Processing and validation of the message is done in the background, with the result of the operation being communicated over webhooks
- A valid Apple Messages for Business integration must exist in the account, otherwise a 400
bad_requesterror will be returned
Request success and failure webhooks
Large message and template processing is deferred to a background queue, meaning the result of the operation cannot be communicated in the HTTP response body. The large payload APIs will therefore return 202 Accepted along with a requestId rather than a 201 Created with a message id. For example:
{"requestId": "dkgSujU2R62HF3W9PnRIGy8K"}
This requestId can be used to track the success or failure of the request (message delivery or template creation or update) using the request:success and request:failure webhook triggers. The payload of the request:success webhook includes a response key, whose value matches a normal HTTP response from the associated standard API. In the case of an error processing the payload, request:failure webhooks have an error key with the details.
Example request:success payload (Post Message API):
{"trigger": "request:success","app": { "_id": "564f56151d195e2100c49f13" },"appUser": { "_id": "4f75e8d7c26953e0df65bb40" },"requestId": "dkgSujU2R62HF3W9PnRIGy8K","timestamp": 1534173863.84,"response": {"message": {"_id": "5b71beb728ef8677a427c769"// ...},"conversation": {"_id": "1f706345a613e803962dfe54"// ...}}}
Example request:failure payload (Post Message API):
{"trigger": "request:failure","app": { "_id": "564f56151d195e2100c49f13" },"appUser": { "_id": "4f75e8d7c26953e0df65bb40" },"requestId": "dkgSujU2R62HF3W9PnRIGy8K","timestamp": 1534173863.84,"error": {"code": "bad_request","message": "Invalid JSON"}}
Example
The following code sample shows how to supply an override payload when sending a message, creating a template, or updating an existing template using the associated large payload APIs:
BASE_URL='https://{subdomain}.zendesk.com/sc'APP_ID='{app_id}'USER_ID='{user_id}'MESSAGE=$(cat <<-END{"type": "text","text": "Hello world","role": "appMaker","override": {"apple": {"payload": {"type": "interactive","interactiveData": {"bid": "com.apple.messages.MSMessageExtensionBalloonPlugin:0000000000:com.apple.icloud.apps.messages.business.extension","data": {"version": "1.0","requestIdentifier": "","images": [{"data": "base64encoded-image-file","identifier": "1"},{"data": "base64encoded-image-file","identifier": "2"},{"data": "base64encoded-image-file","identifier": "3"}],"listPicker": {"sections": [{"title": "Appetizers","order": 0,"items": [{"title": "Tacos","order": 0,"identifier": "taco-appetizer","imageIdentifier": "2"},{"title": "Burritos","order": 1,"identifier": "burrito-appetizer","imageIdentifier": "3"}]},{"title": "Meals","order": 1,"items": [{"title": "Tacos","order": 0,"identifier": "taco-meal","imageIdentifier": "2"},{"title": "Burritos","order": 1,"identifier": "burrito-meal","imageIdentifier": "3"}]}]}},"receivedMessage": {"style": "small","title": "Food Picker","subtitle": "Let\"s eat!","imageIdentifier": "1"},"replyMessage": {"style": "small","title": "Selected food","subtitle": "Nutrition"}}}}}}END)curl $BASE_URL/v1.1/apps/$APP_ID/appusers/$USER_ID/messages/large \-X POST \--user '{key_id}:{secret}' \-H 'content-type: application/json' \-d "$MESSAGE"curl $BASE_URL/v1.1/apps/$APP_ID/templates/large \-X POST \--user '{key_id}:{secret}' \-H 'content-type: application/json' \-d "{\"name\": \"test-template-1234\",\"message\": $MESSAGE}"TEMPLATE_ID='{template_id}'curl $BASE_URL/v1.1/apps/$APP_ID/templates/$TEMPLATE_ID/large \-X PUT \--user '{key_id}:{secret}' \-H 'content-type: application/json' \-d "{\"name\": \"new-template-name\",\"message\": $MESSAGE}"
Next steps
- Subscribe to delivery events to confirm the delivery of a message to a channel.
- Craft structured messages to enrich the conversational experience.
- Learn more about channel transfer flows which allow a user to move between channels.
- Leverage message overrides to send channel-specific message types that don't correspond to any of the officially supported structured messages.