Authenticating users in the help center
With Help Center authentication for Messaging, the Web Widget automatically uses the identity of end users when they are signed in to the help center. The system shares their name and email with agents (see Data mapping). To use this feature, add your web widget to your help center. Once you have it automatically embedded, turn on help center authentication from the Installation section of your Web Widget settings. End users who sign in to the help center will now automatically be authenticated in the Web Widget as well.
Users can also start a Web Widget conversation while signed out. If they sign in to the help center during the conversation, the system updates or merges their previous unauthenticated session with their authenticated profile, allowing them to continue seamlessly as the signed-in user.
For Web Widgets embedded outside the help center, authentication continues to use JWT-based method as before. This new help center authentication option applies only to Web Widgets embedded within the Zendesk help center and does not affect Zendesk Mobile SDKs.
Known issues
Here are a few known limitations concerning this feature:
- Legacy AI agent flows do not populate the user's email into the
system.user.emailvariable. - This feature is not compatible with Advanced encryption.
- Synchronization of an authenticated user's data into Sunshine Conversations only happens when a user logs in to the help center and the web widget gets initialized. This means that additional API-level integration may be necessary in order to keep Sunshine Conversations user data in sync.
- The Voice API call button is not supported.
zendeskId property
Messaging users who are authenticated in this way will have their authenticated property set to true, and they will also have a zendeskId property that links them to their corresponding Support user id.
{"user": {"id": "67fd2a0f8dda4605934a8abf","zendeskId": "31240610949271","authenticated": true,...}}
An external ID is not required for this authentication method, but if the external_id property has been set on the corresponding Support user, the messaging user will inherit it. By assigning an external ID, messaging users who authenticate through the help center can also be linked across different applications that have embedded a Zendesk Web Widget or SDK.
Data mapping
Zendesk messaging uses a different user model than the core Zendesk user records that agents access in Agent Workspace. The core user records are available through the Ticketing API, while messaging users are accessed through the Sunshine Conversations API. Since these two user schemas differ, when the Web Widget links a messaging user to a Zendesk user, only the following user properties are transferred to the messaging user.
| Zendesk core user data | Messaging user representation | Agent Workspace UI |
|---|---|---|
| id | zendeskId | Not shown |
| name | profile.givenName profile.surname | Visible in: - Conversation history - User essentials card - User profile view |
| identities | identities (primary email only) | Visible in: - User essentials card - User profile view |
| external_id | externalId | Visible in: - User profile view |
Example Zendesk user mapping:
{"user": {"id": 31240610949271,"external_id": "01JRTE8SFDV4088CX0T1PJZMVE","name": "Roger Wilco","email": "[email protected]",}}{"identities": [{"id": 31240574951063,"user_id": 31240610949271,"type": "email","value": "[email protected]","primary": true,"verified": true,"verification_method": "full","verified_at": "2025-04-07T21:42:50Z",}, {"id": 31240574958359,"user_id": 31240610949271,"type": "email","value": "[email protected]","primary": false,"verified": true,"verification_method": "full","verified_at": "2025-04-07T21:42:50Z",}]}
Example messaging user mapping:
{"user": {"id": "67fd2a0f8dda4605934a8abf","zendeskId": "31240610949271","authenticated": true,"externalId": "01JRTE8SFDV4088CX0T1PJZMVE","profile": {"givenName": "Roger","surname": "Wilco"},"identities": [{"type": "email","value": "[email protected]","verification": "full"}]}}
Manually synchronizing user data
When an end user first authenticates with the Web Widget through the help center, the messaging user is populated with the corresponding Zendesk user’s name, email, and external_id, as described in Data mapping. However, Zendesk user properties can be changed manually through the Agent Workspace or the Ticketing API. For example, the properties can change when an agent updates a user’s primary email address. Messaging users can also be modified through the Sunshine Conversations API. These changes may cause the Zendesk user and its linked messaging user to become out of sync.
To address this, a synchronize user action is available to update the messaging user data. By providing a zendeskId, the API locates both the Zendesk user and messaging user associated with that id and updates the messaging user with the Zendesk user’s current name, email, and external_id.
Use caution when synchronizing, as external_ids and email addresses must remain unique within an account. To maintain this uniqueness, other messaging users may be modified to resolve conflicts. Specifically:
- The synchronize user API may merge two messaging users if a Zendesk user’s
external_idmatches a different messaging user. In this case, the synchronization will combine those messaging users. - The API will not merge two messaging users that correspond to different Zendesk users through
zendeskId. However, it may transfer email addresses orexternal_ids between messaging users to reflect changes in ownership on the Zendesk user side.
Linking users across application boundaries
End user identities can span multiple applications by assigning a unique external_id to each user. When users sign into the help center through single sign-on (SSO), you can assign an external_id by including it as an additional SAML assertion or as a custom attribute in OIDC. The custom SSO option also supports the external_id claim. Alternatively, you can assign an external_id directly to a user using the Users API.
When embedding messaging through the Web Widget or Mobile SDK within your own application, separate from the Zendesk help center, your application manages user authentication independently. In this case, JWT-based authentication bridges your user’s authentication state into the embedded messaging experience. If the external_id in the messaging JWT matches the external_id assigned to the corresponding core Zendesk user, Zendesk unifies the user’s identity across platforms. This enables end users to access the same conversation history whether they interact through the help center or through an embedded widget or SDK within your application.

It's important to note that the messaging user will only be synchronized with the Zendesk user's external_id, name and email address whenever the user logs in to the help center, and the web widget loads. If the user profile properties of the Zendesk user ever change, they won't be updated on the messaging user side until the user logs in to the help center again. This user data can still be synchronized out of band.
Custom Web Widget initialization behavior
The Web Widget offers JavaScript APIs which allow you to customize some of the widget's behavior. You can use these APIs to programmatically open the widget, for example. You might also want the Web Widget to only load on your help center for authenticated users.
It is possible to provide your own Web Widget initialization code by modifying your help center theme, however when you are leveraging help center authentication for messaging, the Web Widget must be initialized in a different way. The Web Widget exposes a useSessionAuth method, which can be used as follows:
- Ensure that automatic Web Widget loading is disabled in Admin Center. Go to Channels > Messaging > Web Widget > Installation and uncheck the option "Automatically embed Web Widget in your help center".
- Under the code box, click the Copy code icon. The code should start with
<script id="ze-snippet" ... - Now you'll have to initialize the widget by modifying the code of your help center theme. Visit Knowledge admin > Customize design > Customize > Edit code.
- Find
header.hbsin the templates folder and add the code below. Be sure to replace the first script tag with the code you copied in step 2.
{{#if signed_in}}<script id="ze-snippet" ...script tag from your installation page></script><script>zE("messenger", "useSessionAuth");</script>{{/if}}
Note that you should only initialize the Web Widget using useSessionAuth when the user is logged in to the help center. This is why the script tags are contained inside of #if signed_in tags. If you wish to have the widget load for both authenticated and unauthenticated users, you can do so like this:
<script id="ze-snippet" ...script tag from your installation page></script>{{#if signed_in}}<script>zE("messenger", "useSessionAuth");</script>{{/if}}
You can find more information about customizing help center JavaScript behaviors in the Help center JavaScript cookbook.
AI agents - Advanced
With AI agents - Advanced you can use the Get User action to surface a user's authentication state and authenticated email inside of bot dialog flows.

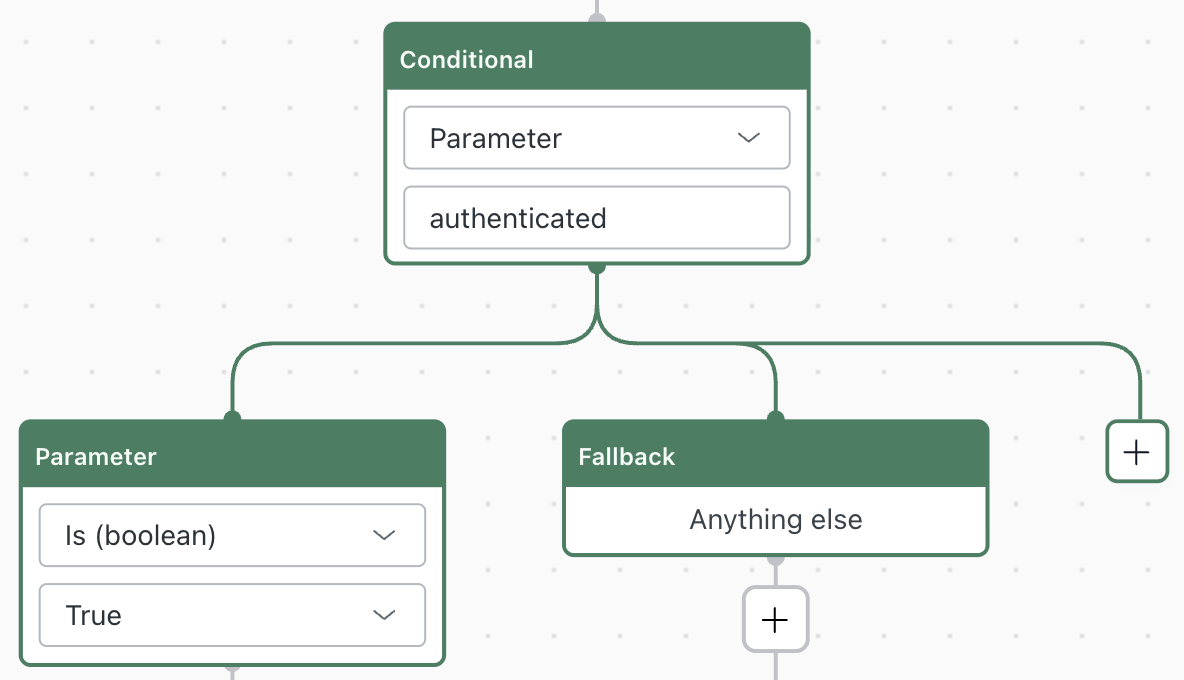
End users who have logged in through the help center will have a boolean authenticated property set to true. In the example below, a conditional branch is being performed based on the authenticated parameter that has been collected from the Get User action:
The Get User action also provides some additional parameters for users who have been authenticated through the help center:
- The
zendeskIdproperty, which identifies the Messaging user's associated Support user. - The
externalIdproperty, if one has been populated on the associated Support user. - The
authenticatedEmailproperty contains the user's verified email.
It's crucial to understand the difference between the authenticatedEmail and the email properties that are exposed by the GetUser action. The email property is used for collecting an unverified email addresses from users who have not logged in.