Set up a paid app or theme
Set up a paid app or theme
Paid apps and themes are a way for your business to generate revenue from apps and themes installed by our customers through the Zendesk Marketplace. We use Stripe for accepting and managing online payments. This section shows you how to get set up on Stripe.
To set up a paid app
- Connect to the Zendesk Stripe application
- Set up an app payment plan
- Set up Stripe to send your customers a purchase receipt
- Customize your receipt
- Setup Stripe Tax reporting
- Ensure your customer's app subscriptions aren't canceled
- Set up Stripe to support Strong Customer Authentication
To set up a paid theme
- Connect to the Zendesk Stripe application
- Set up Stripe to send your customers a purchase receipt
- Customize your receipt
- Setup Stripe Tax reporting
- Set up Stripe to support Strong Customer Authentication
For additional information, see Frequently Asked Questions.
Connect to the Zendesk Stripe application
To collect payments for your apps and themes in the Zendesk Marketplace, you need to connect a Stripe account to our Zendesk Stripe application. Follow the steps below.
Click the URL below to connect to Zendesk’s Stripe application using OAuth:
https://support.zendesk.com/marketplace_payment_service/oauth/stripe/authorize
Note: If you already use Stripe for your business, we recommend setting up a new Stripe account to receive the payments for your Zendesk apps and themes. Connecting to the Zendesk Stripe app allows us to make transactions on your behalf. It also gives us access to transactional data in your Stripe account. If you want your non-Zendesk transactions to stay private, you should set up a new Stripe account.
If you don't have a Stripe account or want to create a new one, you'll need to answer some initial questions about your bank and business to create the account.
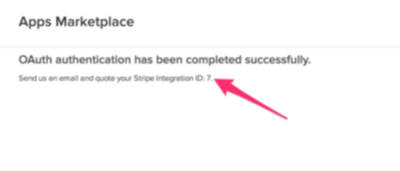
After completing the OAuth flow, you’ll receive a Stripe Integration ID. Keep a copy of the ID handy because you’ll need to submit it as part of the app submission process.

Your new Stripe account is now connected to the Zendesk Stripe application.
Set up an app payment plan
Each app you sell needs to be set up as a product in Stripe with one or more prices. You can choose from three payment types:
- One-time payment
- Per account/per month payments
- Per agent/per month payments
If you want to sell your app based on a monthly subscription, you need to set up a product as described below. You don’t need to set up a product or price for one-time payments. However, you do need to send us the amount you want to charge for your app. This information is captured when you submit the app for approval.
To set up a plan for monthly payments:
- Sign in to your Stripe dashboard.
- Click More in the left nav bar, then click Product catalogue.

- Then click Add product near the upper-right corner.
- Enter your product name and click Next.
- Provide the following information to set up your payment plan:
- If necessary, update the Product tax code to align with the products and services you plan to offer.
- Select Recurring.
- Choose your pricing model: Flat rate
- Price: Plan cost.
- Important: For Currency, select USD - US Dollar.
- Billing period: Select Monthly.
- Price description: A plan name. For example, Time Tracker Plus - Basic tier.
- Unit quantity: Leave as 1.
You may wish to create multiple prices for a product if you want to submit multiple plan options. See Managing multiple plans for more details.
After creating your product and prices, you need to tell us:
- the price unique identifier, so we can associate it with your app's plan.
- if the payment plan is per account or per agent per month.

Set up Stripe to send your customers a purchase receipt
To ensure customers receive an email receipt after purchasing your app or theme:
- Sign in to your Stripe dashboard.
- Click Business Settings > Customer emails.

- Select the two Email Customers check boxes, and then click Done. Note: If you use your own invoicing/receipting system, make sure you uncheck these options to ensure customers do not receive two receipts.
Customize your receipt
You can easily customize the email receipt sent to your customers.
- Sign in to your Stripe dashboard.
- Click Business Settings.

- In the Public information section, ensure your business information is correct.
- Click Business Settings > Customer emails.
- Customize your design and click Save design.

Set up Stripe Tax reporting
To ensure tax compliance across regions and provide a scalable solution that supports all customers and partners globally, Zendesk Marketplace uses Stripe tax calculation and collection capabilities. This enhances partner trust and simplifies the tax collection process for everyone involved.
-
Sign in to your Stripe dashboard.
-
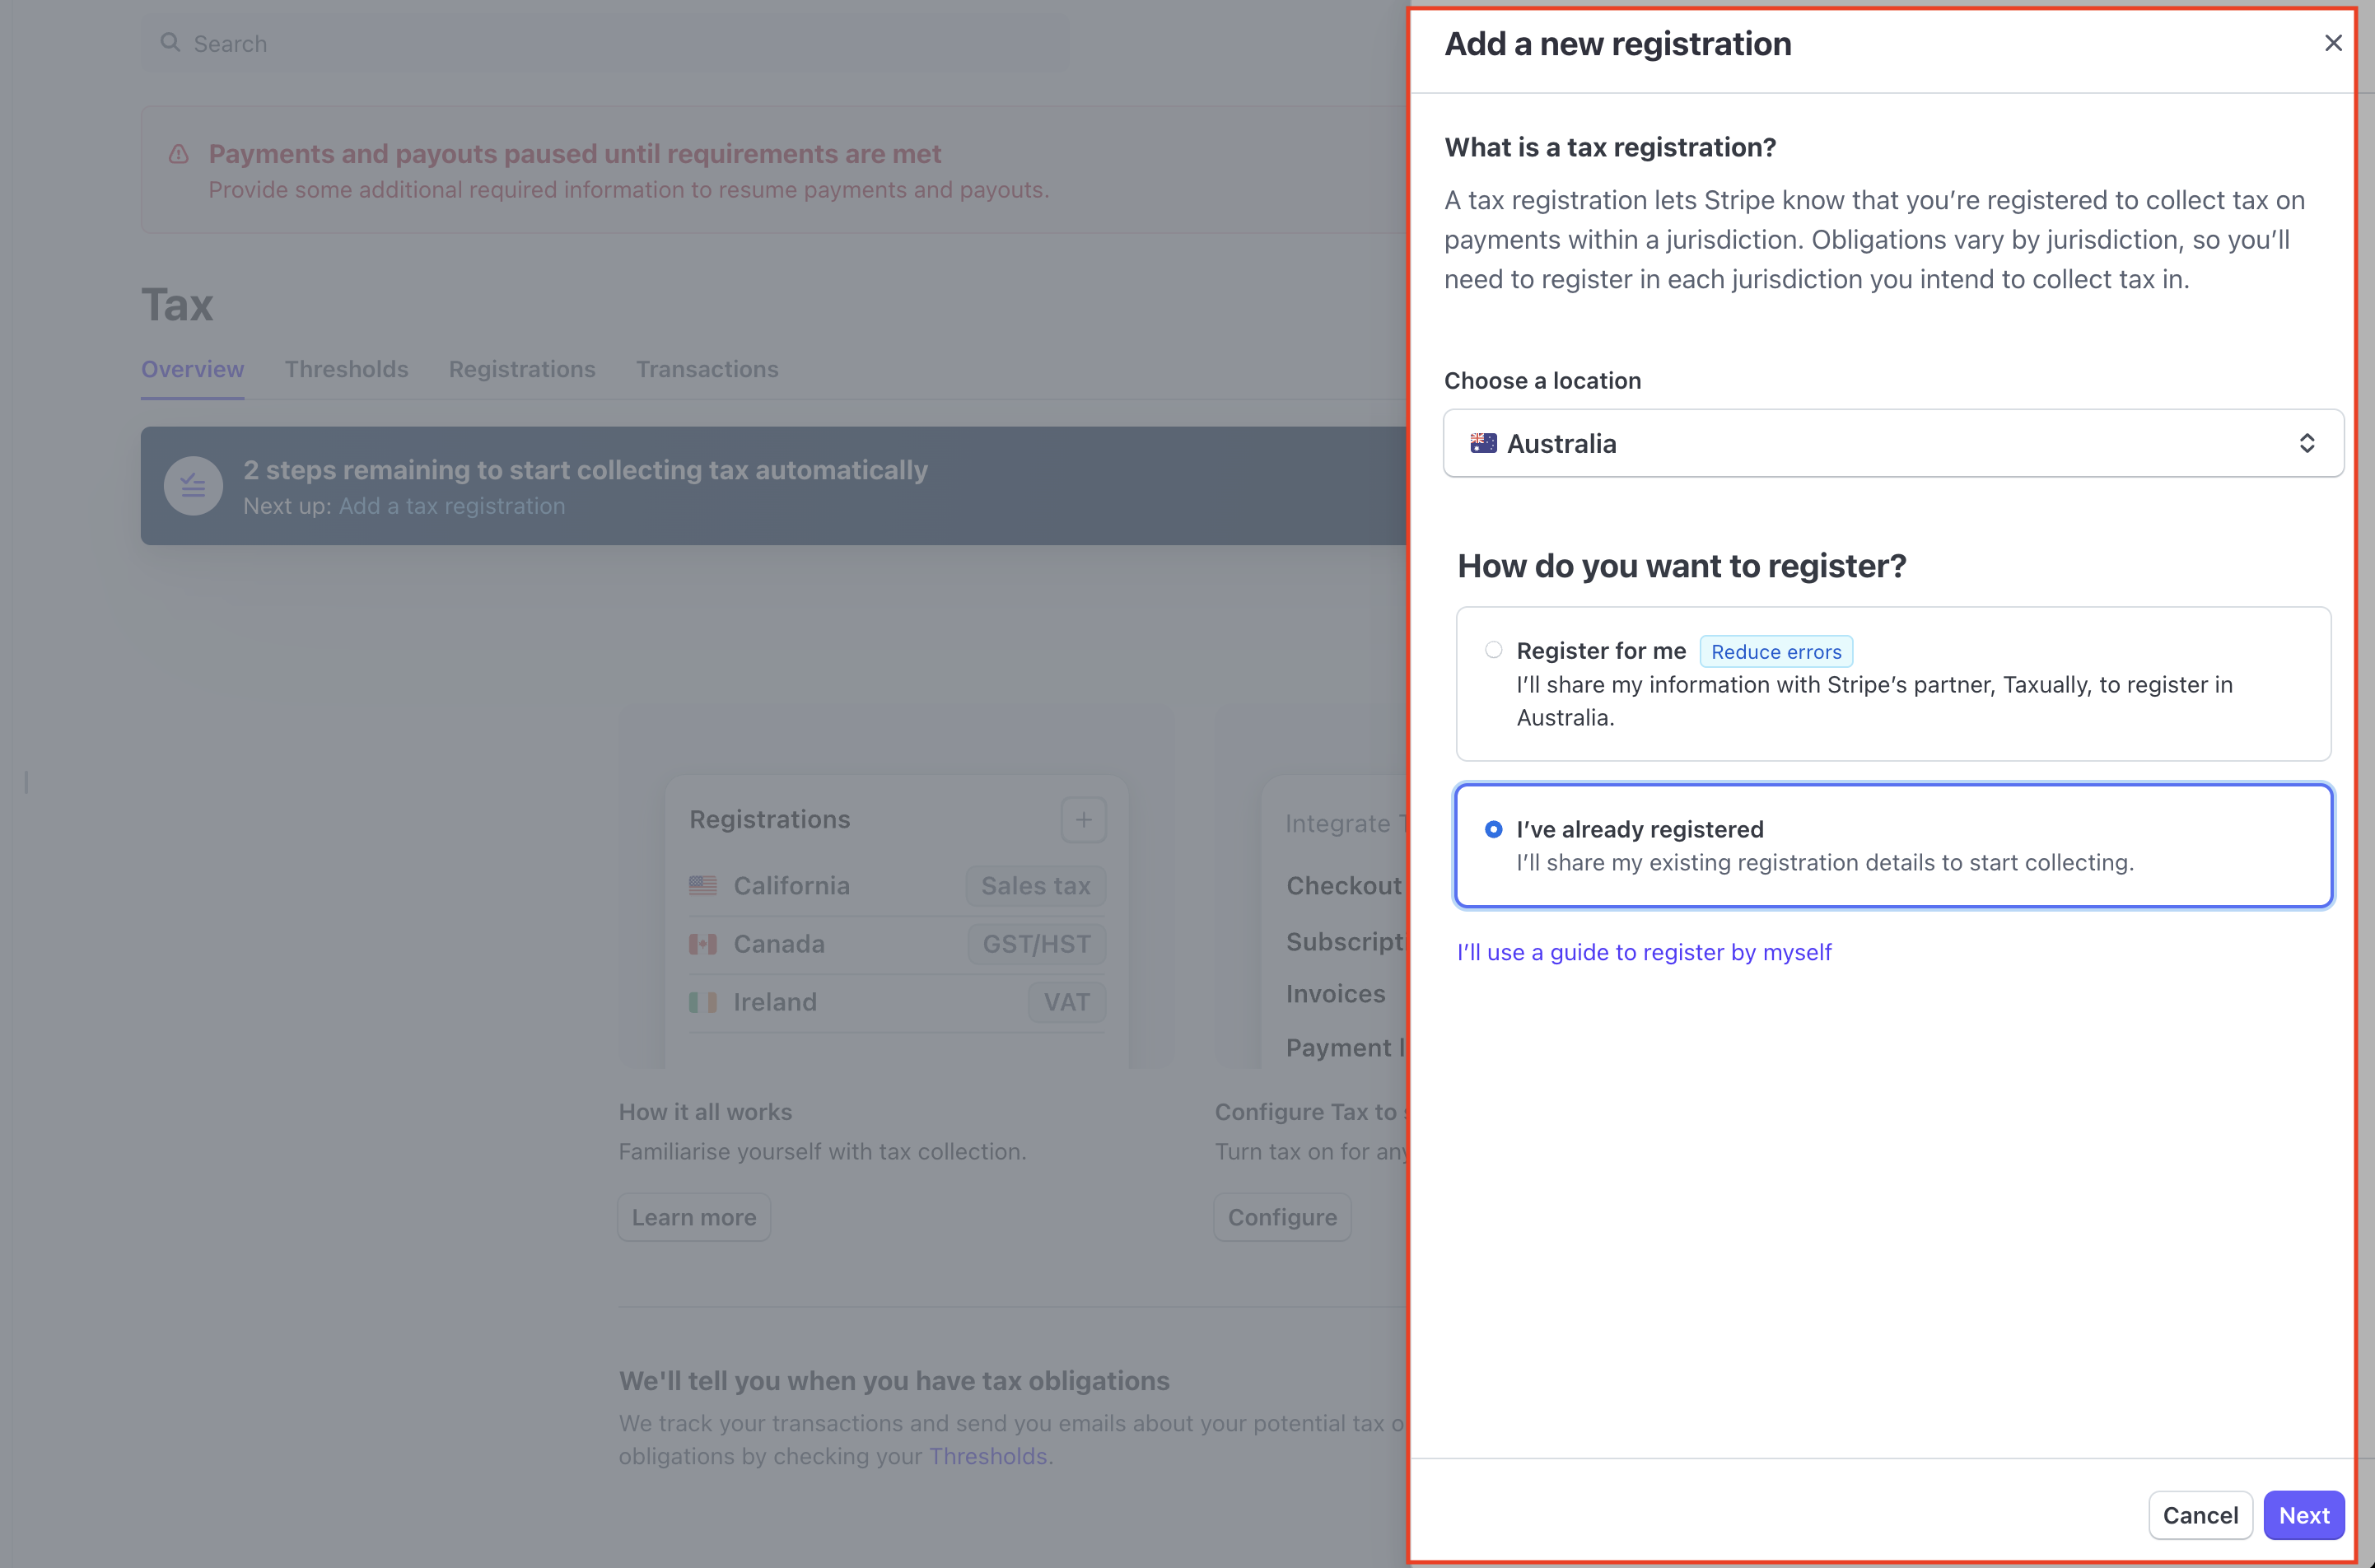
Click Tax > Add registration.
-
Select the country where you are registered for tax collection.

-
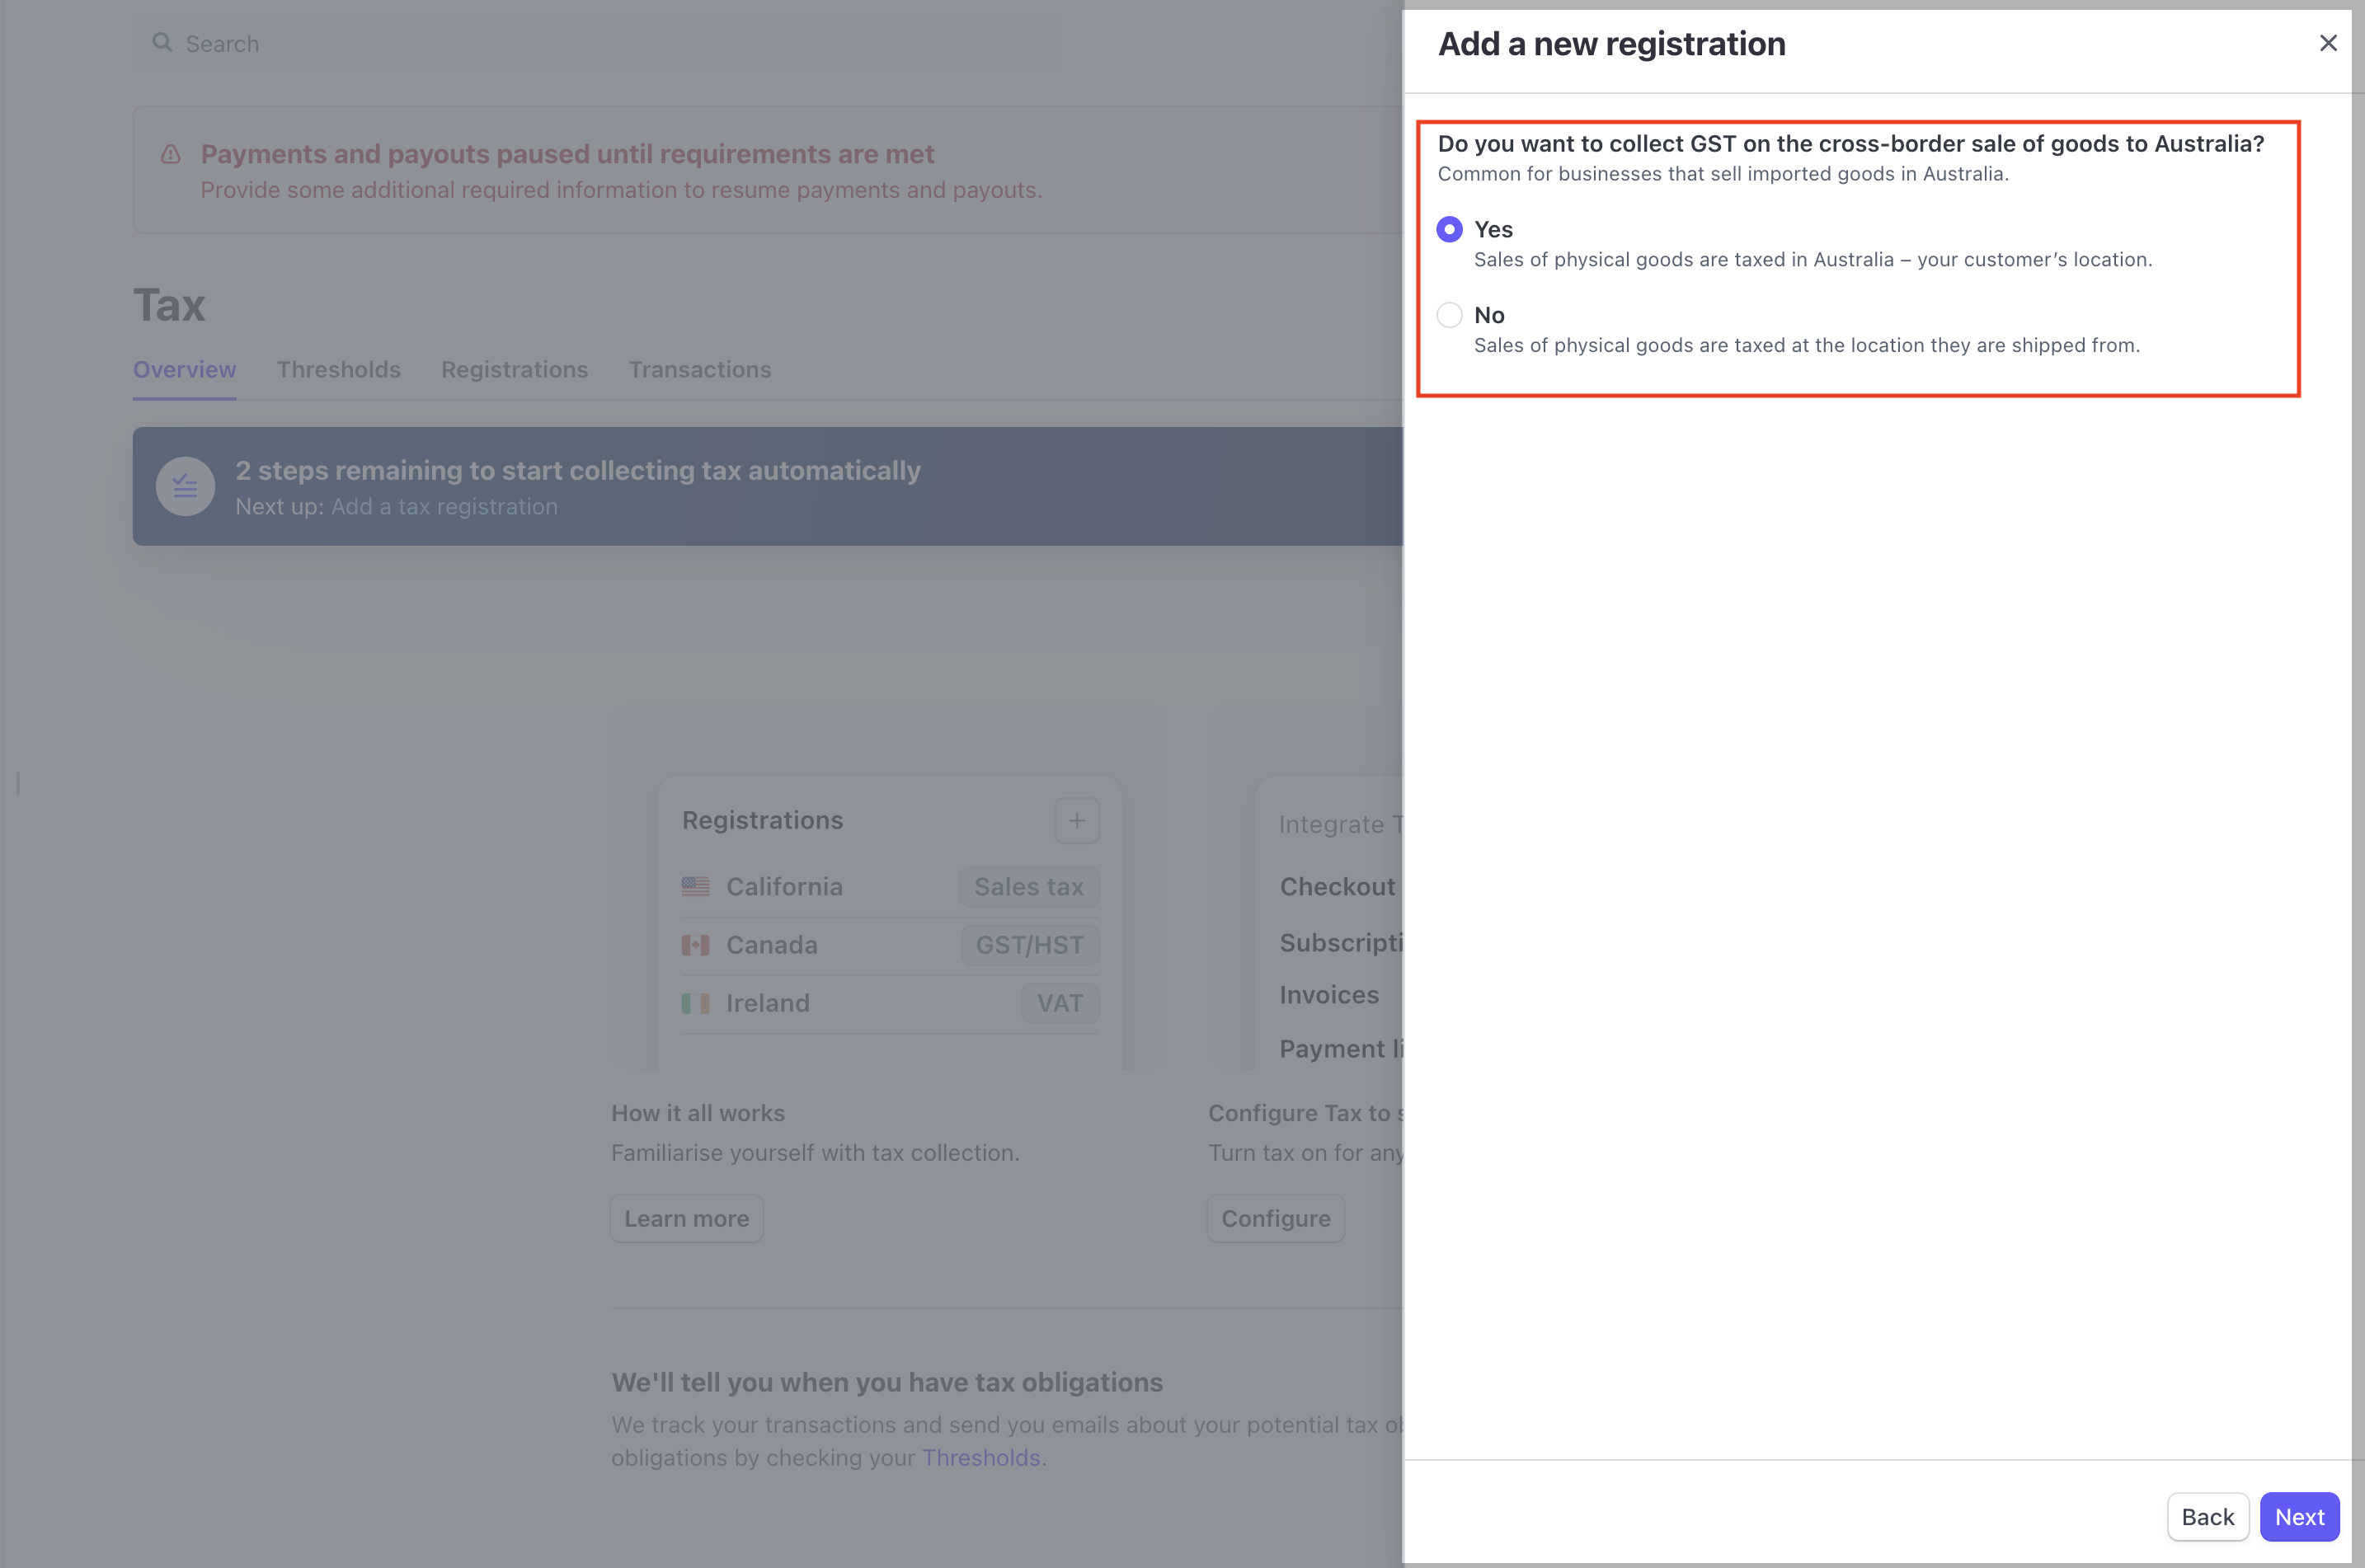
Select the option that matches your country’s tax regulations and follow the on-screen instructions to provide any additional information required, as requirements may vary by country.

-
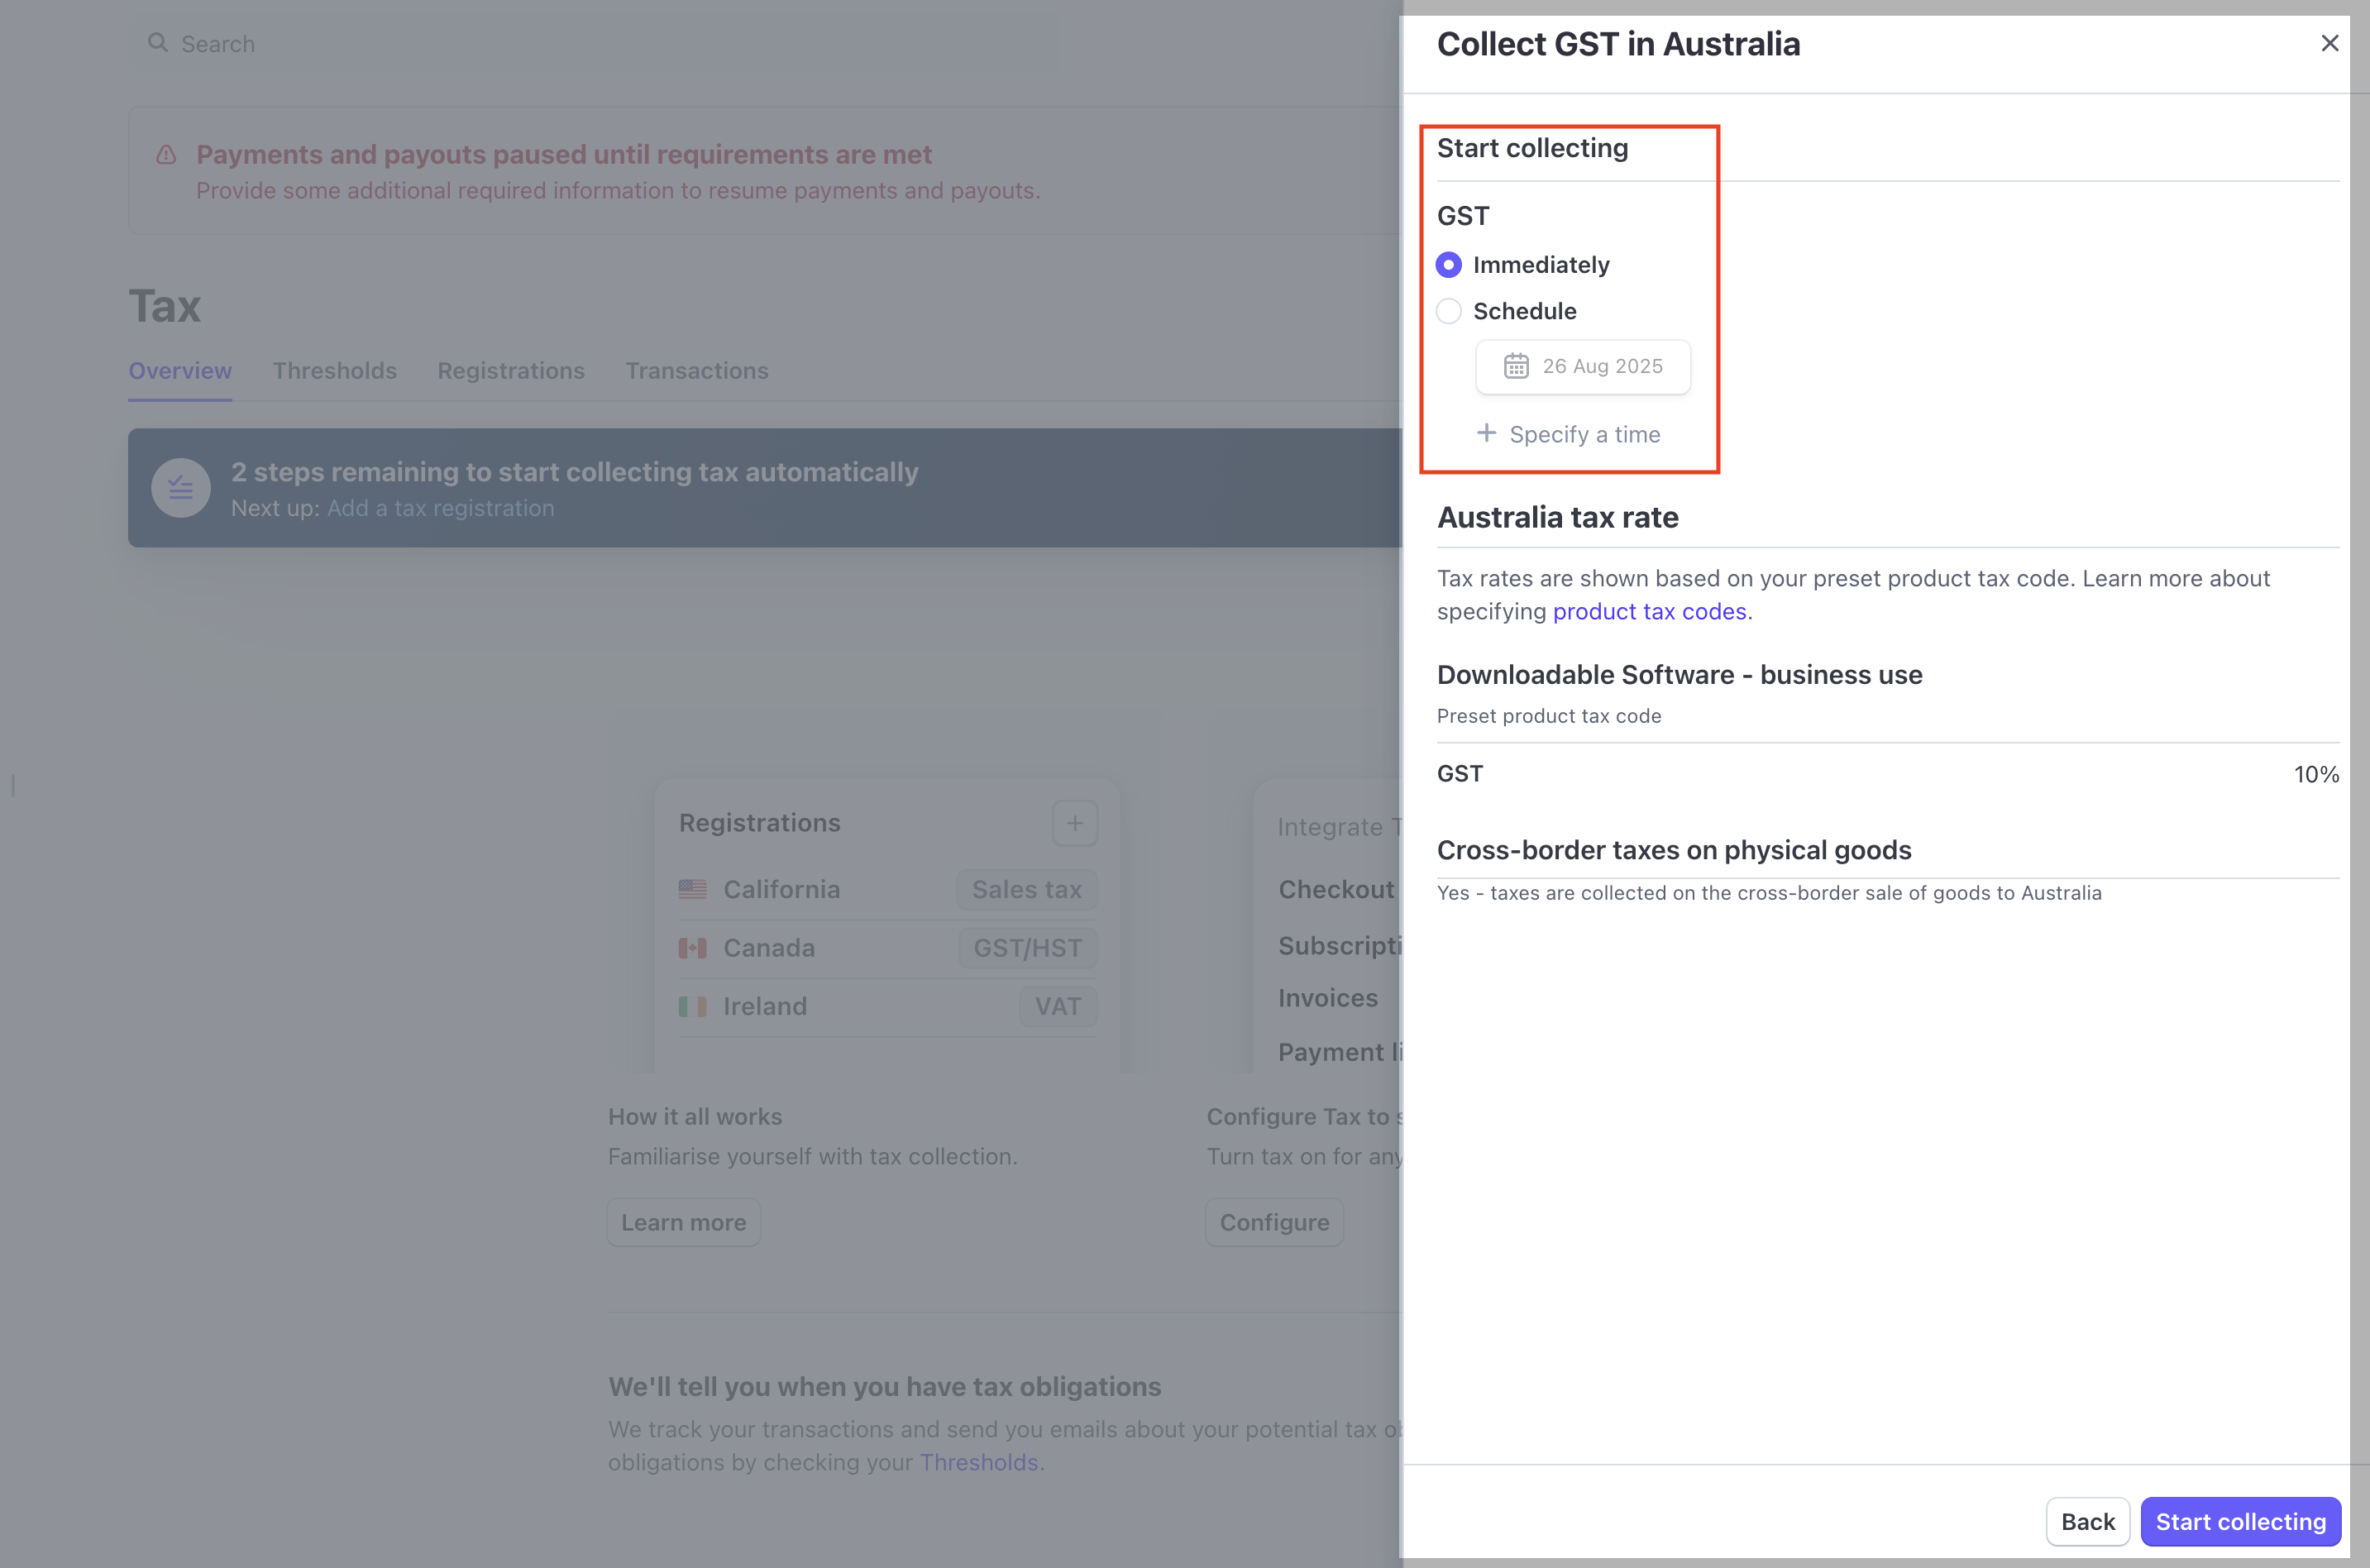
Select the appropriate option, then click Start collecting.

Ensure your customer's app subscriptions aren't canceled
Ideally, a customer's app subscription should never be canceled due to lack of payment. Stripe's default action after a period of non-payment is to cancel the subscription. Doing this means that the customer cannot update their payment details on the App Manage page of their Zendesk account without creating a whole new subscription in Stripe. This means that any coupon codes the customer has used will not be applied to the new subscription.
To ensure subscriptions are never canceled, please update your subscription settings:
- Sign in to your Stripe dashboard.
- Click Billing > Settings.
- In the Invoices charged automatically > Custom dunning rules section, ensure the drop-down option for Then finally is set to mark the subscription as unpaid, and click Save.

If a customer has an unpaid invoice, Zendesk disables their app until they update their credit card and the invoice is successfully paid.
Set up Stripe to support Strong Customer Authentication
Beginning in September 2019, many European customers must provide Strong Customer Authentication for their recurring app subscription payments. Please configure Stripe as follows to prompt for this extra step using email when necessary.
-
Sign in to your Stripe dashboard.
-
Click Settings > Billing > Automatic collection.
-
In the Manage payments that require 3D Secure section, ensure the toggle for Send a Stripe-hosted link for cardholders to authenticate when required is set to active, and click Save.

Frequently Asked Questions
- Can I provide a trial period to customers?
- Can I remove the option for a free trial if I no longer want to offer one?
- Does a customer still need to provide a credit card for an app or theme with a trial period?
- Can I create coupons for one-time app or theme purchases?
- How do I provide discounts to my customers?
- How do I process a refund for a customer?
- How do I know if a customer has uninstalled our app before refunding them?
- What happens if a customer doesn’t pay their monthly bill or their credit card is not charged successfully?
- How/when do I collect my payment from Stripe?
- Does Zendesk pass the customer's Zendesk domain to Stripe?
- Is a customer billed if they have an issue with installing a paid app?
- What if my app requires a subscription to my product or additional fees?
- How to access a Stripe Tax report?
- Where can Stripe Tax transactions be found?
Can I provide a trial period to customers?
Yes, you can create a trial period (between 1 and 90 days) when submitting or updating your app in the Marketplace Portal. The trial period is shown to customers in the Zendesk Marketplace. The customer can also see the remaining time on their trial by visiting their App Management page for apps.
Can I remove the option for a free trial if I no longer want to offer one?
Yes, go to the Marketplace Portal, click Submit update on the app you wish to remove the trial for, enter 0 in the Free Trial duration field.
Does a customer still need to provide a credit card for an app or theme with a trial period?
Yes, a customer still needs to enter their credit card details when installing an app or theme with a free trial. Once the trial period is over, the customer is automatically billed.
Can I create coupons for one-time app or theme purchases?
No, currently coupons are only available for subscription-based plans for apps (per account/per month or per agent/per month).
How do I provide discounts to my customers?
You can create coupon codes within your Stripe dashboard and then provide them to your customers, who can redeem them in our Marketplace.
To create a coupon in your Stripe account:
-
Sign in to the Stripe dashboard.
-
Click Billing > Coupons in the left hand menu.
-
Click + New.


-
Choose whether your coupon will apply a Percent off or an Amount discount.
-
Ensure the currency is USD - US Dollar
-
Specify the Duration of your coupon:
- once
- over a period of months
- every month for the period of the subscription
-
Give your coupon an ID. This is the code that you provide to your customers.
-
Specify the Max redemptions (optional, default is once).
-
Specify a Redeem by date if you would like the coupon to expire (optional, default is no expiry).
-
Click Create coupon to set up your coupon.
How do I process a refund for a customer?
You can process a refund in Stripe.
-
Sign in to the Stripe dashboard.
-
Search for the email address of the customer. This will show you a list of all payments made by the customer.

-
In the Payments section, find the payment you want to refund and click the Payment ID.
-
On the payment page, click the Refund button.

-
Confirm that you want to give a refund and give a reason for the refund.

After the refund is processed, the Refund button is no longer displayed. The status of the payment will also change to Refunded.

How do I know if a customer has uninstalled our app before refunding them?
Before processing a refund, check that the customer has uninstalled the app they're being refunded for. This is easy when the app is sold on a recurring basis (per account per month, per agent per month).
- Sign in to the Stripe dashboard.
- Search for the email address of the customer and click into their customer account page.
- In the Subscriptions section, you should no longer see the subscription listed. This indicates that the customer has uninstalled the app.
What happens if a customer doesn’t pay their monthly bill or their credit card is not charged successfully?
If a customer's subscription goes into arrears, Stripe takes care of the dunning process based on the settings you configured in the Billing > Settings page. If the Subscription is marked as unpaid or you manually cancel the subscription, the app is locked/disabled in the customer's Zendesk account. The Manage Apps page in Zendesk informs admins that the app has been disabled due to payment problems. To re-enable their app, the customer needs to provide a valid credit card.
How/when do I collect my payment from Stripe?
Stripe transfers funds to your bank account based on the schedule listed in your dashboard.
For example:
- “Daily — 7 day rolling basis” means that charges processed on March 1st will be grouped together and deposited in your account on March 8th.
- “Weekly (Monday) — 2 business day rolling basis” means that charges processed before a given Thursday are grouped together and deposited in your account on the following Monday.
Your transfer schedule can be configured to simplify your accounting.

Stripe currently offers the option for funds to be transferred daily, weekly (on a given day), or monthly (on a given day of the month).
You can see all attempted transfers Stripe makes to your bank account via your Stripe dashboard.
Does Zendesk pass the customer's Zendesk domain to Stripe?
Yes, the customer's Zendesk domain is passed as metadata during checkout. The domain is displayed in the customer record in the Stripe dashboard.

Is a customer billed if they have an issue with installing a paid app?
No, a customer will not be billed. If your customer experiences installation issues, please contact Zendesk Customer Support.
What if my app requires a subscription to my product or additional fees?
If your app requires a subscription or other purchase outside of Zendesk, you'll need to provide a URL that contains related pricing details when you submit the app. Refer to Submitting Marketplace apps.
How to access a Stripe Tax report?
You can view tax reports categorized by jurisdiction and tax type in your Stripe Dashboard by navigating to Tax > Reports. These reports are useful for managing tax filing and ensuring compliance. For more details, see Stripe Tax Reports.
Where can Stripe Tax transactions be found?
To review tax-related transaction details in the Stripe Dashboard:
- Sign in to your Stripe account.
- Click Tax > Transactions.
There you can find all tax assessments and transaction records generated by Stripe Tax, including those for recurring and one-time payments.
Next steps: Register your organization