Ticketing API quick start
In this 10-minute quick start, you'll use the Zendesk Ticketing API to create a few tickets in Zendesk Support.
The tutorial is intended for admins and agents with no developer experience. To make the API requests, the tutorial uses your web browser's built-in JavaScript console.
If you're a more experienced developer, check out the API reference. The reference includes curl examples for each endpoint. The API reference also includes links to related Postman collections. See Exploring Zendesk APIs with Postman.
What you'll need
To complete this tutorial, you'll need the following:
-
A Zendesk Support account with agent or admin access. To get a free account for testing, see Getting a trial or sponsored account for development.
-
API password access is enabled for the account. See Managing password access to the API in Zendesk help.
-
A web browser, such as Chrome, Firefox, Safari, or Microsoft Edge. These browsers include a built-in JavaScript console.
Creating tickets
To create a ticket, use the JavaScript console to make an HTTP POST request to the Ticketing API's Create Ticket endpoint.
-
Sign in to your Zendesk account as an admin or agent. From the Zendesk Agent Workspace, open your browser's JavaScript console:
- Chrome: View > Developer > JavaScript Console
- Firefox: Tools > Browser Tools > Web Developer Tools. Then click the Console tab.
- Safari: Develop > Show JavaScript Console
- Microsoft Edge: Tools > Developer > JavaScript Console
-
Paste the following script into your browser's console.
for (let i = 1; i < 4; i++) {const subject = `Test ticket ${i}`const body = `This is test ticket ${i}`$.ajax({url: "/api/v2/tickets.json",contentType: "application/json",type: "POST",data: JSON.stringify({ticket: { subject: subject, comment: { body: body } }})}).done(data => {console.log(data.ticket)})}Here's what the code looks like after pasting it into Google Chrome's JavaScript console:
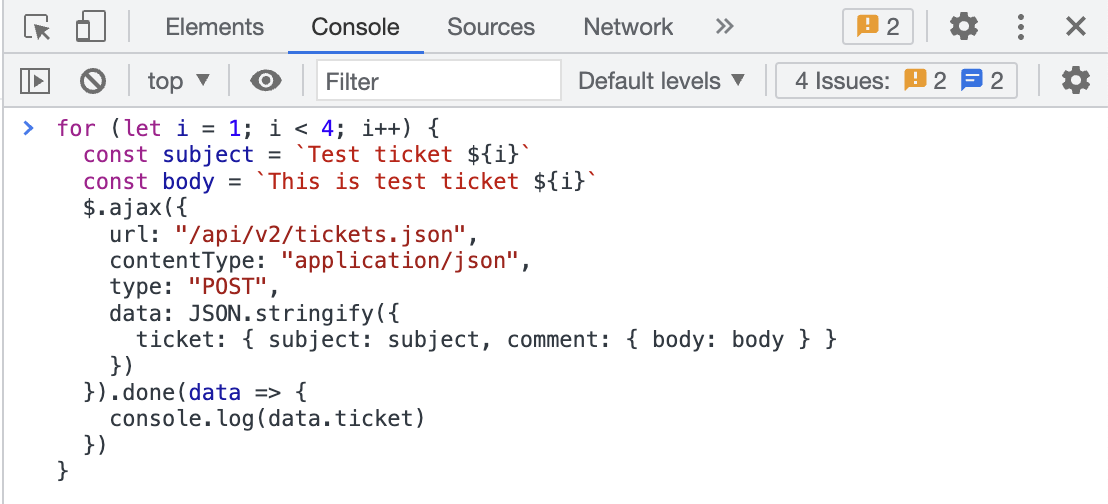
The code snippet creates a loop that makes three requests to the Create Ticket endpoint. Each request creates a ticket in Zendesk Support.
-
Press Enter.
If successful, the console lists the tickets as JavaScript objects.

You can expand each object to see the ticket's properties.

-
To view the tickets in the Agent Workspace, reload the browser tab. Then click Views > Recently updated tickets.

When you're done trying out the API, delete the test tickets by selecting them in the list and clicking Delete.
Troubleshooting tips
If the script returned an error, try the following troubleshooting tips:
-
If you get a 404 (Not Found) response, sign in to your Zendesk account before running the script.
-
If you get a
TypeError: $.ajax not a functionerror, ensure you run the script from the Agent Workspace in Zendesk Support. -
If you get a JavaScript error indicating that
$.ajaxis not defined, ensure you don't have any browser settings or plugins that block scripts from loading.
Next steps
The best way to learn how to use the Zendesk APIs is to try different requests on your own. You can use any of the following resources along the way:
-
To see what's possible using Zendesk APIs, check out the API reference.
-
Use Postman to explore the Zendesk APIs. Postman is a popular application for testing APIs and making API requests. See Exploring Zendesk APIs with Postman.
-
Install curl to run example requests from the API reference documentation. curl is a command-line tool for making HTTP requests without a web browser. See Installing and using curl.
-
Speed up development with an API client. An API client takes care of a lot of the low-level details of making requests and handling responses and lets you focus on the logic of your application.
-
Learn about the most common tasks developers perform with the Ticketing API.
-
Ask questions or look for answers in the Zendesk APIs community.