Using ZIS Links
In this tutorial, you'll create an integration that uses ZIS links. A ZIS link stores a relationship between two data objects. For this tutorial, you'll link Zendesk ticket ids to Slack message ids.
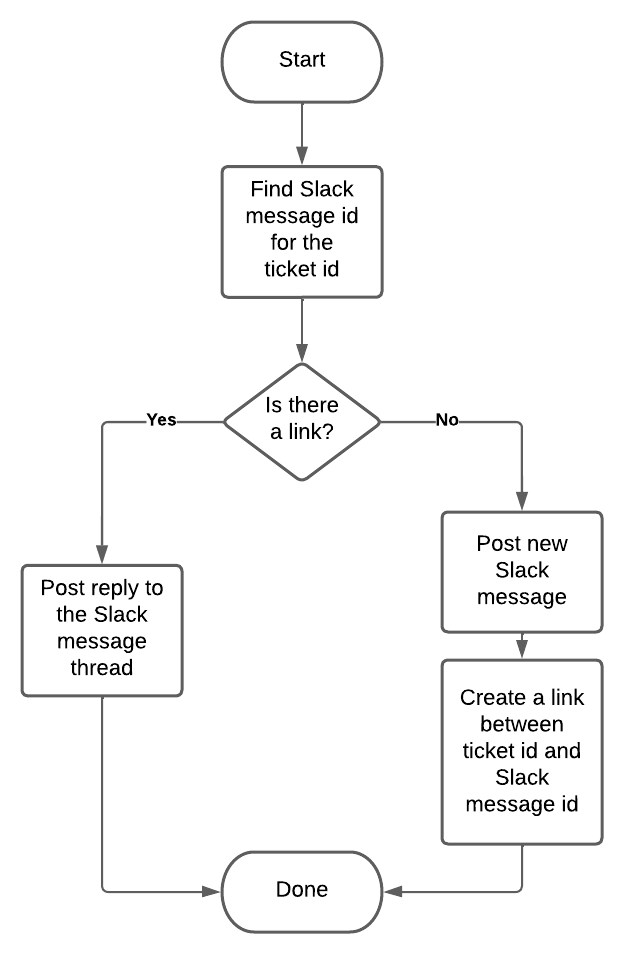
The integration you create listens for Ticket Created and Ticket Comment Created events in Zendesk. When the integration detects one of these events, it runs a ZIS flow. The flow checks for any existing ZIS links between the event's ticket id and a Slack message id. If a link exists, the flow posts a reply to the existing Slack message thread for the ticket. If no link exists, the flow posts a new Slack message for the ticket. The flow then creates a ZIS link between the ticket id and the Slack message id.
What you'll need
To complete this tutorial, you'll need the following:
-
Familiarity with ZIS. Before you start, complete the Building your first ZIS integration tutorial.
-
A registered ZIS integration. You can use the same integration you created in Building your first ZIS integration or register a new one. To register a new integration, see Registering the integration name.
-
A ZIS OAuth token for the integration. See Obtaining a ZIS OAuth token.
-
A Slack workspace. If you need a workspace, see Create a Slack workspace in the Slack documentation.
Setting up the Slack app
The integration's ZIS flow uses the Slack API to post messages and replies. To use the API, you first need to create a Slack app. The app includes an OAuth client. For this tutorial, you'll create a Slack app named Zendesk Ticket Bot.
To create the Slack app, complete the steps in the following sections:
Then return here.
Adding the Slack app to the channel
Next, invite the Slack app to a channel in your Slack workspace. This lets your integration post messages to the channel.
-
In Slack, open your workspace.
-
Go to a Slack channel where you'd like to receive messages from the integration. In the channel, enter the following in the message field:
/invite @Zendesk Ticket Bot -
Press Enter.
Depending on your Slack settings, the channel may display a success message.

Creating an OAuth connection for Slack
Create an OAuth connection named "slack". The integration's ZIS flow uses this connection to authenticate Slack API requests.
In a typical setup, an admin uses a private Zendesk app to create an OAuth connection. For this tutorial, you'll create the connection without a Zendesk app.
-
Register the Slack OAuth client in ZIS. Name the client "slack". To register the client, follow the steps in Registering an OAuth client, starting at step 2. Use the example request for Slack.
-
Create an OAuth connection for Slack. Name the connection "slack". To create the connection, follow the steps under Starting an authorization code flow in the OAuth connections documentation. Then return here.
Creating the integration
Next, create the ZIS integration.
-
Create a JSON file named my_zis_bundle.json.
-
Add the following bundle skeleton to my_zis_bundle.json:
{"name": "Example integration with ZIS links","description": "Post Slack message when ticket is updated","zis_template_version": "2019-10-14","resources": {"PostToSlack": {"_placeholder_": "ZIS custom action definition goes here"},"TicketUpdateFlow": {"_placeholder_": "ZIS flow goes here"},"TicketCreatedJobSpec": {"_placeholder_": "ZIS job spec goes here"},"CommentAddedJobSpec": {"_placeholder_": "ZIS job spec goes here"}}}You'll define the custom action, ZIS flow, and job specs in the next steps.
-
In my_zis_bundle.json, replace the
PostToSlackplaceholder with the following custom action definition. In the definition, replace "SLACK_CHANNEL" with the Slack channel you selected in Adding the Slack app to the channel."PostToSlack": {"type": "ZIS::Action::Http","properties": {"name": "PostToSlack","definition": {"method": "POST","url": "https://slack.com/api/chat.postMessage","connectionName": "slack","headers": [{"key": "Content-Type","value": "application/json"}],"requestBody": {"channel": "SLACK_CHANNEL","text.$": "$.text","thread_ts.$": "$.thread_ts"}}}},When called, the custom action sends a POST request to the Slack API's chat.postMessage endpoint. The request body contains a Slack channel, message text, and message id.
-
Replace the
TicketUpdateFlowplaceholder with the following ZIS flow definition. In the definition, replace "INTEGRATION" with your integration key.The flow contains two Action states that call built-in ZIS link actions. These action states are highlighted.
"TicketUpdateFlow": {"type": "ZIS::Flow","properties": {"name": "TicketUpdateFlow","definition": {"StartAt": "GetLinkedMessage","States": {"GetLinkedMessage": {"Type": "Action","ActionName": "zis:common:action:LoadLinks","Parameters": {"link_type": "ticket_to_message","left_object_name.$": "ticket_id:{{$.input.ticket_event.ticket.id}}"},"ResultPath": "$.get_linked_message_response","Next": "CheckLink"},"CheckLink": {"Type": "Choice","Choices": [{"Variable": "$.get_linked_message_response.count","NumericEquals": 0,"Next": "SendMessageOnTicketCreate"},{"Variable": "$.get_linked_message_response.count","NumericEquals": 1,"Next": "ExtractThreadId"}]},"SendMessageOnTicketCreate": {"Type": "Action","ActionName": "zis:INTEGRATION:action:PostToSlack","Parameters": {"text.$": ":rotating_light: Ticket <https://{{$.subdomain}}.zendesk.com/agent/tickets/{{$.input.ticket_event.ticket.id}}| #{{$.input.ticket_event.ticket.id}}> was created!","thread_ts": 0},"ResultPath": "$.send_message_response","Next": "CreateLink"},"ExtractThreadId": {"Type": "Action","ActionName": "zis:common:transform:Jq","Parameters": {"expr": ".right_object.name | split(\":\")[1]","data.$": "$.get_linked_message_response.links[0]"},"ResultPath": "$.thread_id","Next": "ThreadMessageOnTicketUpdate"},"ThreadMessageOnTicketUpdate": {"Type": "Action","ActionName": "zis:INTEGRATION:action:PostToSlack","Parameters": {"text.$": "$.input.ticket_event.comment.body","thread_ts.$": "$.thread_id"},"Next": "Done"},"CreateLink": {"Type": "Action","ActionName": "zis:common:action:CreateLink","Parameters": {"link_type": "ticket_to_message","left_object": {"name.$": "ticket_id:{{$.input.ticket_event.ticket.id}}"},"right_object": {"name.$": "thread_ts:{{$.send_message_response.message.ts}}"}},"Next": "Done"},"Done": {"Type": "Succeed"}}}}},The flow's
GetLinkedMessageAction state calls the built-in LoadLinks action. The state loads any existing ZIS links between the event's ticket id and Slack message ids. Later states can access the action's response at the "$.get_linked_message_response" path.The
CreateLinkAction state calls the built-in CreateLink action. The state creates a ZIS link between the event's ticket id and its related Slack message id. The ZIS flow only runs this state if the event's ticket id isn't already linked to a Slack message id. -
Replace the
TicketCreatedJobSpecplaceholder with the following job spec definition. In the definition, replace "INTEGRATION" with your integration key."TicketCreatedJobSpec": {"type": "ZIS::JobSpec","properties": {"name": "TicketCreatedJobSpec","event_source": "support","event_type": "ticket.TicketCreated","flow_name": "zis:INTEGRATION:flow:TicketUpdateFlow"}},The job spec tells ZIS to run the ZIS flow when it detects a Ticket Created event.
-
Replace the
TicketCreatedJobSpecplaceholder with the following job spec definition. In the definition, replace "INTEGRATION" with your integration key."CommentAddedJobSpec": {"type": "ZIS::JobSpec","properties": {"name": "CommentAddedJobSpec","event_source": "support","event_type": "ticket.CommentAdded","flow_name": "zis:INTEGRATION:flow:TicketUpdateFlow"}}The job spec tells ZIS to run the ZIS flow when it detects a Comment Created event.
-
Save my_zis_bundle.json. The file should now look like this:
{"name": "Example integration with ZIS links","description": "Post Slack message when ticket is updated","zis_template_version": "2019-10-14","resources": {"PostToSlack": {"type": "ZIS::Action::Http","properties": {"name": "PostToSlack","definition": {"method": "POST","url": "https://slack.com/api/chat.postMessage","connectionName": "slack","headers": [{"key": "Content-Type","value": "application/json"}],"requestBody": {"channel": "SLACK_CHANNEL","text.$": "$.text","thread_ts.$": "$.thread_ts"}}}},"TicketUpdateFlow": {"type": "ZIS::Flow","properties": {"name": "TicketUpdateFlow","definition": {"StartAt": "GetLinkedMessage","States": {"GetLinkedMessage": {"Type": "Action","ActionName": "zis:common:action:LoadLinks","Parameters": {"link_type": "ticket_to_message","left_object_name.$": "ticket_id:{{$.input.ticket_event.ticket.id}}"},"ResultPath": "$.get_linked_message_response","Next": "CheckLink"},"CheckLink": {"Type": "Choice","Choices": [{"Variable": "$.get_linked_message_response.count","NumericEquals": 0,"Next": "SendMessageOnTicketCreate"},{"Variable": "$.get_linked_message_response.count","NumericEquals": 1,"Next": "ExtractThreadId"}]},"SendMessageOnTicketCreate": {"Type": "Action","ActionName": "zis:INTEGRATION:action:PostToSlack","Parameters": {"text.$": ":rotating_light: Ticket <https://{{$.subdomain}}.zendesk.com/agent/tickets/{{$.input.ticket_event.ticket.id}}| #{{$.input.ticket_event.ticket.id}}> was created!","thread_ts": 0},"ResultPath": "$.send_message_response","Next": "CreateLink"},"ExtractThreadId": {"Type": "Action","ActionName": "zis:common:transform:Jq","Parameters": {"expr": ".right_object.name | split(\":\")[1]","data.$": "$.get_linked_message_response.links[0]"},"ResultPath": "$.thread_id","Next": "ThreadMessageOnTicketUpdate"},"ThreadMessageOnTicketUpdate": {"Type": "Action","ActionName": "zis:INTEGRATION:action:PostToSlack","Parameters": {"text.$": "$.input.ticket_event.comment.body","thread_ts.$": "$.thread_id"},"Next": "Done"},"CreateLink": {"Type": "Action","ActionName": "zis:common:action:CreateLink","Parameters": {"link_type": "ticket_to_message","left_object": {"name.$": "ticket_id:{{$.input.ticket_event.ticket.id}}"},"right_object": {"name.$": "thread_ts:{{$.send_message_response.message.ts}}"}},"Next": "Done"},"Done": {"Type": "Succeed"}}}}},"TicketCreatedJobSpec": {"type": "ZIS::JobSpec","properties": {"name": "TicketCreatedJobSpec","event_source": "support","event_type": "ticket.TicketCreated","flow_name": "zis:INTEGRATION:flow:TicketUpdateFlow"}},"CommentAddedJobSpec": {"type": "ZIS::JobSpec","properties": {"name": "CommentAddedJobSpec","event_source": "support","event_type": "ticket.CommentAdded","flow_name": "zis:INTEGRATION:flow:TicketUpdateFlow"}}}} -
Upload the bundle to ZIS.
curl -X POST https://{subdomain}.zendesk.com/api/services/zis/registry/{integration}/bundles \-u {email}/token:{api_token} \-H "Content-Type: application/json" \-d @my_zis_bundle.json -
Install the
TicketCreatedJobSpecjob spec.curl -X POST "https://{subdomain}.zendesk.com/api/services/zis/registry/job_specs/install?job_spec_name=zis:{integration}:job_spec:TicketCreatedJobSpec" \-u {email}/token:{api_token} -
Install the
CommentAddedJobSpecjob spec.curl -X POST "https://{subdomain}.zendesk.com/api/services/zis/registry/job_specs/install?job_spec_name=zis:{integration}:job_spec:CommentAddedJobSpec" \-u {email}/token:{api_token}The integration is now enabled.
Testing the integration
To test the integration, create a new ticket in Zendesk Support. Verify the integration posts a new Slack message for the ticket. Then update the ticket with a new comment. Verify the integration posts a reply to the existing message thread.
-
Use the following request to create a Zendesk Support ticket.
curl -X POST https://{subdomain}.zendesk.com/api/v2/tickets.json \-u {email}/token:{api_token} \-H "Content-Type: application/json" \-d '{"ticket": {"subject": "My printer is on fire!","status": "solved","comment": {"body": "The smoke is very colorful."}}}'Save the
ticket.idvalue from the response. You'll use the ticket id in the next steps. -
Check your Slack channel. The channel should contain a message for the ticket you created. The message should contain a thread for the ticket's comment.

-
Use the following request to update the ticket with a comment. Replace "{ticket_id}" with the id you saved in step 1.
curl -X PUT https://{subdomain}.zendesk.com/api/v2/tickets/{ticket_id}.json \-u {email}/token:{api_token} \-H "Content-Type: application/json" \-d '{"ticket": {"status": "solved","comment": {"body": "The printer is no longer on fire. Thanks!","public": true}}}' -
Check the Slack message from step 2. The message thread should now contain a reply with the comment from step 3.

Congratulations! You've created an integration that uses ZIS links. For another example of a ZIS integration, see the Zendesk app as an admin interface tutorial series.