Building your first ZIS integration
This tutorial shows you how to build a simple ZIS integration from scratch. The integration will listen for Ticket Created events in Zendesk. When it detects the event, the integration will post the ticket's id, status, and priority to an external target representing an external application.
The tutorial consists of the following parts:
- What you need
- Registering the integration name
- Building the integration
- Deploying and testing the integration
Disclaimer: Zendesk provides this article for instructional purposes only. The integration and examples are not meant for production environments. Zendesk also does not provide support for the test integration. Please post any issue in the Zendesk developer community or search for a solution online.
What you need
To build the example integration, you’ll need the following:
- A Zendesk account for testing. ZIS is supported on the Zendesk Suite Growth plan or above, and the Support Professional plan or above. If you don't have a Zendesk account for testing, you can get a free sponsored test account. See Request a sponsored test account. The test account supports ZIS.
- Be an admin on the account or have access to somebody who is an admin. The admin can give you admin access. See Setting roles and access in Zendesk Admin Center.
- An external target representing an external application. You can get a free target from RequestBin. The site lets you create a unique endpoint URL that echoes back any data you send to it.
Registering the integration name
The first step in building an integration is registering the name of the integration with the ZIS Registry Service. This name is also called the integration key.
The name you choose has to be globally unique and can be up to 64 characters long. Integration names support the following characters: lower-case letters (a-z), numbers, hyphens (-), and underscores (_).
To register an integration name, make an API request to the Create Integration endpoint.
To authenticate the request, you can use an API token. If you haven't done so already, check that API access is enabled in Admin Center under Apps and Integrations > APIs > Zendesk APIs. See Managing access to the Zendesk API.
This tutorial gives Postman and curl examples of the same request, but you can use whatever tool you like to make requests.
Using Postman
-
In Postman, select File > New > HTTP Request.
-
In the Postman request editor, enter the Create Integration endpoint:
https://{subdomain}.zendesk.com/api/services/zis/registry/{integration}Replace
{subdomain}with your Zendesk subdomain and{integration}with the name you'd like to register for your integration. Because it must be globally unique, use something specific to you, not "zis_tutorial". -
Select POST as the method on the left side.
-
Click the Body tab below your request path. Make sure the raw and JSON options are selected and paste
{"description": "An example integration"}. -
Click the Authorization tab and select Basic Auth.
-
For Username, enter your Zendesk admin email followed by "/token". Example: [email protected]/token
-
For Password, enter your API token.
-
Click Send.
The request and response should look like this in Postman:
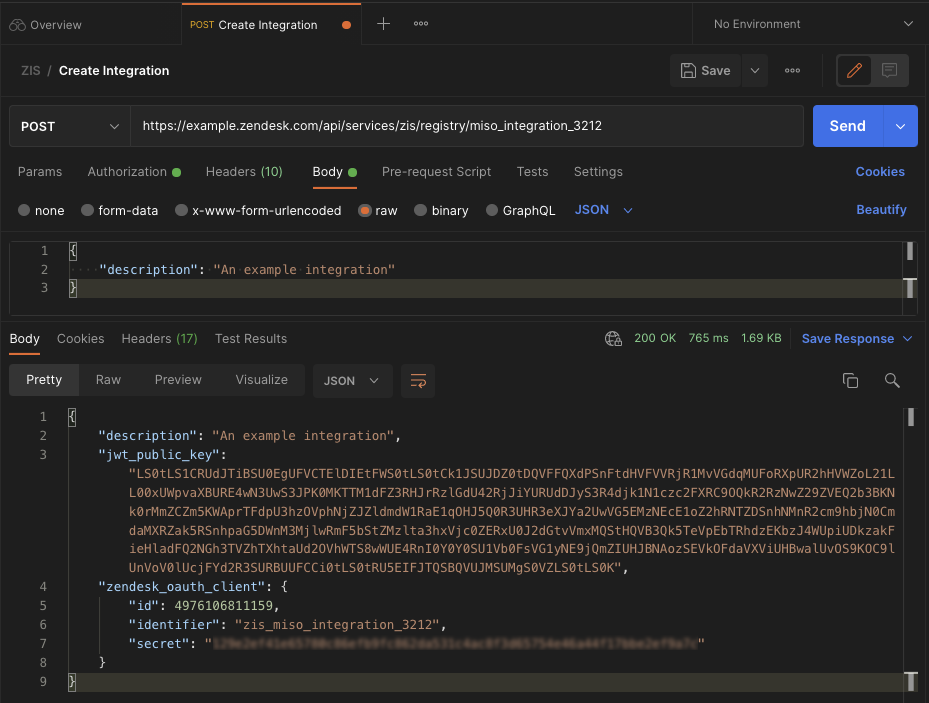
Don't confuse the identifier value in the response with the integration name you just registered (miso_integration_3212 in the example). ZIS adds a zis_ prefix to the identifier value, which is only used to get an OAuth token. Your integration name is the name you gave it in the API request, without the prefix.
Save your registered integration name. In the example, it would be miso_integration_3212, not zis_miso_integration_3212.
Using curl
-
In your command line interface, make the following curl request:
curl https://{subdomain}.zendesk.com/api/services/zis/registry/{integration} \-d '{"description": "An example integration"}' \-H "Content-type: application/json" \-u {email_address}/token:{token} -X POST
Building the integration
The logic of a ZIS integration is defined in a ZIS bundle. A ZIS bundle is a JSON object that contains the following types of nested objects:
Actionobjects, which define HTTP requests and other actionsFlowobjects, which define different states of the integration. Each state specifies an action to run when the integration enters that stateJobSpecobjects, which specify the flows to run when given events happen
In this part of the tutorial, you'll create a starter bundle and then populate it with the JSON objects that define the logic of your integration.
- Creating a starter bundle
- Defining a ZIS action
- Defining a ZIS flow
- Defining a ZIS job spec
- Code complete
Creating a starter bundle
In this section, you’ll create an empty starter bundle with placeholders for the following objects that you'll add later:
- an
Actionobject to post the id, status, and priority of a ticket to an external target - a
Flowobject to run the action and pass the ticket's data to it - a
JobSpecobject to run the flow when a Ticket Created event is detected, and pass the new ticket's data to the flow
To create the starter bundle
-
Create a JSON file named my_zis_bundle.json.
-
Add the following bundle skeleton to the file:
{"name": "My first ZIS integration","description": "Posts ticket data to an external target on ticket create","zis_template_version": "2019-10-14","resources": {"action_post_ticket_data": {"_placeholder_": "ZIS action properties here"},"flow_ticket_created": {"_placeholder_": "ZIS flow properties here"},"jobspec_handle_ticket_event": {"_placeholder_": "ZIS job spec properties here"}}}
You'll define the action, flow, and job spec in the next sections.
Note: You shouldn't change the zis_template_version value.
For more information on ZIS bundles, see Anatomy of a ZIS bundle and the Bundles API.
Defining a ZIS action
For the integration, you want a ZIS action that can make HTTP requests. When a Ticket Created event is detected by the integration, it should make a POST request sending the ticket data to the external target simulating the external application. You can create that specific functionality by building a custom action. For more information, see ZIS custom actions.
Suppose the external target expects the new ticket id in a header named X-Zendesk-Ticket-Id and the ticket status and priority in a JSON object named data.
In curl, the POST request to the target might look as follows:
curl https://abc123.x.pipedream.net \-H "key: X-Zendesk-Ticket-Id" \-H "value: 45326774" \-d '{"data": {"status": "new", "priority": "high"}}' \-H "Content-Type: application/json" \-X POST
In this section, you'll define the same POST request as a ZIS action.
To define your ZIS action
In your my_zis_bundle.json file, replace the placeholder line in the action_post_ticket_data object with the following ZIS Action properties (lines 2 to 21 below):
"action_post_ticket_data": {"type": "ZIS::Action::Http","properties": {"name": "action_post_ticket_data","definition": {"method": "POST","url": "EXTERNAL_TARGET_URL","headers": [{"key": "X-Zendesk-Ticket-Id","value.$": "$.ticketId"}],"requestBody": {"data": {"status.$": "$.ticketStatus","priority.$": "$.ticketPriority"}}}}},
Replace the "EXTERNAL_TARGET_URL" placeholder with the endpoint URL you obtained from RequestBin. Example: "https
You did the following in the ZIS action:
- Named your action
action_post_ticket_data. ZIS validation rules require that an action’sproperties.namebe the same as its top-level key (in this case,action_post_ticket_data) - Used the
typeproperty to specify the type of the action is "ZIS::Action::Http" - Used the
definitionobject to define the HTTP request
You also used variables named $.ticketId, $.ticketStatus, and $.ticketPriority to provide data to the action.
To assign a variable to a property in a ZIS action, add a ".$" suffix to the property name. Example: "status.$": "$.ticketStatus". The suffix will be omitted when the data is sent to the target.
You'll define the variables in the flow in the next section. To give you a preview, the variables above are defined as follows in the flow:
"Parameters": {"ticketId.$": "$.input.ticket_event.ticket.id","ticketStatus.$": "$.input.ticket_event.ticket.status","ticketPriority.$": "$.input.ticket_event.ticket.priority"}
The input data in the example is received from the Ticket Created event specified in the job spec. The input data is documented in the Ticket Created event in the Trigger Events reference docs. For example, "$.input.ticket_event.ticket.status" corresponds to "new" in the example in the doc.
All parameters in ZIS bundles use JSONPath semantics.
Defining a ZIS flow
Now that you've defined the ZIS action, you can add it to a ZIS flow. A ZIS flow defines one or more states for the integration. You can create different types of states but in this tutorial you’ll create a state of type "Action" that runs the action you defined.
The integration in this tutorial enters its first (and only) state when a Zendesk ticket is created. In this section, you'll create a state named "ZendeskTicketCreated" and add your action to it.
To define your ZIS flow
In your my_zis_bundle.json file, replace the placeholder line in the flow_ticket_created object with the following ZIS flow properties (lines 2 to 20):
"flow_ticket_created": {"type": "ZIS::Flow","properties": {"name": "ticket-created-flow","definition": {"StartAt": "ZendeskTicketCreated","States": {"ZendeskTicketCreated": {"Type": "Action","ActionName": "zis:INTEGRATION:action:action_post_ticket_data","Parameters": {"ticketId.$": "$.input.ticket_event.ticket.id","ticketStatus.$": "$.input.ticket_event.ticket.status","ticketPriority.$": "$.input.ticket_event.ticket.priority"},"End": true}}}}},
Replace the "INTEGRATION" placeholder with the integration name you registered in Registering the integration name.
You did the following in your ZIS flow:
- Named your flow
ticket-created-flow - Used the (required)
StartAtproperty to specify the first state to enter when the flow is triggered by an event - Defined a
ZendeskTicketCreatedstate in the (required)Statesobject - Used the
ActionNameproperty to tell ZIS what action to run when the integration enters theZendeskTicketCreatedstate - Defined variables used in your action in the
Parametersobject. Theinputdata is received from Ticket Created event specified in the job spec. See the Ticket Created event in the Trigger Events reference docs. For example,"$.input.ticket_event.ticket.id"corresponds to 35436 in the example in the docs. - Set
Endto true in theZendeskTicketCreatedstate to tell ZIS to exit the flow after the action runs
Defining a ZIS job spec
A job spec works like an event handler. It specifies a flow to run when a given event is detected.
A job spec also passes event data to the flow in the background. The format of the data depends on the event and is documented in the ZIS Trigger Events reference docs.
The integration in this tutorial runs your ticket-created-flow flow when a ticket is created.
To define your ZIS job spec
In your my_zis_bundle.json file, replace the placeholder line in the jobspec_handle_ticket_event object with the following ZIS job spec properties (lines 2 to 9):
"jobspec_handle_ticket_event": {"type": "ZIS::JobSpec","properties": {"name": "handle-ticket-created-event","event_source": "support","event_type": "ticket.TicketCreated","flow_name": "zis:INTEGRATION:flow:ticket-created-flow"}}
Replace the "INTEGRATION" placeholder with the integration name you registered in Registering the integration name.
You did the following in your ZIS job spec:
-
Used the
event_sourceproperty to tell ZIS that the source of the event is support. See Referencing an event in a job spec in the reference docs. -
Used the
event_typeproperty to tell ZIS to listen for the"ticket.TicketCreated"event. The event will pass data to your flow in the background. For an example of the data passed to the flow, see the Ticket Created doc. -
Used the
flow_nameproperty to tell ZIS to run yourticket-created-flowflow when it detects the Ticket Created event. Theflow_nameproperty uses the following format for the value:zis:{integration}:flow:{flow_name}.
Code complete
Your action, flow, and job spec now make up a complete ZIS bundle. Your my_zis_bundle.json file should look as follows:
{"name": "My first ZIS integration","description": "Posts ticket data to an external target on ticket create","zis_template_version": "2019-10-14","resources": {"action_post_ticket_data": {"type": "ZIS::Action::Http","properties": {"name": "action_post_ticket_data","definition": {"method": "POST","url": "EXTERNAL_TARGET_URL","headers": [{"key": "X-Zendesk-Ticket-Id","value.$": "$.ticketId"}],"requestBody": {"data": {"status.$": "$.ticketStatus","priority.$": "$.ticketPriority"}}}}},"flow_ticket_created": {"type": "ZIS::Flow","properties": {"name": "ticket-created-flow","definition": {"StartAt": "ZendeskTicketCreated","States": {"ZendeskTicketCreated": {"Type": "Action","ActionName": "zis:INTEGRATION:action:action_post_ticket_data","Parameters": {"ticketId.$": "$.input.ticket_event.ticket.id","ticketStatus.$": "$.input.ticket_event.ticket.status","ticketPriority.$": "$.input.ticket_event.ticket.priority"},"End": true}}}}},"jobspec_handle_ticket_event": {"type": "ZIS::JobSpec","properties": {"name": "handle-ticket-created-event","event_source": "support","event_type": "ticket.TicketCreated","flow_name": "zis:INTEGRATION:flow:ticket-created-flow"}}}}
Don’t forget to replace "INTEGRATION" with the integration name and "EXTERNAL_TARGET_URL" with the endpoint URL you obtained from RequestBin, then save the file.
Deploying and testing the integration
After creating your my_zis_bundle.json bundle file, you can deploy and test the integration by completing the following steps:
Private integrations can only be installed on the Suite Growth plan or above or the Support Professional plan or above.
Uploading the bundle
The first step to deploying the integration is to upload the bundle by making an API request to the Create or Update Bundle endpoint.
Using Postman
-
In Postman, select File > New > HTTP Request.
-
In the Postman request editor, enter the Upload or Update Bundle endpoint:
https://{subdomain}.zendesk.com/api/services/zis/registry/{integration}/bundlesReplace
{subdomain}with your Zendesk subdomain and{integration}with your registered integration name. -
Select POST as the method on the left side.
-
Click the Body tab below your request path. Make sure the raw and JSON options are selected and paste the content from your my_zis_bundle.json file.
-
Click the Authorization tab and select Basic Auth.
-
For Username, enter your Zendesk admin email followed by "/token". Example: [email protected]/token
-
For Password, enter your API token.
-
Click Send.
ZIS will perform some basic validation of the bundle and report any issues in the response.
If the request is successful, it returns an empty 200 OK response.
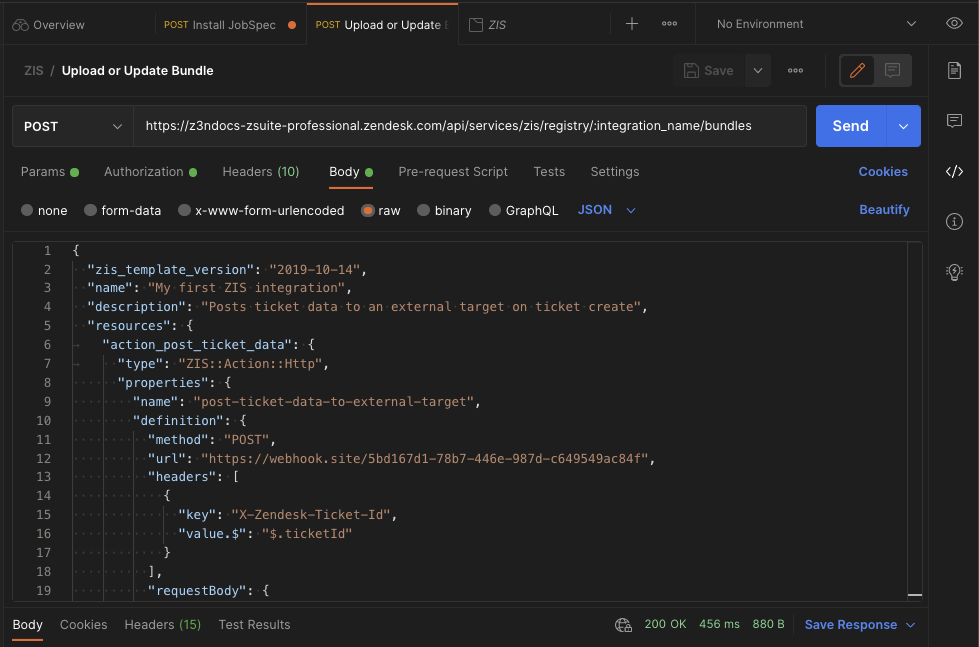
The request and response should look like this in Postman:
Using curl
In your command line interface, navigate to the folder that contains your my_zis_bundle.json file.
curl https://{subdomain}.zendesk.com/api/services/zis/registry/{integration}/bundles \-d @my_zis_bundle.json \-H "Content-Type: application/json" \-v -u {email}/token:{token} -X POST
Installing the job spec
The next deployment step is to install the job spec specified in your bundle. ZIS will get the job spec from the bundle you just uploaded.
To install the job spec, make an API request to the Install Job Spec endpoint specifying your job spec name using the following format: zis:{integration}:job_spec:{job_spec_name}.
Using Postman
-
In Postman, select File > New > HTTP Request.
-
In the Postman request editor, enter the Install Job Spec endpoint:
https://{subdomain}.zendesk.com/api/services/zis/registry/job_specs/installReplace
{subdomain}with your Zendesk subdomain. -
Add a query parameter named
job_spec_namewith a value ofzis:{integration}:job_spec:handle-ticket-created-event.Replace
{integration}with your registered integration name. -
Select POST as the method on the left side.
-
Click the Authorization tab and select Basic Auth.
-
For Username, enter your Zendesk admin email followed by "/token". Example: [email protected]/token
-
For Password, enter your API token.
-
Click Send.
If the request is successful, it returns an empty 200 OK response.
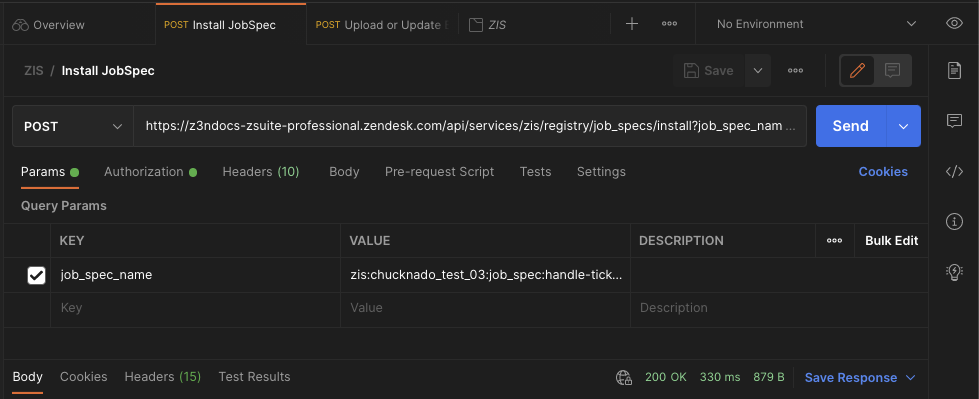
The request and response should look like this in Postman:
Using curl
curl "https://{subdomain}.zendesk.com/api/services/zis/registry/job_specs/install?job_spec_name=zis:{integration}:job_spec:handle-ticket-created-event" \-v -u {email}/token:{token} -X POST
Make sure to enclose the endpoint path in quotes because it contains special characters.
Testing the integration
You can test your integration by creating a new ticket in Zendesk.
-
In Zendesk, create a ticket and give it a status and priority.
You can use the Zendesk Agent Workspace or make the following curl request:
curl https://{subdomain}.zendesk.com/api/v2/tickets.json \-d '{"ticket": {"subject": "My printer is on fire!", "priority": "urgent", "status": "open", "comment": { "body": "The smoke is very colorful." }}}' \-H "Content-Type: application/json" -v -u {email_address}/token:{token} -X POST -
Navigate to your RequestBin dashboard.
You should see a header with the ticket id as well as a JSON payload with the ticket status and priority.

If nothing happens, a good starting point for troubleshooting is checking the integrations log in the Zendesk Admin Center:
- Sign into your Zendesk account as a admin.
- In Admin Center, click Apps and integrations in the sidebar, then select Integrations > Logs.
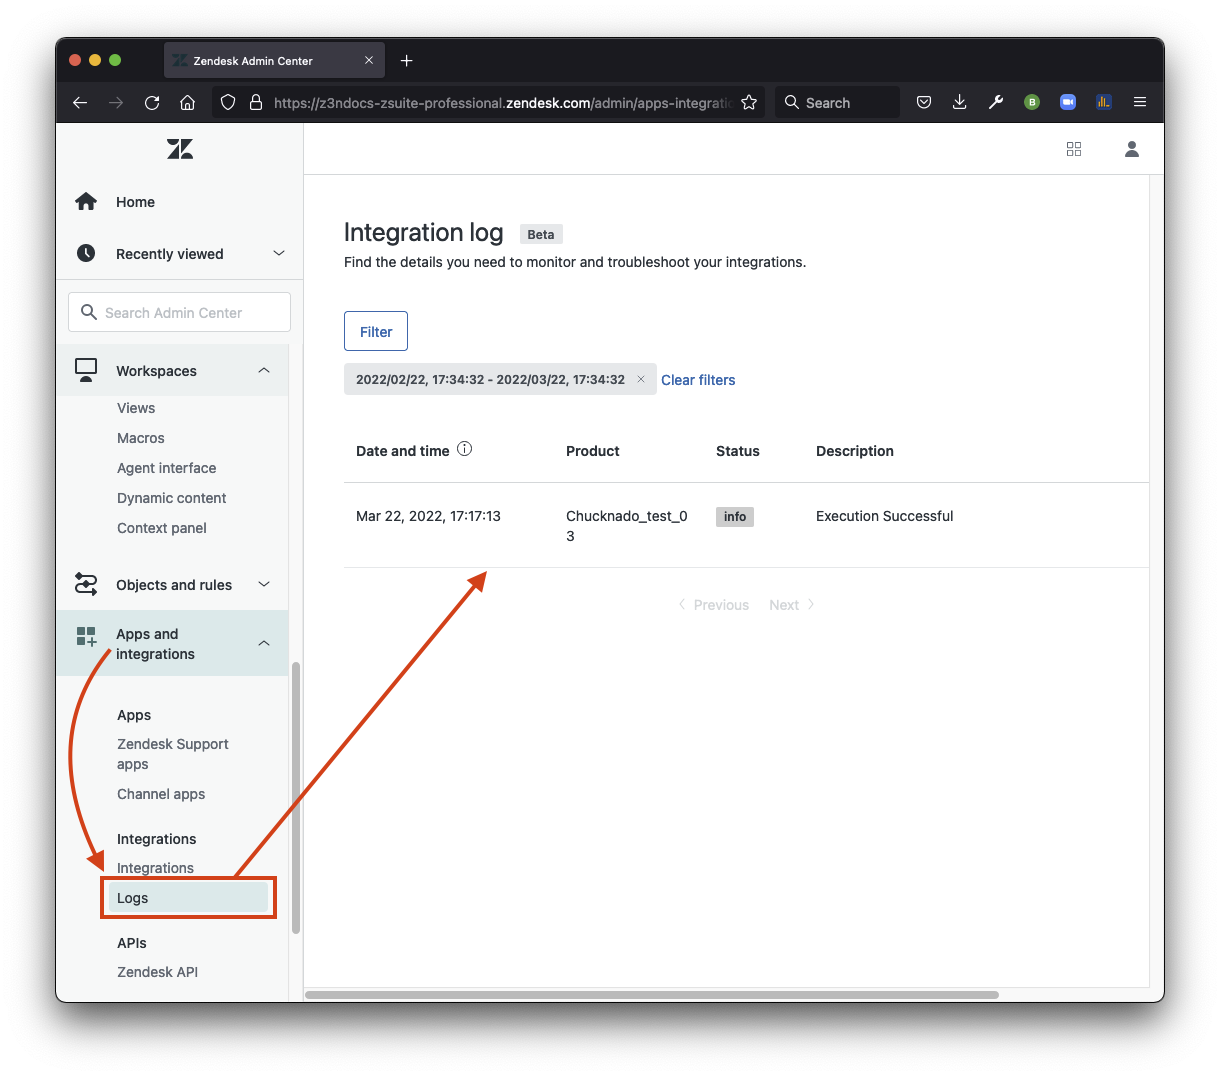
For more information, see Viewing the integrations log in the Zendesk help center.
Congratulations, you just created your first ZIS integration from scratch.