Making client-side CORS requests to the Ticketing API
Client-side apps are web applications that run entirely in the user's web browser. Cross-Origin Resource Sharing (CORS) permits a client-side app to make an API request from one domain to another using the browser. To make an authenticated CORS request from the browser to a Zendesk API, you must authenticate the request using an OAuth access token.
In this tutorial, you'll create a client-side app that makes CORS requests from the browser to the Ticketing API. The app uses OAuth access tokens to authenticate these requests. The requests retrieve data about a specified ticket from Zendesk Support.
You can use the app's code as a starting point for building similar client-side apps that make authenticated CORS requests to Zendesk APIs.
Disclaimer: Zendesk provides this article for instructional purposes only. Zendesk doesn't provide support for the apps or example code in this tutorial. Zendesk doesn't support third-party technologies, such as Node.js or related libraries.
Note: This article covers how to authenticate Zendesk API requests in a client-side app that runs outside of Zendesk. To use OAuth to authenticate Zendesk API requests in an app that runs in Zendesk, see Adding third-party OAuth to a Support app.
How CORS works
For security purposes, modern browsers have a same-origin policy restriction that prevents scripts running in the browser from accessing resources in other domains. However, if the server in the other domain implements Cross-Origin Resource Sharing (CORS), the browser will allow a script to access resources in that domain.
Zendesk only implements CORS for API requests authenticated with OAuth access tokens. It does not implement CORS for API requests that use an API token.
Exceptions: A few Zendesk API endpoints don't require any authentication at all. They include the Create Request and Search Articles endpoints. CORS is implemented for these endpoints.
If an API request is authenticated with OAuth, Zendesk includes a special "Access-Control-Allow-Origin" CORS header in the response. The header has a value of '*', which allows requests from a page in any origin. The header basically gives the browser permission to access resources in the Zendesk domain.
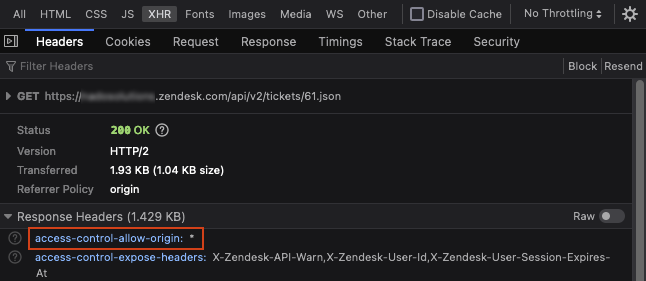
The CORS headers are only included in the HTTP responses of certain API requests, including successful requests (HTTP statuses 200, 201, or 204) or if the resource wasn't found (status 404). The headers are not included in responses with a "403 Forbidden" or "429 Too Many Requests" status. In these cases, the browser detects a CORS error and blocks access to the Zendesk domain. The status of the request doesn't reach the browser.
The following JavaScript snippet makes a CORS request to the Ticketing API's Show Ticket endpoint. The request is authenticated using an OAuth access token.
fetch(`https://${ZENDESK_SUBDOMAIN}.zendesk.com/api/v2/tickets/${TICKET_ID}.json`,{method: "GET",headers: {Authorization: `Bearer ${ACCESS_TOKEN}`}})
Security for client-side apps
The client-side app in this tutorial uses the browser's local storage to store Zendesk OAuth access tokens. While this is standard practice, it makes the app vulnerable to a cross-site scripting (XSS) attack. If an attacker can run JavaScript in the app, either through the source code or a third-party library, they can access the stored tokens.
When building a similar client-side app, take appropriate security measures to protect against XSS attacks and reduce the risk of token theft. These measures include but are not limited to:
- Limiting the scope of OAuth access tokens to only needed permissions
- Reviewing any source code changes for security vulnerabilities
- Only using trusted third-party libraries
If possible, consider creating a server-side app that securely stores credentials instead. For an example of a similar server-side app, see Building a custom ticket form with the Ticketing API.
What you'll need
To complete this tutorial, you'll need the following:
-
A Zendesk Support account with admin access. To get a free account for testing, see Getting a trial or sponsored account for development
-
A text editor
-
A command-line terminal, such as Windows Terminal or Terminal on Mac
-
Node.js 18.15.0 or later. The client-side app you create won't use Node.js. However, the tutorial uses a Node.js package, Browsersync, to run a local web server on your computer
Registering your app with Zendesk Support
Before you can set up an OAuth flow for an app, you need to register the app with Zendesk Support. You do this by creating an OAuth client.
To create an OAuth client, follow the instructions in Registering your application with Zendesk in Zendesk help. You must be signed in as a Zendesk Support admin to create an OAuth client.
When registering the app, specify http://localhost:3000 as one of the Redirect URLs. You'll create this URL later in the tutorial. Provide any Client name and Unique identifier you want.
After you create the client, securely save the client's Unique identifier, also called the client id. You'll use this credential later in the tutorial.
Note: OAuth clients are scoped to one Zendesk instance. To request a global OAuth client that works with multiple Zendesk instances, see Set up a global OAuth client.
Creating a client-side app that makes CORS requests
Next, create a client-side app that lets users retrieve information for a specific ticket id. The app should do the following:
- Let users specify a ticket id
- Authenticate users with Zendesk using an OAuth authorization grant flow
- Store the access token returned by the OAuth flow in the browser's local storage
- Use the stored token to authenticate a CORS request to the Show Ticket endpoint for the specified ticket
- Display the returned ticket's subject, status, and creation date
To create the client-side app
-
In your terminal, create and navigate to a folder named cors_app_example. Example:
mkdir cors_app_examplecd cors_app_example -
In the cors_app_example folder, create an index.html file. Paste the following code into the file.
<html><head><title>Get ticket details</title></head><body><h1>Enter a ticket ID</h1><form id="get-ticket"><input type="text" id="ticket-id" placeholder="Ticket ID" /><button id="get-btn">Get Ticket</button></form><div id="details"></div><script>const ZENDESK_CLIENT_ID = "YOUR_CLIENT_ID"const ZENDESK_SUBDOMAIN = "YOUR_ZENDESK_SUBDOMAIN"const REDIRECT_URI = "http://localhost:3000"const SCOPES = "tickets:read"const details = document.getElementById("details")const ticketIdInput = document.getElementById("ticket-id")const init = () => {details.style.display = "none"const urlParams = new URLSearchParams(location.hash.substring(1))const accessToken = urlParams.get("access_token")if (location.href.includes(REDIRECT_URI) && accessToken) {localStorage.accessToken = accessTokenticketIdInput.value = localStorage.ticketIdwindow.location.hash = ""makeRequest(accessToken, ticketIdInput.value)}}const getTicket = event => {event.preventDefault()const ticketId = ticketIdInput.valueconst accessToken = localStorage.accessTokenif (accessToken) {return makeRequest(accessToken, ticketId)}localStorage.ticketId = ticketIdstartAuthFlow()}const startAuthFlow = () => {const endpoint = `https://${ZENDESK_SUBDOMAIN}.zendesk.com/oauth/authorizations/new`const urlParams = new URLSearchParams({response_type: "token",redirect_uri: REDIRECT_URI,client_id: ZENDESK_CLIENT_ID,scope: SCOPES})location = `${endpoint}?${urlParams.toString()}`}const makeRequest = async (accessToken, ticketId) => {const url = `https://${ZENDESK_SUBDOMAIN}.zendesk.com/api/v2/tickets/${ticketId}.json`const response = await fetch(url, {method: "GET",headers: { Authorization: `Bearer ${accessToken}` }})if (response.ok) {const { ticket } = await response.json()const detailsHtml = `<p>Subject: ${ticket.subject}<br>Status: <strong>${ticket.status.toUpperCase()}</strong><br>Created: ${ticket.created_at}</p>`details.innerHTML = detailsHtmldetails.style.display = "block"}}window.addEventListener("load", init)document.getElementById("get-btn").addEventListener("click", getTicket)</script></body></html>In the code, replace the following placeholders:
- "YOUR_CLIENT_ID" with your OAuth client's unique identifier
- "YOUR_ZENDESK_SUBDOMAIN" with your Zendesk subdomain
Testing the app
To finish, test your app to ensure it works as intended.
-
If you haven't already, install Browsersync in your terminal.
npm install -g browser-sync -
In the cors_app_example folder, use Browsersync to start a local web server.
browser-sync start --server -
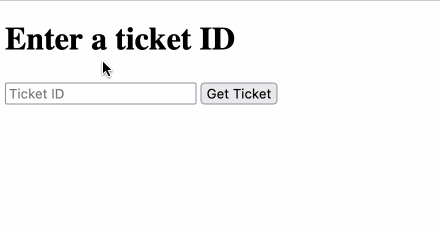
In a web browser, go to
http://localhost:3000.The app displays a blank form.

-
Enter a valid ticket id and click Get Ticket. If needed, sign in to Zendesk.
The app displays the ticket's subject, status, and creation date.
If you wanted, you can repeat this process using other ticket ids, browsers, and Zendesk users.