Building your first Sell app - Part 4: Getting data
This tutorial is part of a series on building a Zendesk Sell app:
- Part 1: Laying the groundwork
- Part 2: Designing the user interface
- Part 3: Creating and inserting templates
- Part 4 - Getting data - YOU ARE HERE
- Part 5: Installing the app in Zendesk Sell
In the previous tutorials, you designed the user interface (UI) for an app named Related Leads. In this tutorial, you'll use Zendesk APIs to get live data and display it in the UI.
The app will fetch an organization's leads from the Sell Core API. It'll do this by making a request to the Retrieve All Leads endpoint:
GET /v2/leads/?organization_name={orgName}
An endpoint is a URL where you can get or set information about a resource. The Retrieve All Leads endpoint gets information about leads. You can use the endpoint's organization_name query parameter to limit the leads to a specific organization. To get the right leads, your app needs to provide the right organization name to the endpoint. This organization name will change based on the deal the user is currently viewing in Zendesk Sell.
The app logic should work as follows:
- The app accesses the deal that the user is viewing in the Zendesk Sell. The app gets the name of the organization associated with this deal.
- The app uses the organization's name to request leads from the Retrieve All Leads endpoint. The request will only retrieve up to five leads. These leads must belong to the organization and have a status of "new."
- If the request is successful, the app shows the organization's name and new leads in the organization template. If the request fails, the app shows an error message in a different template.

This tutorial covers the steps to building the app logic:
- Calling the framework API
- Calling the REST API
- Displaying the organization's leads
- Displaying the error message
- Code complete!
Calling the framework API
The first step is to access the deal the user is viewing in Zendesk Sell. You can then get the name of the organization associated with the deal.
How it works
In the deal card sidebar, the Zendesk Apps framework (ZAF) includes a Deals API that gives you access to the data of the deal.
The framework's Deal object lists the deal properties you can retrieve. The deal.organization property returns an organization object. This object contains data about the organization associated with the deal, including the organization.name property.
Based on this information, you can use the following path to get the name of the organization associated with a deal:
"deal.organization.name"
In ZAF, you use the client.get(_path_) method to query the Data API. The method doesn't return the values directly. Instead, it returns an object containing a property with a name that corresponds to the API path. For example:
{"deal.organization.name": "Acme Co"}
Because the name string contains periods, you must use JavaScript bracket notation to retrieve its value:
const client = ZAFClient.init();client.get("deal.organization.name").then(function (data) {console.log(data["deal.organization.name"]); // something like Acme Co});
Communication between an iframe and its parent page is asynchronous. The browser doesn't wait for a response to a request. It continues working normally while the request is being handled. You get a callback when the request receives a response. The .then() method is used to wait for the callback. The method returns a Promise and takes two arguments: a function to run on success and a function to run on failure. The statement basically means, "make the request, then do one of these two things based on the outcome."
client.get("deal.organization.name").then(run_this_fn_on_success,run_this_fn_on_failure);
For more information, refer to Promise.prototype.then() on the Mozilla Developer Network.
Getting the organization's name
In this section, you'll use the deal.organization.name path and the ZAF Client API's get method to retrieve the name of the organization associated with a deal.
-
In main.js, delete the
displayLeads()anddisplayError()function calls from your self-invoking function.displayLeads();displayError(); -
Replace the deleted function calls with the following statement.
...client.get("deal.organization.name").then(function (data) {const orgName = data["deal.organization.name"];console.log('Organization name is ' + orgName);});The statement gets the name of the organization associated with the deal the user is viewing. After getting a successful response, it assigns the returned data to a variable named orgName.
-
Check the organization name by refreshing the app and looking for the
console.logmessage in your browser console.
-
Replace the
console.log()statement with the following function call:requestLeads(client, orgName);The call passes the
clientandorgNamevariables to therequestLeads()function. You'll define this function in the next section. The function's job is to make an HTTP request to the Retrieve All Leads endpoint in the Sell Core API. You pass theclientargument because the function will need the ZAF Client object to make the HTTP request. You pass theorgNameargument because you want to limit the API request by the organization's name.Your self-invoking function should now look like this:
(function () {const client = ZAFClient.init();client.invoke("resize", { width: "100%", height: "150px" });client.get("deal.organization.name").then(function (data) {const orgName = data["deal.organization.name"];requestLeads(client, orgName);});})();
Calling the REST API
Your app can now get the name of the organization associated with a deal. Use this name to get information about leads for the organization from the Sell Core API.
Defining the API request
The client.request() method makes HTTP requests to external APIs. The method takes an object that defines the request settings as an argument. For example:
const settings = {url:"/v2/leads/" +"?organization_name=" +encodeURIComponent(orgName) +"&status=new" +"&per_page=5",type: "GET",dataType: "json",};client.request(settings).then(function (data) {console.log(data);},function (response) {console.error(response);});
The REST API doc for the Retrieve All Leads endpoint indicates the settings to include:
-
The url is
/v2/leads/?organization_name={orgName}&status=new&per_page=5. For Sell Core API endpoints, you don't need to specify the full URL. For other endpoints, specify the full URL, such as 'https://example.com/api/resource.json'. The URL also includes several query parameters:
?organization_name={orgName}limits the response to a specific organization.&status=newlimits the response to leads with a status of "new."&per_page=5limits the response to five leads or fewer.
-
The type is
GET. -
The dataType is
json.
The request shouldn't include a cors setting. Requests from the ZAF Client to the Sell Core API aren't cross-origin requests and don't require the Zendesk proxy service.
Don't include credentials, such as an API key, in the request or its settings. The ZAF Client automatically authenticates requests made to the Sell Core API.
Note: The ZAF Client only supports the Sell Core API. ZAF doesn't support other Sell APIs, such as the Search API or Firehose API.
Getting the organization's leads
In this section, you'll use the client.request() method and the Retrieve All Leads endpoint to make an HTTP request that retrieves an organization's new leads.
-
In main.js, insert the following function directly after your self-invoking function:
function requestLeads(client, orgName) {const settings = {url:"/v2/leads/" +"?organization_name=" +encodeURIComponent(orgName) +"&status=new" +"&per_page=5",type: "GET",dataType: "json",};client.request(settings).then(function (data) {console.log(data);},function (response) {console.error(response);});}If the request is successful, the app displays the data in the browser console with
console.log(data). If the request is not successful, the app displays the response in the console withconsole.error(response). -
Check the results of the request in your browser console. Save main.js, refresh the app, and look for the
console.logmessage in the console. The message should contain an object with leads data for the organization.
-
Test the results in case of failure by introducing a typo in one of the request settings. Save main.js, refresh the app, and look for a related
console.errormessage in the console.Fix the typo after you ensure the error handling works.
-
In the first callback function, replace the
console.logstatement with a call to thedisplayLeads()function. Include theorgNameanddataarguments in the call.displayLeads(orgName, data); -
In the second callback function, replace the
console.logstatement with a call to thedisplayError()function. Include theresponseargument in the call.displayError(response);Your
requestLeads()function should now look as follows:function requestLeads(client, orgName) {const settings = {url:"/v2/leads/" +"?organization_name=" +encodeURIComponent(orgName) +"&status=new" +"&per_page=5",type: "GET",dataType: "json",};client.request(settings).then(function (data) {displayLeads(orgName, data);},function (response) {displayError(response);});}
Displaying the organization's leads
In the previous section, you passed the organization name and leads data to the displayLeads() function call after getting a successful response from the Sell Core API.
In this section, you'll take that information and display it in your organization template.
-
In your
displayLeads()function definition, addorgNameanddataarguments to receive the respective organization name and leads data:function displayLeads(orgName, data) {... -
In the
displayLeads()function definition, replace the hard-codedorgNamevalue in theorgDataobject with theorgNameargument:const orgData = {orgName: orgName,leads: [{"name": "Alice Aragorn", "url": "https://app.futuresimple.com/leads/2104416001" },{"name": "Bob Baggins", "url": "https://app.futuresimple.com/leads/2104416001" },]}; -
Replace the hard-coded
leadsvalue with a call to thegetLeads()function. Pass thedataargument to this function.const orgData = {orgName: orgName,leads: getLeads(data)}; -
Add the following
getLeads()function definition directly after thedisplayLeads()function definition:function getLeads(data) {let leads = [];for (let lead of data.items) {leads.push({name: `${lead.data.first_name} ${lead.data.last_name}`,url: `https://app.futuresimple.com/leads/${lead.data.id}`,});}return leads;}This function iterates through each lead in the response to retrieve:
- The lead's first and last name
- The lead's ID
It uses this information to create an array of objects. Each object in the array represents a lead and contains:
- The lead's full name (
name) - The Leads page URL for the lead (
url)
It returns these objects in an array (
leads). -
Save main.js and refresh the app. If your ZCLI server is not already started, see Testing the app for instructions.
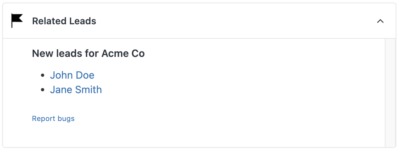
If the organization associated with the deal has no new leads, the alternative heading will display.

Displaying the error message
In Calling the REST API, you passed a response object to the displayError() function after getting an error response from the Zendesk API:
displayError(response);
In this section, you'll take information from the error response and display it in your error template.
-
In main.js, add the
responseargument to yourdisplayError()function definition to receive the error data:function displayError(response) {... -
In the
displayError()function definition, replace the hard-coded values in theerrorDataobject with the values in theresponseobject:const errorData = {'status': response.status,'statusText': response.statusText}; -
Test the error page by making a typo in one of the request settings in
requestLeads(). Save main.js, and refresh the app. Your error template should display.Remember to fix the typo in your request settings after you're satisfied that the error template works as intended.
Code complete!
Congratulations! You developed your first working Sell app. The final version of your main.js file should look like this:
(function () {const client = ZAFClient.init();client.invoke("resize", { width: "100%", height: "150px" });client.get("deal.organization.name").then(function (data) {const orgName = data["deal.organization.name"];requestLeads(client, orgName);});})();function requestLeads(client, orgName) {const settings = {url:"/v2/leads/" +"?organization_name=" +encodeURIComponent(orgName) +"&status=new" +"&per_page=5",type: "GET",dataType: "json",};client.request(settings).then(function (data) {displayLeads(orgName, data);},function (response) {displayError(response);});}function displayLeads(orgName, data) {const orgData = {orgName: orgName,leads: getLeads(data)};renderTemplate("org-template", orgData, "content");}function getLeads(data) {let leads = [];for (let lead of data.items) {leads.push({name: `${lead.data.first_name} ${lead.data.last_name}`,url: `https://app.futuresimple.com/leads/${lead.data.id}`,});}return leads;}function renderTemplate(templateId, dataObject, divId) {const source = document.getElementById(templateId).innerHTML;const template = Handlebars.compile(source);const compiledHtml = template(dataObject);document.getElementById(divId).innerHTML = compiledHtml;}function displayError(response) {const errorData = {'status': response.status,'statusText': response.statusText};renderTemplate("error-template", errorData, "content");}
Your iframe.html file should look like this:
<!DOCTYPE html><html><head><meta charset="utf-8"><!-- See Using Zendesk Garden:https://developer.zendesk.com/apps/docs/developer-guide/setup#using-zendesk-gardenhttps://garden.zendesk.com/css-components/bedrock/https://garden.zendesk.com/css-components/utilities/typography/--><link rel="stylesheet" href="https://cdn.jsdelivr.net/combine/npm/@zendeskgarden/[email protected],npm/@zendeskgarden/[email protected]"><link rel="stylesheet" href="main.css"></head><body><div id="content"></div><footer><a href="https://example.com/support" target="_blank">Report bugs</a></footer><script id="org-template" type="text/x-handlebars-template">{{#if leads}}<h2>New leads for {{orgName}}</h2><ul>{{#each leads}}<li><a href="{{url}}" target="_blank">{{name}}</a></li>{{/each}}</ul>{{else}}<h2>No new leads found for {{orgName}}.</h2>{{/if}}</script><script id="error-template" type="text/x-handlebars-template"><p>{{status}} - {{statusText}} error. Please report a bug at the link below.</p></script><script src="https://static.zdassets.com/zendesk_app_framework_sdk/2.0/zaf_sdk.min.js"></script><script src="https://cdn.jsdelivr.net/npm/[email protected]/dist/handlebars.min.js"></script><script src="main.js"></script></body></html>
If you like, keep tweaking your app.
The final step involves validating, packaging, and installing the app in your Zendesk Sell instance. Continue to Part 5 - Installing the app in Zendesk Sell.