Building a Sell app using OAuth 2.0 - Part 3: Setting up OAuth 2.0
In the previous tutorial, you set up an app location and then installed the private app in your Zendesk Sell instance. The app only displays a template example. In this tutorial, you'll implement the OAuth authorization flow.
Zendesk apps are not authorized to use third party services on their own. In most cases you'll need to implement OAuth. OAuth is an open standard which allows an app to get permission from a user of the third party service to access the service on the user's behalf.
The Apps framework only supports the Authorization Code Grant Flow and Mailchimp supports this flow. Learn more about Mailchimp’s OAuth 2 workflow.
This tutorial covers the following tasks:
- Creating a Mailchimp account
- Registering an app with Mailchimp
- Configuring OAuth in the manifest file
- Uploading an updated app in Sell
- Setting up the OAuth authorization flow
This tutorial is part of a series on building a Zendesk app:
- Part 1: Laying the groundwork
- Part 2: Installing the app in Zendesk Sell
- Part 3: OAuth 2.0 setup - YOU ARE HERE
- Part 4: Creating audiences in Mailchimp
- Part 5: Getting data from the Mailchimp API
Creating a Mailchimp account
If you don't have a Mailchimp account, you can create a new account. Select the free plan which for the purposes of this tutorial allows you to create a single audience.
Registering an app with Mailchimp
Follow the Mailchimp instructions to register your private app. You'll need to provide the following:
- The redirect URI for the OAuth client which is
https://zis.zendesk.com/api/services/zis/connections/oauth/callback. For more information, see Managing third-party OAuth access tokens in the Apps developer guide - A logo from your project folder (/dist/assets/logo.png) or choose your own logo
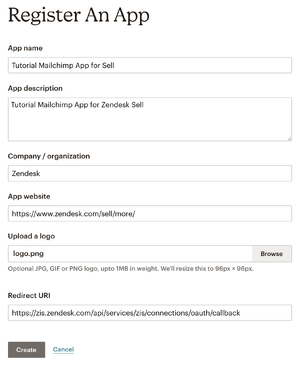
After successfully registering your app, you’ll see the client_id and client_secret at the bottom of the page. Each application is assigned a unique client ID (also known as Consumer key or API key) and client secret. Make note of these values as they will be added to your app's configuration files.
Note: Your client secret protects your application's security so keep it in a secure place. Do not share your client secret with anyone.
Configuring OAuth in the manifest file
Since you now have the OAuth credentials, you must specify the OAuth details in the manifest file. This enables users to go through the OAuth authorization flow during the app installation process.
Configure OAuth
-
In your app project folder, open the manifest file (dist/manifest.json) in your code editor.
-
Under the
oauthobject, replace "{your_client_id}" and "{your_client_secret}" with the client id and client secret credentials provided when you registered your app in Mailchimp. -
Enter the values for
authorize_uriandaccess_token_urias shown below:"oauth": {"client_id": "{your_client_id}","client_secret": "{your_client_secret}","authorize_uri": "https://login.mailchimp.com/oauth2/authorize","access_token_uri": "https://login.mailchimp.com/oauth2/token"}They are defined by Mailchimp. For more information, see Implement the OAuth 2 workflow on your server in the Mailchimp documentation.
-
To the parameters list, add a parameter with
name"access token" andtype"oauth":"parameters":[{"name":"access_token","type":"oauth"}]The OAuth workflow uses an access token to make a request on behalf of the authenticating user. The OAuth parameter is used to access the OAuth access token in your app. It works similarly to secure settings. It prevents sensitive data from being accessed by users in the browser console. The token is inserted on the server-side at the proxy layer.
Once an access token is obtained, authenticated API requests can be made on behalf of the user by including an authorization header in the HTTP call. You make requests to third party products using OAuth with the App framework client.request() method. You use the placeholder {{setting.access_token}} which matches the name for the OAuth parameter in the manifest.json file, and a secure property set to "true". Example:
const client = ZAFClient.init()const settings = {url: 'https://www.example.com/api/user',headers: {"Authorization": "Bearer {{setting.access_token}}"},secure: true,type: 'GET',dataType: 'json',contentType: 'application/json'}client.request(settings).then(...)
The Zendesk proxy server will intercept the outgoing request and replace the {{setting.access_token}} placeholder with the encoded token.
At this point you have set up OAuth.
Uploading an updated app in Sell
Next, you'll test the OAuth setup by building the app again and update the existing installation in Sell.
Upload the updated app
-
In your command line interface, run the following command to generate a new app zip file:
$ npm run build -
Refer to Uploading and installing a private app in Zendesk Sell to upload an app. But instead of installing a new private app, find your existing app installation and select the Update from the dropdown options menu.

-
Select your new zip file and click Upload.
-
In the app's settings dropdown menu, click Change settings option.
-
Go through the OAuth flow to complete the installation process. See Setting up the OAuth authorization flow.
Setting up the OAuth authorization flow
Under the OAuth Authentication section, you're prompted to set up OAuth.
Set up OAuth during app installation
-
Click the link Sign in with {YOUR_APP_NAME}.

You are redirected to authorize_uri:
https://login.mailchimp.com/oauth2/authorize?response_type=code&client_id=YOUR_CLIENT_ID&redirect_uri=YOUR_REDIRECT_URI -
The OAuth server redirects to the login and authorization prompt.

-
Click Allow.
-
When you successfully finish the OAuth process you should see a green check mark icon in the OAuth Authentication section.
-
Open a Person card and check the app is working.
In this tutorial, you registered your app client with Mailchimp, set up OAuth in your app, reuploaded and tested your app in Sell. Next, you create audiences in Mailchimp so this data can be requested from our app. Continue to Part 4 - Creating audiences in Mailchimp.