Building your first Support app - Part 2: Designing the user interface
In the previous tutorial in this series, you installed ZCLI and created the starter files for an app named Requester X-ray. In this tutorial, you'll work on the user interface so that it meets the design requirements of your app. The tutorial covers the following tasks:
- Reviewing the main HTML file
- Testing the app
- Cleaning up the default code
- Adding a footer
- Adding styles
- Changing the logo
This tutorial is the second part of a series on building a Zendesk app:
- Part 1 - Laying the groundwork
- Part 2 - Designing the user interface - YOU ARE HERE
- Part 3 - Creating and inserting templates
- Part 4 - Getting data
- Part 5 - Installing the app in Zendesk Support
Reviewing the main HTML file
A Zendesk app lives in an iframe in the product. Like any iframe app, developing a Zendesk app consists of combining static and dynamic elements in the HTML file to be displayed in the iframe.
ZCLI created a default HTML file called iframe.html in your assets folder (xr_app/assets/iframe.html). The HTML file defines the visual elements of your app -- such as the header -- that don't change when the app changes states. Open the iframe.html file in your favorite text editor.

To interact with the Apps framework, the HTML file must import the ZAF SDK library in a script tag:
<script src="https://static.zdassets.com/zendesk_app_framework_sdk/2.0/zaf_sdk.min.js"></script>
After importing the SDK, you can use the ZAFClient.init() method to create a Zendesk JavaScript API client:
var client = ZAFClient.init();
The client provides an interface between your app and a host application such as Zendesk Support. The client gives you a number of methods to interact with the Apps framework. Use the get() and set() methods to read and write data in the framework APIs. Use the invoke() method to run methods in the framework APIs. Use the request() method to make HTTP requests to any REST API. Use the on() method to listen to events. The starter file gives an example:
client.invoke('resize', { width: '100%', height: '200px' });
Testing the app
Your app doesn't do much yet but you can already run it using ZCLI. Run your app often to test your latest changes.
Zendesk highly recommends using private browsing or the Incognito mode in your browser when testing and developing apps. Your browser may cache certain files used by the app. If a change is not working in your app, the browser might be using an older cached version of the file. With private browsing, files aren't cached.
To enable private browsing in Chrome, click the menu button on the upper-right corner of the browser window and select New Incognito Window. In Firefox, click the menu button on the upper-right corner and select New Private Window.
Test your app
-
In your command-line interface, navigate to the xr_app folder. Example if you're in the projects folder:
cd xr_app -
Start the local HTTP server included in ZCLI by running the following command:
zcli apps:serverAfter a moment, a status message appears informing you that a local web server has started up.
-
In your browser's private or incognito window, navigate to any ticket in Zendesk Support. You'll need to sign in as an agent or administrator. The URL should look something like this:
https://{subdomain}.zendesk.com/agent/tickets/{ticket_id} -
Append ?zcli_apps=true to the ticket URL, and reload the page.
The URL should look like this:
https://{subdomain}.zendesk.com/agent/tickets/{ticket_id}?zcli_apps=trueTip: Bookmark the modified URL for easy access in the future. You might also want to create a dummy ticket for app testing.
-
If you're using the Chrome browser, the content of your app may be blocked. Click the lock icon on the left side of the address bar and select Site settings. On the Settings page, scroll to the Insecure Content section and select Allow.
Click the lock icon in the address bar:

On the Settings page, allow insecure content:

Note: Firefox doesn't block app content but Safari does and has no option to disable blocking. You must use Chrome or Firefox to work with the local ZCLI server.
-
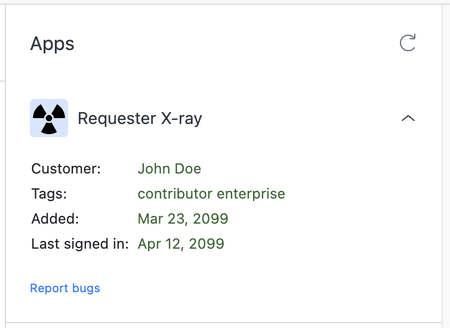
If the app doesn't appear in the sidebar on the right side of the ticket interface, click the Apps button on the upper-right side to display the sidebar.
The Requester X-ray app should appear in the sidebar:

Even if the app appears in a Zendesk Support page, it's actually running locally on your machine.
Note: If nothing happens, check for a shield or lock icon in the Address bar. See step 5. If still nothing happens, make sure your account is on the Zendesk Suite Growth plan or above, or the Support Professional plan or above. Apps are only supported on these plans.
The framework displays a "Requester X-ray" heading that's not defined in the iframe.html file. The heading is defined in the manifest.json file in your app's root folder.
Open the manifest.json file in your text editor. The file already contains values you supplied when you created the app files.
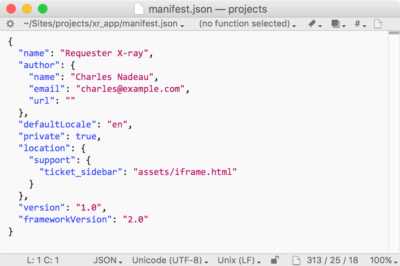
The heading is defined in the name property ("Requester X-ray").
You're free to change or delete all the HTML markup in the iframe.html file. Review your mockup to identify the changes you need to make:
The review gives you your first to-do list:
- Clean up the default code, which includes deleting the "Hello, World!" heading and moving the JavaScript to another file
- Add a footer that displays "Report bugs" with a link to your website where users can report bugs.
- Add styles to format the footer
- Replace the default logo in the header
Note: You can ignore the main content for now. You'll insert it with a template in the next tutorial in the series.
Cleaning up the default code
-
Start by deleting the
<h2>heading in iframe.html. -
Create a file named main.js in the assets folder.
-
In main.js, add the following function, which contains the JavaScript code in iframe.html:
(function () {var client = ZAFClient.init();client.invoke('resize', { width: '100%', height: '200px' });})();The code defines a self-invoking, anonymous function that runs after the document is loaded in the browser -- in other words, when the DOM is ready.
-
While the code is open in front of you, resize the app by changing the height property in the resize method from 200px to 120px.
-
Back in iframe.html, delete the following
<script>tag, which you don't need anymore:<script>// Initialise Apps framework client. See also:// https://developer.zendesk.com/documentation/apps/app-developer-guide/getting_startedvar client = ZAFClient.init()client.invoke("resize", { width: "100%", height: "120px" })</script> -
Replace it with the following
<script>tag to import your new script:<script src="main.js"></script>Insert the tag after the
<script>tag that references the ZAF SDK to make sure the SDK is loaded in memory before your script runs. The body of your iframe.html file should look as follows:<body><script src="https://static.zdassets.com/zendesk_app_framework_sdk/2.0/zaf_sdk.min.js"></script><script src="main.js"></script></body> -
Save both files.
Adding a footer
According to the mockup, the footer should display a "Report bugs" link. The spec specifies that the link should let the user go to your website to report a bug.
Add a footer link
-
In the body of the iframe.html file, add the following footer block before the script tags:
<footer><a href="https://mysite.github.io/support" target="_blank">Report bugs</a></footer> -
Save the file.
-
On your test ticket in the agent interface, click the Refresh icon in the Apps panel.

In the mockup, the link text in the footer is smaller and uses a different typeface. In the next step, you'll add some CSS to start styling your app.
Adding styles
By default, ZCLI imports the Zendesk Garden stylesheet in the iframe file:
<link rel="stylesheet" href="https://cdn.jsdelivr.net/combine/npm/@zendeskgarden/[email protected],npm/@zendeskgarden/[email protected]">
Zendesk Garden is designed to be a common baseline of styles and components between all Zendesk products. The default link above doesn't include all Zendesk Garden assets, only the Garden component CSS and CSS utilities. A complete list of assets you can import is available from the jsDelivr CDN. See https://www.jsdelivr.com/?query=zendeskgarden. The jsDelivr files are npm packages that can also be installed from npm. See https://www.npmjs.com/search?q=zendeskgarden. Use the Zendesk Garden assets if you want your app to match the look and feel of Zendesk products.
Zendesk recommends integrating the individual CSS files currently hosted on jsDelivr into your application files and referencing them using relative paths within your application. This helps prevent connectivity issues by hosting your assets on Zendesk's own app CDN and not a third-party CDN.
Disclaimer: Zendesk is not able to provide support for third party package hosting services, such as NPM or JsDelivr. Consider posting the issue to our developer community or searching online.
You don't have to use Zendesk Garden in your projects. The choice is yours. In this tutorial, you decide to use the popular Bootstrap CSS as the base stylesheet for your app. You'll add any modifications in a separate file named main.css.
-
In iframe.html, replace the Zendesk Garden
<link>tag with the following Bootstrap<link>tag:<link rel="stylesheet" href="https://stackpath.bootstrapcdn.com/bootstrap/4.3.1/css/bootstrap.min.css"crossorigin="anonymous"> -
Add a link to a stylesheet named main.css after the Bootstrap
<link>tag:<link href="main.css" rel="stylesheet"> -
Create a file named main.css in the assets folder.
-
Add the following rule to main.css to style the footer:
footer {font-size: 10px;padding-top: 20px;} -
Save the file.
-
On your test ticket in the agent interface, click the Refresh icon in the Apps panel.

The next task is to change the logo.
Changing the logo
By default, the framework displays the image named logo-small.png in your assets folder. To change the logo of the app, just replace the logo-small.png file in the assets folder with your own image.
Your replacement logo-small.png file should meet the following specs:
- Size: 128x128 pixels. The CSS will scale the image to fit the header. The same image will also be used in the Zendesk Support user interface later and scaled accordingly.
- File format: PNG-24 with transparency.
- Border: None because the corners will be rounded by the CSS.
The assets folder also includes a logo.png image. Replace this image with a 320x320 version of your logo. The 320x320 version will be displayed in the Zendesk Marketplace where Support admins can browse for public and private apps to install.
Change the logo
-
Right-click each of the following image links and download them into the assets folder in your app folder. If prompted, agree to overwrite the existing version of the files.
-
On your test ticket in the agent interface, click the Refresh icon in the Apps panel.
If the updated image doesn't appear, you'll need to do a hard refresh of the page in Zendesk Support. See the instructions for Firefox or Chrome on their respective websites. You can also clear your browser cache or paste the URL into another browser.

-
If you're moving to the next tutorial, you can leave the ZCLI server running. If you're done for this session, you can shut down the server by switching to your command-line interface and pressing Control+C.
In this tutorial, you cleaned up the iframe.html file created by ZCLI, moved the JavaScript in a separate file, added a footer, added some styles, and replaced the logo to meet the design requirements of your app.
In the next tutorial, you'll create a template to display the related information about the requester. Continue to Part 3 - Creating and inserting templates.