Building a Support ticket editor app
In this tutorial, you'll build a Zendesk Support app for the ticket editor location. An app in this location is displayed as a button in the ticket editor's toolbar.
What you'll need
To complete this tutorial, you'll need the following:
-
A Zendesk account with the Zendesk Suite Growth plan or above, or the Support
Professional plan or above. To get a free eligible account for testing, see Getting a trial or sponsored account for development. -
Sunshine custom objects enabled in Zendesk Support. For instructions, see Enabling custom objects.
-
The Zendesk Command Line Interface (ZCLI). To install or upgrade ZCLI, refer to Installing and updating ZCLI. You also need to authenticate ZCLI with your Zendesk account. See Authentication in the ZCLI documentation.
ZCLI replaces the Zendesk Apps Tools (ZAT), which has been deprecated.
-
Familiarity with the Zendesk Apps framework (ZAF). Before you start, complete the Building your first Support app tutorial.
Planning the app
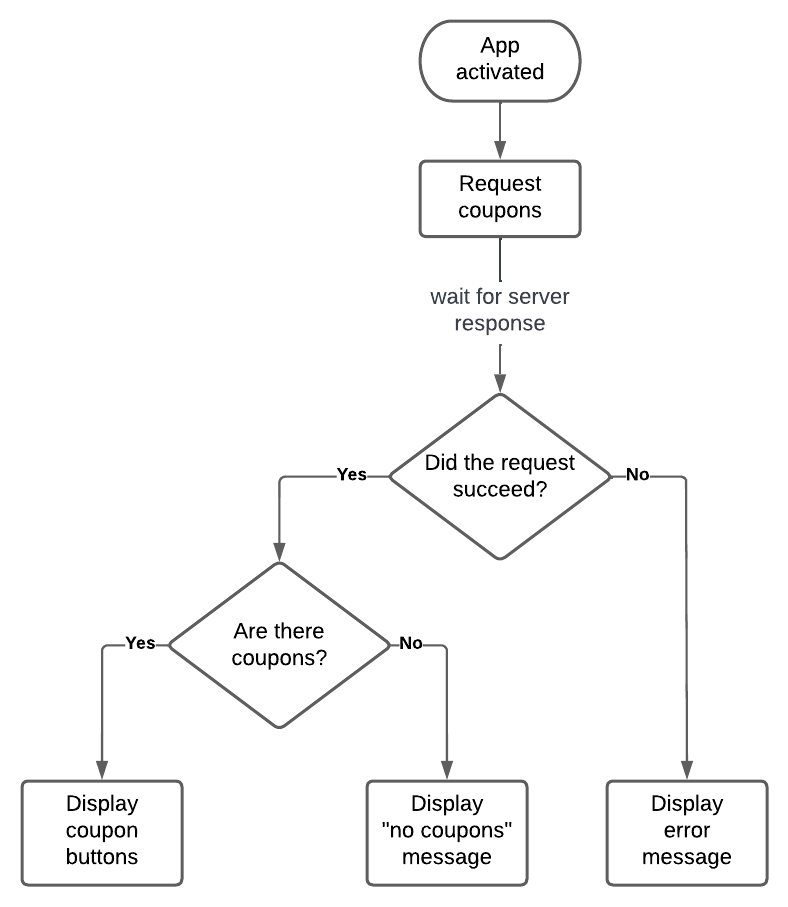
The app you create lets agents insert coupon codes into Zendesk ticket comments. The coupons are stored in Zendesk as Sunshine custom objects. To fetch the coupons, the app makes a request to the Custom Objects Search API endpoint. The request returns up to nine coupons, sorted by creation date in descending order.
If the request returns one or more coupons, the app's iframe displays a button for each coupon. When an agent clicks one of the buttons, the app inserts the coupon's redemption code at the agent's cursor.

If the request returns no coupons, the app displays a related "no coupons" message. If the request fails, the app displays an error message.
Creating the app files
First, create basic starter files for an app named Add coupon code.
-
In your shell, navigate to the folder where you want to store the app. Example:
$ cd projects -
In the folder, run:
zcli apps:new -
At the prompts, enter the following values:
- Directory name: add_coupon_code
- Author's name: Your name
- Author's email: Your email address
- Author's website: Leave blank and press Enter.
- App name: Add coupon code
ZCLI creates app starter files in the add_coupon_code folder.
Setting the app location
Update the app to run in the ticket editor location.
![]()
-
In the add_coupon_code folder, open manifest.json in your text editor.
-
Replace the
locationproperty with the following:..."location": {"support": {"ticket_editor": "assets/iframe.html"}},... -
Save manifest.json.
Changing the logo and icon
In addition to logo images, ticket editor apps require an SVG app icon named icon_ticket_editor.svg in the app's assets folder. To learn more about requirements for the icon, see Styles and assets.
To add the app icon and replace the app's default logo images, right-click each of the following image links and download them into the add_coupon_codes/assets folder. Save the images using the listed filename. If prompted, overwrite any existing versions of the files.
Running the app locally
Use ZCLI to run the app locally. This lets you verify the app icon is displayed correctly.
-
In your shell, navigate to the add_coupon_code folder. Example:
cd projects/add_coupon_code -
Start a local ZCLI web server by running the following command:
zcli apps:serverAfter a moment, a status message appears informing you that the server has started.
Note: To stop the server, press Ctrl+C.
-
In your browser's private or incognito window, sign in to Zendesk Support and go to the Agent Workspace. From the workspace, open a new or existing ticket.
The URL should look like this:
https://{subdomain}.zendesk.com/agent/tickets/{ticket_id} -
Append
?zcli_apps=trueto the URL and press Enter. The URL should now look like this:https://{subdomain}.zendesk.com/agent/tickets/{ticket_id}?zcli_apps=trueThe ticket editor displays the app icon.

-
Click the icon to open the app.
The app displays a "Hello, World!" heading.

Designing the user interface
Add some buttons and styling to the app's iframe. This lets you mock up the app's visual design without using live data.
-
In the app's assets folder, open iframe.html. Replace the file's contents with the following:
<!DOCTYPE html><html><head><meta charset="utf-8" /><title>Add a coupon code</title><!-- Styling --><linkhref="https://cdn.jsdelivr.net/combine/npm/@zendeskgarden/css-bedrock"rel="stylesheet"/><link rel="stylesheet" href="main.css" /></head><body><!-- Main container --><div id="container"><button data-cpn-id="1">Coupon 1</button><button data-cpn-id="2">Coupon 2</button><button data-cpn-id="3">Coupon 3</button><button data-cpn-id="4">Coupon 4</button><button data-cpn-id="5">Coupon 5</button><button data-cpn-id="6">Coupon 6</button><button data-cpn-id="7">Coupon 7</button><button data-cpn-id="8">Coupon 8</button><button data-cpn-id="9">Coupon 9</button></div><!-- Scripts --><script src="https://static.zdassets.com/zendesk_app_framework_sdk/2.0/zaf_sdk.min.js"></script><script src="main.js"></script></body></html>The HTML contains nine hard-coded
<button>elements. For now, you can use these buttons to test the look and style of the app. You'll replace them later in the tutorial. -
In the assets folder, create a main.css file. Paste the following into the file:
#container {display: grid;grid-template-columns: repeat(auto-fit, minmax(100px, 1fr));grid-auto-rows: 40px;grid-auto-columns: 100px;grid-gap: 5px;align-items: stretch;margin: 10px 5px;}#container > button {border-radius: 4px;border: 0px;cursor: pointer;transition: background-color 0.25s;overflow: hidden;text-overflow: ellipsis;}#container > button:hover {background-color: rgba(31, 115, 183, 0.2);}p.center {text-align: center;}p.bold {font-weight: bold;}The CSS lays out the app's coupon buttons into a grid. The CSS also contains rules to format messages for the app.
-
In the assets folder, create a main.js file. Paste the following into the file:
(function () {const client = ZAFClient.init();client.invoke("resize", { width: "400px", height: "150px" });})();The code initializes a ZAF client. It then uses the ZAF client to set a default size for the app's iframe.
-
Save iframe.html, main.css, and main.js.
-
In your browser, refresh the ticket page. Click the app icon to reopen the app.
The app now displays a grid of coupon buttons.

Clicking a coupon button doesn't do anything yet. You'll add handlers for the buttons in the next section.
Getting data
Next, load live data into the app. For this tutorial, the app uses data from custom "coupon" objects. Before loading the data, you need to define these objects.
-
Use the following Create Object Type request to create a schema for the "coupon" custom object type.
curl -X POST https://{subdomain}.zendesk.com/api/sunshine/objects/types \-H "Authorization: Bearer {access_token}" \-H "Content-Type: application/json" \-d '{"data": {"key": "coupon","schema": {"properties": {"label": {"type": "string","description": "Button text for the coupon code. Example: \"$5 off\""},"code": {"type": "string","description": "Redemption code for the coupon"}},"required": ["label","code"]}}}'Tip: You also add a custom object schema as an app requirement. See Custom object app requirements. However, app requirements don't work with the local ZCLI web server.
-
Use the following Create Object Record requests to create three "coupon" objects. The objects use the schema you defined in step 1.
curl -X POST https://{subdomain}.zendesk.com/api/sunshine/objects/records \-H "Authorization: Bearer {access_token}" \-H "Content-Type: application/json" \-d '{"data": {"type": "coupon","attributes": {"label": "$5 off","code": "$5OFF-ABCD-2099"}}}'curl -X POST https://{subdomain}.zendesk.com/api/sunshine/objects/records \-H "Authorization: Bearer {access_token}" \-H "Content-Type: application/json" \-d '{"data": {"type": "coupon","attributes": {"label": "$10 off","code": "$10OFF-EFGH-2099"}}}'curl -X POST https://{subdomain}.zendesk.com/api/sunshine/objects/records \-H "Authorization: Bearer {access_token}" \-H "Content-Type: application/json" \-d '{"data": {"type": "coupon","attributes": {"label": "Free shipping","code": "FREE-SHIPPING-IJKL-2099"}}}' -
In main.js, replace the file's contents with the following code.
The code implements the app logic from Planning the app. To insert a coupon code at the agent's cursor, the app uses the ZAF client's
invoke()method. The method runs the ticket.editor.insert action. The method call is highlighted below.(function () {const client = ZAFClient.init();client.invoke(`resize`, { height: `40px` });const settings = {url: `/api/sunshine/objects/query?per_page=9`,type: `POST`,contentType: `application/json`,data: JSON.stringify({query: {$and: [{ _type: { $eq: `coupon` } }],},}),};client.request(settings).then((response) => {const coupons = response.data;if (coupons.length > 0) {// Resize the app to avoid scrollbarresizeApp(coupons, client);displayCouponButtons(coupons, client);} else {displayNoCouponsMsg();}},(error) => {displayErrorMsg(error);console.error(error);});})();function resizeApp(coupons, client) {// The app displays 3 coupon buttons per rowconst rowCount = Math.ceil(coupons.length / 3);// Each row is approximately 42px. Adds 24px for container marginconst iframeHeight = rowCount * 42 + 24;client.invoke(`resize`, { width: `400px`, height: `${iframeHeight}px` });}function displayCouponButtons(coupons, client) {coupons.forEach((coupon) => {const couponButton = `<button data-cpn-id="${coupon.id}">${coupon.attributes.label}</button>`;insertContent(couponButton);document.querySelector(`[data-cpn-id="${coupon.id}"]`).addEventListener(`click`, () => {client.invoke(`ticket.editor.insert`, `${coupon.attributes.code}`);client.invoke('hide');client.invoke('show');});});}function displayNoCouponsMsg() {const noCouponsMsg = `<p class="center bold">No coupons available</p>`;insertContent(noCouponsMsg);}function displayErrorMsg(error) {const errorMsg = `<p class="center bold">${error.status}: ${error.statusText}</p>`;insertContent(errorMsg);}function insertContent(content) {const container = document.getElementById(`container`);container.insertAdjacentHTML(`beforeend`, content);} -
In iframe.html, remove the hard-coded
<button>elements from the "container" div. The code in main.js now dynamically adds coupon buttons....<!-- Main container --><div id="container"></div>... -
Save main.js and iframe.html.
-
In your browser, refresh the ticket page. Click the app icon to reopen the app.
The app's iframe now displays buttons for the "coupon" objects you created.
-
Click each coupon button. Verify the app inserts the correct coupon code at your cursor.
Testing the app
Next, test the app to verify it works as intended. This tutorial provides steps for three test cases:
You can use a similar workflow to cover other test cases.
Test case 1: New coupon
If you add a "coupon" custom object, the app should display a related coupon button.
-
Use the following Create Object Record request to add a "coupon" object.
curl -X POST https://{subdomain}.zendesk.com/api/sunshine/objects/records \-H "Authorization: Bearer {access_token}" \-H "Content-Type: application/json" \-d '{"data": {"type": "coupon","attributes": {"label": "5% off","code": "5%-OFF-MNOP-2099"}}}' -
In your browser, refresh the ticket page. Click the app icon to reopen the app.
Verify the app displays a related coupon button.

-
Click the coupon button. Verify the app inserts the correct coupon code at your cursor.
-
If wanted, repeat steps 1–3 to test more coupons. The app only displays the nine most recently created coupons.
Test case 2: No coupons
If the app's Custom Objects Search request returns no coupons, the app should display a related message.
-
In main.js, add the following comparison object to the Custom Objects Search request. This ensures the request returns no matching objects.
...const settings = {url: `/api/sunshine/objects/query?per_page=9`,type: `POST`,contentType: `application/json`,data: JSON.stringify({query: {$and: [{ _type: { $eq: `coupon` } }],$and: [{ _type: { $eq: `null` } }],},}),};... -
Save main.js.
-
In your browser, refresh the ticket page. Click the app icon to reopen the app.
Verify the app displays a "No coupons available" message.

-
In main.js, revert your change from step 1.
...const settings = {url: `/api/sunshine/objects/query?per_page=9`,type: `POST`,contentType: `application/json`,data: JSON.stringify({query: {$and: [{ _type: { $eq: `coupon` } }],},}),};... -
Save main.js.
Test case 3: Request error
If the app's Custom Objects Search request returns an error, the app should display the error's HTTP status code and a related status text.
-
In main.js, add the following typo to the Custom Objects Search request. This ensures the request fails and returns an error.
...const settings = {url: `/api/sunshine/objects/query?per_page=9foo`,type: `POST`,contentType: `application/json`,data: JSON.stringify({query: {$and: [{ _type: { $eq: `coupon` } }],},}),};... -
Save main.js.
-
In your browser, refresh the ticket page. Click the app icon to reopen the app.
Verify the app displays an error message.

-
In main.js, revert your change from step 1.
...const settings = {url: `/api/sunshine/objects/query?per_page=9`,type: `POST`,contentType: `application/json`,data: JSON.stringify({query: {$and: [{ _type: { $eq: `coupon` } }],},}),};... -
Save main.js.
Code complete!
Congratulations! You built a working ticket editor app. The main.js file should now look like this:
(function () {const client = ZAFClient.init();client.invoke(`resize`, { height: `40px` });const settings = {url: `/api/sunshine/objects/query?per_page=9`,type: `POST`,contentType: `application/json`,data: JSON.stringify({query: {$and: [{ _type: { $eq: `coupon` } }],},}),};client.request(settings).then((response) => {const coupons = response.data;if (coupons.length > 0) {// Resize the app to avoid scrollbarresizeApp(coupons, client);displayCouponButtons(coupons, client);} else {displayNoCouponsMsg();}},(error) => {displayErrorMsg(error);console.error(error);});})();function resizeApp(coupons, client) {// The app displays 3 coupon buttons per rowconst rowCount = Math.ceil(coupons.length / 3);// Each row is approximately 42px. Adds 24px for container marginconst iframeHeight = rowCount * 42 + 24;client.invoke(`resize`, { width: `400px`, height: `${iframeHeight}px` });}function displayCouponButtons(coupons, client) {coupons.forEach((coupon) => {const couponButton = `<button data-cpn-id="${coupon.id}">${coupon.attributes.label}</button>`;insertContent(couponButton);document.querySelector(`[data-cpn-id="${coupon.id}"]`).addEventListener(`click`, () => {client.invoke(`ticket.editor.insert`, `${coupon.attributes.code}`);client.invoke('hide');client.invoke('show');});});}function displayNoCouponsMsg() {const noCouponsMsg = `<p class="center bold">No coupons available</p>`;insertContent(noCouponsMsg);}function displayErrorMsg(error) {const errorMsg = `<p class="center bold">${error.status}: ${error.statusText}</p>`;insertContent(errorMsg);}function insertContent(content) {const container = document.getElementById(`container`);container.insertAdjacentHTML(`beforeend`, content);}
The iframe.html file should look like this:
<!DOCTYPE html><html><head><meta charset="utf-8" /><!-- Styling --><linkhref="https://cdn.jsdelivr.net/combine/npm/@zendeskgarden/css-bedrock"rel="stylesheet"/><link rel="stylesheet" href="main.css" /></head><body><!-- Main container --><div id="container"></div><!-- Scripts --><script src="https://static.zdassets.com/zendesk_app_framework_sdk/2.0/zaf_sdk.min.js"></script><script src="main.js"></script></body></html>
Installing the app
As an optional step, you can upload and install the app as a private app in your Zendesk Support instance.
-
In the add_coupon_code folder, run:
zcli apps:createZCLI packages, uploads, and installs the app to your Zendesk instance.
-
In Admin Center, click the Apps and integrations icon (
 )
in the sidebar. Then select Apps > Zendesk Support apps.
)
in the sidebar. Then select Apps > Zendesk Support apps.The app appears in the list of currently installed apps on the My Apps page.
