Building a Sell app using OAuth 2.0 - Part 2: Installing the app in Zendesk Sell
In the previous tutorial, you read about the app design requirements, installed the Zendesk CLI, and downloaded an app template with starter files to build a Sell app.
In this tutorial, you'll specify the app's location in the Zendesk Sell interface, install the app privately, and learn how to develop apps locally. The tutorial covers the following tasks:
- Setting the app's location in Sell
- Reviewing the template files
- Installing the app in Sell
- Testing the app
- Testing the app locally
This tutorial is the second part of a series on building a Zendesk app:
- Part 1: Laying the groundwork
- Part 2: Installing the app in Zendesk Sell - YOU ARE HERE
- Part 3: OAuth 2.0 setup
- Part 4: Creating audiences in Mailchimp
- Part 5: Getting data from the Mailchimp API
Setting the app's location in Sell
You can run a Zendesk app in different locations in the Zendesk Sell user interface. In this tutorial, you set the app's location to the right sidebar of the Person page:
To set the app location in Sell
-
In your code editor, open the manifest.json file in your app project folder ( /dist/manifest.json ). The manifest.json file is used to configure the app.
-
Replace the default value of the location property with the following value:
"location": {"sell": {"person_card": "assets/index.html"}}, -
Save the file.
Reviewing the template files
Your Zendesk app will live in an iframe in the person_card location you specified in the previous section. Like any iframe app, developing a Zendesk app consists of combining static and dynamic elements in the HTML file to be displayed in the iframe.
The main HTML file index.html is located in your root app project folder. Open the index.html file in your code editor and rename the title to "Sell OAuth Mailchimp Tutorial App". Save the file.
<!DOCTYPE html><html><head><meta charset="UTF-8" /><title>Sell OAuth Mailchimp Tutorial App</title><script src="https://assets.zendesk.com/apps/sdk/2.0/zaf_sdk.js"></script><linkrel="stylesheet"href="https://assets.zendesk.com/apps/sdk-assets/css/0/zendesk_garden.css"type="text/css"/></head><body><div id="app"></div></body></html>
To interact with the Apps framework, the HTML file imports the ZAF SDK library in a script tag:
<script src="https://static.zdassets.com/zendesk_app_framework_sdk/2.0/zaf_sdk.min.js"></script>
The SDK provides a ZAFClient global object that allows cross-frame communication between your app and the host Zendesk product. After importing the SDK, you can use the ZAFClient.init() method to create an apps API client:
const client = ZAFClient.init()
The client provides an interface between your app and a host application such as Zendesk Sell. The client gives you a number of methods to interact with the Apps framework. Use the get() and set() methods to read and write data in the framework APIs. Use the invoke() method to run methods in the framework APIs. Use the request() method to make HTTP requests to any REST API. Use the on() method to listen to events. For details, see the ZAF Client API doc. Due to the nature of cross-frame communication, every interaction between your iframe and the framework happens asynchronously.
The client is initialized in the src/index.tsx file inside a root <App/> component. To initialize the client only once, the React useMemo hook is used.
declare var ZAFClient: {init: () => Client,}const App = () => {const client = useMemo(() => ZAFClient.init(), [])return (<ZAFClientContextProvider value={client}><ThemeProvider><EntryView /></ThemeProvider></ZAFClientContextProvider>)}
The <App/> component will be rendered in the div container with the id 'app'.
ReactDOM.render(<App />, document.getElementById('app'))
The div is defined in the index.html file between the <body> tags.
The React Context is used to make the client accessible to the component tree without having to pass it down manually at every level.
<ZAFClientContextProvider value={client}>
<ZAFClientContextProvider> is a part of the @zendesk/sell-zaf-app-toolbox package. The package contains methods, hooks, and components to help you build and integrate React apps with Zendesk Sell quicker and with less effort.
For this app, Zendesk Garden is used as the UI framework. Zendesk Garden is designed to be a common baseline of styles and components between all Zendesk products. For example, it provides customizable React components such as spinners and buttons which can be included in the project. The Zendesk Garden assets styles your app to match the look and feel of Zendesk products.
The <EntryView/> component is wrapped in <ThemeProvider> delivered by the @zendeskgarden/react-theming package to provide default global theming for nested components.
<ThemeProvider><EntryView /></ThemeProvider>
Zendesk Sell exposes the Apps Sell API which may differ between locations. The API defines the events and objects that you can use to build apps in Zendesk Sell.
Since the app will be displayed in the the Person Card location on the right side, one of the available objects is the contact object. In this object, you'll use the email address property.
The EntryView.tsx file (src/EntryView.tsx) is an app component which makes two HTTP requests and then displays the data.
export const EntryView = () => {useClientHeight(230)const contactEmailResponse = useSellContactEmail()const todayDate = useFormattedDate(new Date())return (<Grid gutters={false} className={css.App}><Row><ResponseHandlerresponse={contactEmailResponse}loadingView={<Loader />}errorView={<div>Something went wrong!</div>}emptyView={<div>There's nothing to see yet.</div>}>{([sellContact]: [string]) => (<Col textAlign="center"><Header contactEmail={sellContact} /><div className={css.dateContainer}>Date: {todayDate}</div><ContentView /></Col>)}</ResponseHandler></Row></Grid>)}
- The first request from the useSellContactEmail hook uses
client.get('contact.email')to get a Sell contact email address based on a current location. - The second request from the useFormattedDate hook formats a given date respecting the Sell account settings.
- useClientHeight is another hook which is used to set the app height. It accepts a height value and calls
client.invoke(‘resize’, {height}). - The
<ResponseHandler/>component is responsible for handling asynchronous requests. Depending on a request status it can display a loader, an error state, or an empty state. When the request is made, a child component with the response data is displayed.
Next, you'll install the app in your Zendesk Sell instance and check how it works.
Installing the app in Sell
Note: You can only upload and install private Sell apps on the Sell Growth plan or above. The Sell account must also be linked to a Zendesk Support account.
Before installing, the app needs to be validated and then packaged as a zip file for uploading. In your command line, run the npm script:
$ npm run build
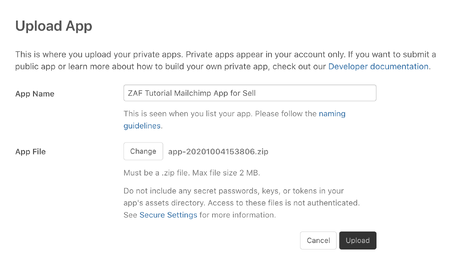
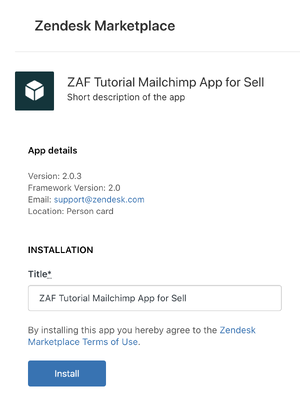
You should get confirmation that a new zip file has been generated. The file can be found in dist/tmp/ folder. Follow the instructions in Uploading and installing a private app in Zendesk Sell to install the private app in Zendesk Sell.
Testing the app
Once you have your app installed, you'll check the app works and is displayed in the right place. First, a contact person will be created and then the card is viewed to see the app is visible.
Create a contact
-
Click Add button on the topbar and choose Contact: Person dropdown option.

-
Fill in the form with First Name, Last Name and Email Address.
-
Click Save & view contact.
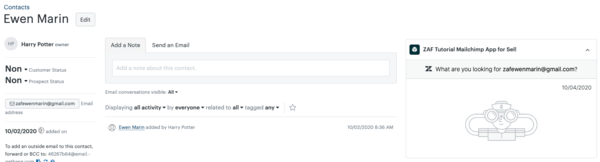
The email address will fetch audiences that are connected with the particular person.
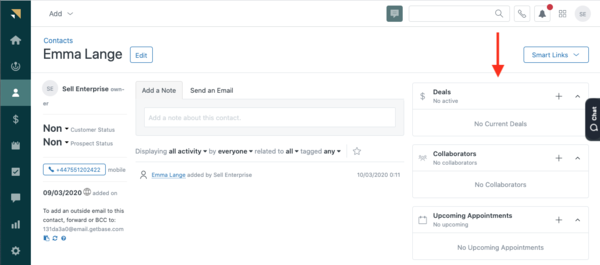
You should see the app in the Person sidebar.
Testing the app locally
The Zendesk CLI (ZCLI) includes a local web server so you can run and test your apps locally as you're developing it.
Note: It is recommended to use private browsing or the Incognito mode in your browser when testing and developing apps. Your browser may cache certain files used by the app. If a change is not working in your app, the browser might be using an older cached version of the file. With private browsing, files aren't cached.
Test your app locally
-
In your project dist/ directory, create a file named zcli.apps.config.json with the following content:
{"plan": "silver","app_id": “YOUR_APP_ID”,"installation_id": “YOUR_INSTALLATION_ID”,"parameters": {}}To find your app details, sign in to your Zendesk Sell instance as an admin and open the following page in the same browser, replacing YOUR_SUBDOMAIN with your own:
https://YOUR_SUBDOMAIN.zendesk.com/api/sell/apps/installations.jsLocate your installed app, find the id and app_id and add the values to "YOUR _APP_ID" and “YOUR_INSTALLATION_ID” in the zcli.apps.config.json file.
-
Save the file.
-
In your command-line tool, navigate to the app's root folder and start the local ZCLI server:
$ npm run serverThe command executes
zcli apps:server ./distunderneath. After a moment, a status message appears informing you that a local web server has started. -
Open a new tab in your command-line tool and start the app:
$ npm run start -
Sign in to Sell and navigate to the Person page.
-
Append
?zcli_apps=trueto the person card URL directly and press Enter. The URL should look something like this:https://app.futuresimple.com/crm/contacts/1234?zcli_apps=trueTip: Bookmark the modified URL for easy access in the future.
-
If you're using the Chrome browser, the content of your app may be blocked.
Click the lock icon on the left side of the address bar and select Site settings. On the Settings page, scroll to the Insecure Content section, and select Allow. Click the lock icon in the address bar:

On the Settings page, allow insecure content:

Note: Firefox doesn't block app content but Safari does and has no option to disable blocking. You must use Chrome or Firefox to work with the local ZCLI server.
-
Make any updates in your code and check if you see the changes reflected in the app.
In this tutorial, you established an app location and installed the app in your Zendesk Sell instance. For now, you can shut down the server by switching to your command-line interface and pressing Control+C.
In the next tutorial, you'll implement the OAuth authorization flow. Continue to Part 3: OAuth 2.0 setup.