Building a server-side app - Part 3: Accessing external APIs
In the previous tutorial, you built a small web app that displayed server-side content in the iframe in Zendesk Support. In this tutorial, you'll update the web app to get data from an external API and display it in the iframe.
The tutorial covers the following tasks:
- Planning the update
- Setting up a project in Asana
- Showing a start page in your app
- Showing the list page
- Listing the tasks
This tutorial is the third part of a series on building a server-side Zendesk app:
- Part 1: Core concepts
- Part 2: Displaying server-side content in a Zendesk app
- Part 3: Accessing external APIs - YOU ARE HERE
- Part 4: Accessing framework APIs
- Part 5: Securing the app
- Part 6: Deploying the app
Planning the update
You should have a good idea of how your app will look and work after the update before you start working on it. Let's say you have an Asana project that lists tech notes for your support team to write.
You'd like to display the tech note ideas in the Zendesk Support agent interface. If an agent has time to write a tech note, the agent can click one of them to see the details in Asana.
The updated app looks like this without any formatting niceties:
Setting up an Asana project
The web app will get data from Asana, a popular task management application. This section describes how to set up Asana for the tutorial.
Creating an Asana project and adding a few tasks
To start, create an Asana project and add some mock tasks to load in the app.
-
Sign in to Asana. From your Asana Home page, create a project by clicking the Plus (+) icon next to the My Workspace label on the left side and create a blank project.

-
Name the project "Tech notes". Mark the project's privacy as Public to My Workspace and set the default view to List. Then click Continue.

-
At the prompt, select Start adding tasks and click Go to project.

-
On the Tech Notes project page, click Add Task and add a couple of tasks to the project. Example: "Clarify the serial number location".

Getting a personal access token
You'll need a personal access token from Asana to make API calls from your web app.
-
Sign in to Asana and go to the Asana developer console.
-
Under Personal access tokens, click Create new token.

-
Name the token "ZAF tutorials", agree to the terms, and click Create token.
Save the resulting token securely. You'll use it later in the tutorial, and it won't be displayed again.
If you lose the token, return to this page to reset it.
Showing a start page in your app
The web app should display a start page when the app starts in Zendesk Support.
-
In the app_remote folder, create a new folder named views.
-
In the views folder, create a template named start.tpl.
-
Open the start.tpl template in a text editor and add the following HTML:
<head><linkhref="https://cdn.jsdelivr.net/bootstrap/3.3.6/css/bootstrap.min.css"rel="stylesheet"/></head><body><a class="btn btn-default btn-block" href="list" role="button">List tech note ideas</a></body> -
In app.py, replace the return statement in the
send_iframe_html()function withreturn template('start').@route('/sidebar')def send_iframe_html():return template('start') -
Because you introduced the Bottle
template()method, addtemplateto the list of imported methods on the first line of app.py:from bottle import route, run, template... -
In the terminal session running the Bottle development server, restart the server by stopping it with Ctrl+C, then restarting it with
python3 app.py. You have to restart the server every time you make a change to Python code.Note: You don't have to restart it when making cosmetic changes such as CSS or template edits.
-
In your browser, reload the Agent Workspace page. The app should display the start page.
The Bootstrap
btn-blockclass stretches the link button across the width of the app's iframe. The button adjusts in the sidebar in the agent interface:
You'll build a route for the link in the next section.
Tip: Button links give you the flexibility to add more features to your app later. For example, if you want to support creating tasks, you can add an Add tech note idea button to the start page, and then build a route for it:

Showing the list page
When an agent clicks on the List tech note ideas link on the start page, the web app should display a list of tasks from the Asana project.
-
In the views folder, create a template named list_tasks.tpl.
-
Open the list_tasks.tpl template in a text editor and add the following HTML:
<head><linkhref="https://cdn.jsdelivr.net/bootstrap/3.3.6/css/bootstrap.min.css"rel="stylesheet"/></head><body>Task list goes here</body> -
In app.py, add the following route after the "/start" route:
...@route('/list')def show_tasks():# authenticate the request# make the request# handle the responsereturn template('list_tasks')... -
Save list_tasks.tpl and app.py.
-
Restart the Bottle development server.
-
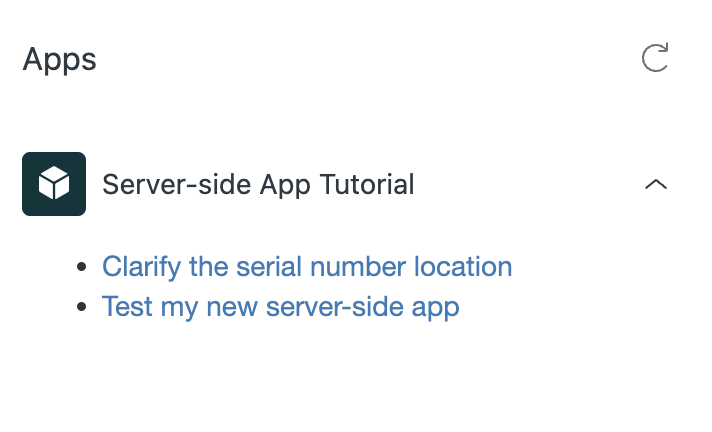
In your browser, reload the Agent Workspace page. In the Zendesk app, click List tech note ideas. The app should display the following content:

Listing the tasks
According to the Asana API docs, the Get tasks from a project endpoint returns "the compact task records for all tasks within the given project, ordered by their priority within the project":
GET /projects/{project_gid}/tasks
The {project_gid} parameter is the global id (gid) for the project that contains the tasks. Example: 13579.
The doc provides a curl example:
curl -X GET https://app.asana.com/api/1.0/projects/{project_gid}/tasks \-H 'Accept: application/json' \-H 'Authorization: Bearer {access-token}'
This is all the information you need to make an API request.
-
Sign in to Asana and go to https://app.asana.com/api/1.0/projects/.
A JSON object containing your projects and their ids should appear in the browser window. Copy the gid for the Tech notes project. You'll use the gid later in the tutorial.
-
In the app_remote folder, create a .env file. Paste the following into the file:
ASANA_ACCESS_TOKEN="{asana_access_token}"ASANA_PROJECT_ID="{asana_project_gid}"Replace
{asana_access_token}with the personal access token you created in Getting a personal access token. Replace{asana_project_gid}with the gid you copied in step 1.The .env file contains environment variables for your project. When you upload your web app to Glitch, secrets stored in the .env aren't publicly visible.
-
In an empty terminal session, run:
pip3 install python-dotenvThe command installs the Python-dotenv package. The package lets you read .env variables using standard Python functions, such as
os.environ.get(). -
In app.py, add the following highlighted statements to the top of the file:
import osfrom dotenv import load_dotenvimport requestsfrom bottle import route, run, templateload_dotenv()...The statements import related packages and load the .env file.
-
In the
show_tasks()function of app.py, replace the following comment:# authenticate the requestwith the following lines:
access_token = os.environ.get('ASANA_ACCESS_TOKEN')header = {'Authorization': 'Bearer {}'.format(access_token)}This creates an Authorization header for the request. The
format()string function interpolates the token value at the curly braces in the string. The result will look as follows:header = {'Authorization': 'Bearer 0/861ed62fdd7ad63143c8bb90a90bg6fa'} -
Make the request by replacing the following comment:
# make the requestwith the following lines:
proj_id = os.environ.get('ASANA_PROJECT_ID')url = 'https://app.asana.com/api/1.0/projects/{}/tasks'.format(proj_id)r = requests.get(url, headers=header)The web app makes a GET request using the
requests.get()method from the requests library. You pass the endpoint URL and the authorization header as method arguments. -
Handle the response by replacing the following 2 lines:
# handle the responsereturn template('list_tasks')with the following block:
if r.status_code == 200:tasks = r.json()return template('list_tasks', list=tasks['data'], proj_id=proj_id)else:msg = 'Problem with the request: {} {}'.format(r.status_code, r.reason)return msgWhen you made the request in step 6, you assigned the response to a variable named
r. If the request is successful (ifr.status_code == 200), the web app passes the list of tasks to the template. If the response is not successful, the app displays a plain text error message derived from the response.The block uses the requests library's
json()method to convert the JSON response to a Python dictionary and assigns it to thetasksvariable:tasks = r.json()...By inspecting the
tasksvariable, you can learn that it contains a value that looks as follows:{'data':[{'name': 'Describe printer shutdown workaround', 'id': 145581874072676},{'name': 'Show the serial number location', 'id': 145581874072678}]}You're only interested in the list of tasks. You retrieve it with
tasks['data']and pass it to the list_tasks.tpl template:...return template('list_tasks', list=tasks['data'])The completed route should look as follows:
...@route('/list')def show_tasks():access_token = os.environ.get('ASANA_ACCESS_TOKEN')header = {'Authorization': 'Bearer {}'.format(access_token)}proj_id = os.environ.get('ASANA_PROJECT_ID')url = 'https://app.asana.com/api/1.0/projects/{}/tasks'.format(proj_id)r = requests.get(url, headers=header)if r.status_code == 200:tasks = r.json()return template('list_tasks', list=tasks['data'], proj_id=proj_id)else:msg = 'Problem with the request: {} {}'.format(r.status_code, r.reason)return msg... -
Switch to the list_tasks.tpl template and replace the following text:
Task list goes herewith the following unordered list:
<ul>% for task in list:<li><ahref="https://app.asana.com/0/{{proj_id}}/{{task['gid']}}"target="_blank">{{task['name']}}</a></li>% end</ul>The templating code sets up a loop to print the tasks passed to the template in the list parameter. To learn more about the templating language, see SimpleTemplate Engine in the Bottle docs.
To test the updated web app in Zendesk Support:
-
Restart the Bottle development server.
-
In your browser, reload the Agent Workspace page. In the Zendesk app, click List tech note ideas. The app should display the following content:
Clicking a link should bring you to the task in Asana.
In this tutorial, you updated the web app to get tasks from the Asana API and then display them in the Zendesk app. In the next tutorial, you'll learn how to access the Zendesk framework APIs. See Part 4 - Accessing framework APIs.