Building your first Sell app - Part 1: Laying the groundwork
In this five-part tutorial series, you'll learn how to build a Zendesk Sell app from start to finish. The app you'll build is called Related Leads. This tutorial covers the first steps for setting up the app:
The other tutorials in the series teach you how to build and install the app:
- Part 2: Designing the user interface
- Part 3: Creating and inserting templates
- Part 4: Getting data
- Part 5: Installing the app in Zendesk Sell
Because the tutorials build on each other, tackle them in order and finish each tutorial before moving on to the next one.
To download the completed source code of the app in this tutorial, click related_leads.zip. You can review the code as you follow along or check your work.
Note: Zendesk provides this article for instructional purposes only. Zendesk does not provide support for the content. Please post any issue in the Zendesk Apps framework (ZAF) community, or search for a solution online.
What you'll need
To build and upload a private Sell app, you must have Zendesk Sell on the Sell Growth plan or above. The Sell account must also be linked to a Zendesk Support account.
Planning the app
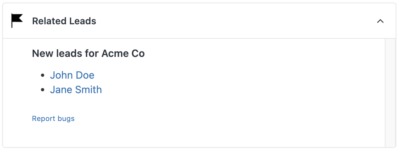
You should have a good idea of how your app will look and work before you start working on it. The Related Leads app will appear in the sidebar when viewing a deal card in Sell.

The app will display the following information about the organization associated with the deal:
- The organization's name
- A list of new leads for the organization
The app will also include a "Report bugs" link that lets the user report a bug to the app's author.
Here's a mockup of the user interface:
Installing ZCLI
In this section, you'll install the Zendesk Command Line Interface (ZCLI). ZCLI lets you:
- Automatically create starter files and folders for a new app
- Test your app locally in a browser
- Validate your app
- Package your app for upload
Installing ZCLI is a one-time task. Once installed, you can use ZCLI for all your Zendesk app projects. To install ZCLI, follow the instructions in Installing and updating ZCLI. You also need to authenticate ZCLI with your Zendesk account. See Authentication in the ZCLI documentation. After you're done, return here to continue the tutorial.
Note: ZCLI replaces the Zendesk Apps Tools (ZAT), which are in maintenance mode. To use ZAT instead, refer to Installing and using ZAT.
Creating the app files
After installing ZCLI, you're ready to start building. The first step is to create the starter files for a new app called Related Leads in a folder called related_leads.
To create the app files
-
In your command-line interface, navigate to the folder where you want the app files to be saved in a subfolder. Use the cd command (for change directory) to navigate to a child folder. For example:
$ cd projects -
Run the following ZCLI command:
$ zcli apps:new -
At the prompts, enter the following values:
- Directory name: related_leads
- Author's name: Your name
- Author's email: Your email address
- Author's website: Leave blank and press Enter.
- App name: Related Leads
ZCLI creates app starter files in the related_leads folder.
-
Open your file browser and navigate to the files. The folder contains an assets and translations folder as well as a manifest.json and README.md file. You can add as many files as you need when you're building your app, but these files are all you need to start. Because it's an iframe app, you can host the app in the Zendesk server infrastructure or on a remote server using any technology stack you prefer. If you're only using client-side technologies, such as Handlebars, as you will be here, you can simply host it in your Zendesk account.
In the next tutorial, you'll learn more about the how your app's user interface (UI) displays in Sell. You'll create some placeholder HTML, add a footer, and add some styles to meet the design requirements specified in Planning the app above. Get started: Part 2: Designing the user interface.