Test drive the Apps framework
In this 15-minute tutorial, you'll use the Zendesk Apps framework (ZAF) to access ticket data. You'll also use the framework to add a comment to a ticket as well as create a ticket.
A Zendesk app is simply a small HTML application installed in the agent interface that extends the product's functionality in some way.
To keep things simple, you'll install and use an app named v2 REPL in Zendesk Support. REPL is itself a Zendesk app that works just like the JavaScript console in your web browser. It lets you try out different framework code snippets without building an app.
Here's REPL in the ticket sidebar:
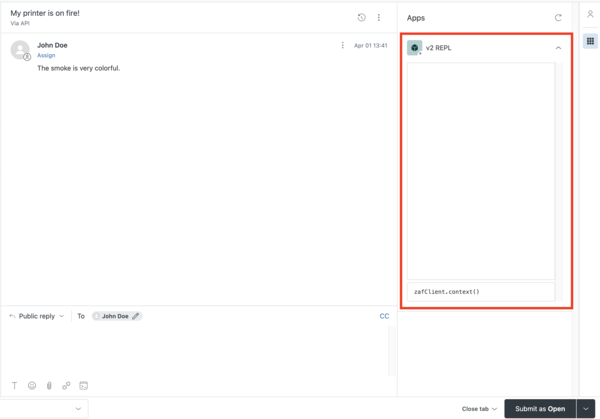
Note: REPL is not supported in Zendesk Chat.
Preparation
-
If you don't already have a Zendesk Support account, register to start a free trial at https://www.zendesk.com/register/.
-
In your browser, navigate to the v2 REPL app in the Zendesk Marketplace at https://www.zendesk.com/marketplace/apps/support/101101/v2-repl/.

-
Click Install to start the installation process, select your Zendesk Support account, then click Install:

-
Accept the terms and license and click Install:

The app is installed in several locations in the agent interface — the nav bar on the left, the top bar, and the sidebar of the Ticket, New Ticket, User, and Organization pages.

Access data
The Apps framework has lots of APIs that give apps access to all kinds of data in your Support, Chat, or Sell accounts. Use the ZAF client's get() method in your apps to retrieve the data.
Try it out
Let's get data from a ticket that's open in the agent interface.
-
Open any ticket in the agent interface.
-
To open the REPL app in the ticket sidebar, click the Apps icon in the upper-right side of the ticket interface.

-
Enter the following statement in the text box on the lower side of the REPL app in the ticket sidebar and press Enter:
zafClient.get('ticket.subject')Example:

After hitting Enter, you should see something like the following response:

The response tells you there were no errors and that the ticket subject is "My printer is on fire!".
-
Update the
ticket.subjectproperty with the set() method:zafClient.set('ticket.subject', 'My copier is on fire!')The statement changes to subject of the ticket to "My copier is on fire!":

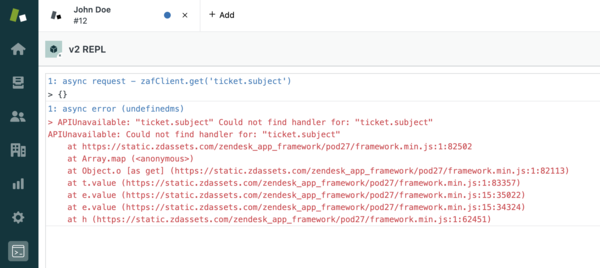
The REPL app is installed in several locations in the agent interface. However, data that's available in some locations may not be available in others. For example, your previous requests accessed ticket data. Ticket data is available in apps running in the ticket sidebar but not apps running in the nav bar:
For more information about the data you can access in each app location, refer to the locations reference documentation.
Use an action
As well as accessing data, you can also use the framework to perform, or invoke, actions. For example, the ticket comment object not only has several properties, but the following actions too:
- comment.appendHtml
- comment.appendMarkdown
- comment.appendText
Use the ZAF client's invoke() method in your apps to use actions.
Try it out
Let's add a comment to a ticket.
-
Open a ticket in your agent interface.
-
In the REPL app in the ticket sidebar, enter the following statement and press Enter:
zafClient.invoke('ticket.comment.appendText', 'On it!')The statement inserts "On it!" in the comment editor:

Like data, the actions you can invoke depend on the location of your app in the agent interface. For more information, refer to the locations reference documentation.
Make an HTTP request
You can use the ZAF client's
request()
method to make REST API calls and other HTTP requests from a client-side Zendesk
app. The request() method helps you avoid cross-domain restrictions and
browser security issues when making third-party API calls. The method also lets
you authenticate Zendesk API requests using browser cookies.
Tip: For more information about the request() method, see Making API
requests from a Zendesk
app.
Try it out
Use the Zendesk REST API to create a ticket from an app. To create a ticket, you make a POST request to the /api/v2/tickets.json endpoint. You can find all the details about the Tickets API in the developer docs, but for now let's just dive in.
-
Open the REPL app in any location.
-
Paste the following statement as a single block and press Enter:
zafClient.request({url: '/api/v2/tickets.json',type: 'POST',contentType: 'application/json',data: JSON.stringify({"ticket": {"subject": "Test ticket #1","comment": { "body": "This is a test ticket" }}})})The
request()method creates a ticket in your account and returns the following information: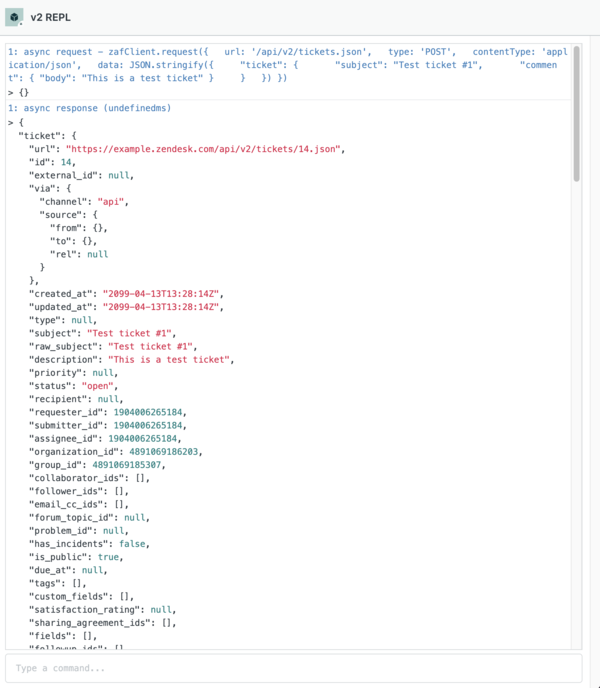
The response lists all the properties of the new ticket. Check out the properties you set yourself (
descriptionandsubject) and the ones the system set for you, such asstatus. Naturally, you could have set the ticket status in the request yourself, as follows (highlighted):data: JSON.stringify({"ticket": {"subject": subject ,"status": "open","comment": { "body": body }}}) -
Switch to the agent interface to view your new ticket. Click Views, then Your unsolved tickets:

To delete your test ticket, select it in the list, click Edit Ticket, and then select Delete.
Next steps
The best way to learn to build Zendesk apps is to keep trying different framework APIs in REPL in different locations in the agent interface. Once you're comfortable with how it all works and start seeing the possibilities, build an app or two. Use any of the following resources along the way:
-
Find out more about the framework APIs and events in Working with framework APIs and Working with framework events.
-
Build and locally run a Zendesk app in the Zendesk app quick start. The quick start introduces you to the tools and workflow commonly used for Zendesk app development.
-
Get hands-on with Building your first Support app, Building your first Sell app, or Building your first Chat app. Each is a five-part tutorial series that describes how to build a simple client-side app from scratch.
-
Try tutorials and read articles in the Apps developer guide.
-
Peruse the Apps reference documentation.
-
Learn about making your apps available in the Marketplace.
-
Ask questions or look for answers in the Zendesk Apps framework (ZAF) community.