Setting up new apps
In this article, you'll learn how to set up a new Zendesk app. The article covers how to:
- Create app starter files
- Set the product and location for an app
- Style an app using Zendesk Garden
- Define and configure installation settings for an app
Creating the app files
We recommend using the Zendesk Command Line Interface (ZCLI) to create starter files for new Zendesk apps. We also recommend using Zendesk Garden to style your apps.
Using ZCLI
You can create starter files for a Zendesk app using ZCLI's zcli apps:new
command. When running the command, you can select one of the following Zendesk
app scaffolds:
-
Basic app scaffold: This is the default scaffold for the
zcli apps:newcommand. If you're new to Zendesk app development, we recommend using this scaffold. The scaffold contains the required files for a Zendesk app. To check out the scaffold's contents, see the scaffold package on GitHub. -
React app scaffold: This scaffold is designed for experienced web developers who are familiar with Node.js, Webpack, and the Zendesk Apps framework (ZAF). To check out the scaffold's contents and setup instructions, see the scaffold package on GitHub. To learn more, see About the Zendesk React app scaffold.
For instructions for using the zcli apps:new command with either scaffold, see
Using the Zendesk Command Line Interface
(ZCLI).
ZCLI replaces the Zendesk Apps Tools (ZAT), which has been deprecated.
Using Zendesk Garden
While you can use any custom CSS or front-end framework for the look and feel of your app, Zendesk recommends using Zendesk Garden. Zendesk Garden is designed to be a common baseline of styles and components between all Zendesk products. If you want your app to match the Zendesk look and feel, use Zendesk Garden CSS classes and React components in your app.
You can import Zendesk Garden CSS classes and React components into your app's HTML template from the jsDelivr CDN. See https://www.jsdelivr.com/?query=zendeskgarden. The jsDelivr files are npm packages that can also be installed from npm. See https://www.npmjs.com/search?q=zendeskgarden.
Zendesk recommends integrating the individual CSS files currently hosted on jsDelivr into your application files and referencing them using relative paths within your application. This helps prevent connectivity issues by hosting your assets on Zendesk's own app CDN and not a third-party CDN.
For more information about the CSS classes and React components in Zendesk Garden, see garden.zendesk.com or the demo app.
Disclaimer: Zendesk is not able to provide support for third party package hosting services, such as NPM or JsDelivr. Consider posting the issue to our developer community or searching online.
File requirements
The following folder structure and files must be included in an app to install the app successfully in a Zendesk product:
assets/logo.pnglogo-small.pngtranslations/en.jsonmanifest.json
Everything else is optional. For example, you can host the rest of the app on a remote app server, including the HTML files to be iframed into the Zendesk product.
The following are brief descriptions of the required files:
-
manifest.json - Describes and configures the app. See Manifest reference.
-
translations/en.json - A standard English translation file. See App internationalization.
-
assets/logo-small.png - Small icon displayed in the header of the app. You can still upload and install the app without it, but a default image will appear in the interface. See Marketing assets for the image specifications.
-
assets/logo.png - Large icon displayed in the Zendesk admin pages for managing apps. You can still upload and install the app without it but a broken image icon will appear in the interface. See Marketing assets for the image specifications.
-
assets/icon_*.svg - An app in the
nav_bar,ticket_editor, ortop_barlocation requires a respectiveicon_nav_bar.svg,icon_ticket_editor.svgoricon_top_bar.svgfile. See SVG app icons and Top bar, nav bar, and ticket editor icon for the image specifications.
If you plan on making the app available in the Zendesk Marketplace (as opposed to creating a private app to run only in your Zendesk account), additional branding assets may be required. See Create app brand assets.
Setting the app location
You must declare where you want your app to appear in each product interface with the location property in manifest.json.
For example, in Zendesk Support you can place the app in the panel on the right side of the ticket in the agent interface. The framework calls this location the ticket_sidebar (or the new_ticket_sidebar in the case of the new ticket page).
"location": {"support": {"ticket_sidebar": "assets/iframe.html"}},
For available locations, see:
Some framework APIs are only available to apps in certain locations. For example, only apps appearing on the ticket page can get and set ticket properties, and listen for changes to the ticket.
If you want the app to appear in multiple locations in the product, add the locations to the product object:
"location": {"support": {"ticket_sidebar": "assets/iframe.html","new_ticket_sidebar": "assets/iframe.html?location=new_ticket_sidebar","nav_bar": "https://dashboard.myapp.com/nav_bar","top_bar": "https://dashboard.myapp.com/top_bar"}},
An app can exist in multiple Zendesk products. The example below shows an app that could appear in the Zendesk Support ticket_sidebar and the Zendesk Chat chat_sidebar.
"location": {"support": {"ticket_sidebar": "assets/iframe.html",},"chat": {"chat_sidebar": "assets/chat_iframe.html"}},
You must specify an object rather than a string to use certain advanced features that are enabled on a per-location basis. Set the location properties in the object.
Example:
"location": {"support": {"background": {"url": "assets/iframe.html"},"ticket_sidebar": {"autoLoad": false},"custom_object_record_sidebar": {"url": "assets/iframe.html","objectTypes": ["car", "truck"]}}},
For custom_object_record_sidebar, objectTypes is required and must be a non-empty array of custom object keys. The objectTypes property is only supported for custom_object_record_sidebar.
For available location properties, see the manifest location reference.
The URL paths can be absolute if pointing to an external page, or relative if pointing to an HTML file in the assets folder.
Note: Use https for all remote, production-ready URL paths. You can use http during development.
Defining installation settings
You can define settings you want product admins to set for the app during or after installing the app. While settings are completely optional, they're simple to set up and use. The framework even auto-generates a settings page for you.
Note: If you are building a multi-product app, you cannot currently specify product-specific settings.
Settings are defined by the parameters property in the manifest file. The property consists of a list of JSON objects representing the settings you want the admin to set.
Example:
"parameters": [{"name": "subdomain","type": "text","required": true,"secure": false,"default": "yoursubdomain"},{"name": "token","type": "text","required": true,"secure": true},{"name": "useSSL","type": "checkbox"}]
You can retrieve the setting values in your app with client.metadata():
var client = ZAFClient.init();client.metadata().then(function(metadata) {console.log(metadata.settings);});
You can also use settings to customize the manifest.json file on a per installation basis. To specify a setting value in the manifest, use double curly brackets. Example:
..."domainWhitelist": ["www.example.com", "{{setting.subdomain}}.example.com"],
For more information about domainWhitelist, see Using secure settings.
Setting properties
Each object in the parameters list represents a setting and can have the following properties:
name
The name of the setting.
"name": "subdomain",
Because you use this value in your app code, make sure you name it appropriately.
required
A boolean value that determines if the user must define the setting or not to install the app. Optional.
"required": true,
default
Specifies a default value to enter for the setting if the user doesn't specify one. Optional.
"default": "yoursubdomain",
The default value is used to populate the parameter form field when the admin installs or updates the app. However, it will not take effect for existing parameters where a value has already been set. Don't use the default value as a fallback value. If your app needs a fallback value, implement it in the app.
Apps running locally on the ZCLI web
server
don't use default setting values from manifest.json. See Defining test
settings.
secure
Use the optional "secure" property when you don't want users to see sensitive information in the parameters when making HTTP requests. Since a lot of apps make HTTP requests to get or set information, any agent can view this data in their browser if the setting is not secure.
"secure": true,
Warning: The secure property has no effect on the default property if specified. The value of default will remain public and should not contain any sensitive information. If your app uses OAuth and requires a client secret, you can use the manifest's oauth parameter instead. See oauth in the manifest reference.
For details, see Using secure settings.
scopes
Defines the specific parts of an HTTP request where a secure setting value can be interpolated.
Defining explicit scopes for all secure settings is recommended to mitigate the risk of exposing secure setting values in unintentional scopes.
If scopes is not defined, the secure setting can be used in any scope.
Warning: Using secure settings in request body or URL scopes can expose sensitive values. Third-party services may log or display these values as plain text.
The following scopes are available for secure settings:
| Scope | Description |
|---|---|
header | HTTP request headers |
body | HTTP request body |
url | URL and domainWhitelist |
jwt_secret_key | ZAF JWT secret key |
jwt_claim | ZAF JWT claims |
basic_auth_username | Basic access authentication user name |
basic_auth_password | Basic access authentication password |
type
Specifies the control to use on the auto-generated settings page for the user.
"type": "text",
Note: For sensitive values, such as passwords or API tokens, use "type": "text" with "secure": true.
{"parameters": [{"name": "apiToken","type": "text","secure": true}]}
The framework generates an HTML settings page for users installing the app. The following controls are available:
| Type | Control |
|---|---|
| text | A single-line input field |
| checkbox | A single checkbox |
| url | A single-line input field, validated for correct URL syntax |
| number | A single-line input field, validated to include only numbers |
| multiline | A multi-line textarea. User input is limited to 64Kb |
| hidden | A parameter never shown to the user on the settings page |
| oauth | Required if your app uses OAuth. See oauth in the manifest reference. The parameter is never shown to the user |
Users need some kind of user interface to enter the settings when installing the app or to edit the settings after installing the app. The framework generates an HTML settings page based on the settings defined in the manifest file. Setting type controls on the page are rendered in the same order as the settings in the manifest file. Example:
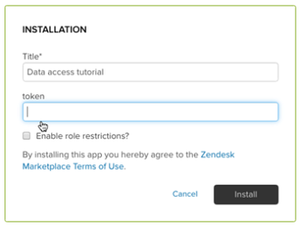
Asterisks indicate required fields.
The maximum length of any setting is 64kB. Exceeding this limit will result in an error.
You can define the setting labels displayed on the generated settings page. The labels and help text in the example above are extracted from the translation file. To translate parameters and add help text, add a parameters property to the app object in your translations files as follows:
{"app": {"parameters": {"subdomain" : { "label": "Subdomain" },"token" : { "label": "Token" },"useSSL" : { "label": "Use SSL?", "helpText": "Use SSL for a secure connection." }}}}
Updating settings
Sometimes you want to change and save a setting from within the app. You can do it with the following REST API endpoint:
PUT /api/v2/apps/installations/{id}.json
For more information, see Update an App Installation in the REST API docs.
Note that only admins can update settings, not agents.
Defining test settings
When testing an app locally, you need to specify values for any installation settings. When you start a ZCLI server for the app, ZCLI interactively asks you for the values. If wanted, you can specify the setting values in the zcli.apps.config.json file instead.
If you previously used ZAT, zcli.apps.config.json replaces the settings.yml file. The ZCLI server doesn't read setting values from settings.yml or default values from manifest.json.
-
If it doesn't already exist, create a zcli.apps.config.json file in your app's root directory.
-
In zcli.apps.config.json, add your setting values as properties of the
parametersobject.For example, if manifest.json defined the following installation setting:
"parameters": [{"name": "mySetting"},...],...You'd specify the setting value in zcli.apps.config.json as:
{..."parameters": {"mySetting": "test value"}} -
Start a ZCLI server for the app. Refer to Testing your Zendesk app locally.