Installing and using ZAT
Important
ZAT (Zendesk Apps Tools) is deprecated. Zendesk recommends migrating to the Zendesk Command Line Interface (ZCLI) for all Zendesk app development.
ZAT uses a Ruby gem that has not been tested in versions of Ruby greater than 2.6.9. Later Ruby versions may be incompatible with some ZAT commands. On macOS, for example, the ZAT libraries may require versions of Ruby greater than 2.6.9 to install. Use the Node.js-based ZCLI instead.
If you run into any problems installing or using ZAT, refer to the known issues.
Setting up your development environment for ZAT
Important: ZAT uses a Ruby gem that has not been tested in versions of Ruby greater than 2.6.9. Later Ruby versions may be incompatible with some ZAT commands. On macOS, for example, the ZAT libraries may require versions of Ruby greater than 2.6.9 to install. Use the Node.js-based ZCLI instead.
ZAT is a Ruby gem. A gem is a self-contained package of Ruby code. You don't need to know Ruby to use ZAT, but you will need to install a compatible version of Ruby.
To start, you'll set up your developer environment and install rbenv. rbenv lets you install and manage different Ruby versions on your computer. rbenv makes it easier to use a Ruby version that's compatible with ZAT.
The steps to set up your developer environment and install rbenv vary based on your computer's operating system (OS):
If you use Linux, install rbenv and its dependencies using your preferred package manager. Then skip to Installing Ruby.
Disclaimer: Zendesk doesn't provide support for third-party technologies, such as macOS, Windows, or Linux.
Setting up a macOS development environment for ZAT
macOS requires a C compiler to install ZAT. You can install this compiler as part of the Command Line Tools for Xcode.
You can then use Homebrew to install rbenv. Homebrew is a command-line tool that helps you install other applications.
To set up a macOS development environment for ZAT
Important: On macOS, the ZAT libraries may require versions of Ruby greater than 2.6.9 to install. ZAT is in maintenance mode and has not been tested in versions of Ruby greater than 2.6.9. Later Ruby versions may be incompatible with some ZAT commands. Use the Node.js-based ZCLI instead.
-
Open the Terminal app. At the prompt, type:
xcode-select --installPress Enter to run the command.
-
When prompted, click Install and accept the legal agreement.
-
To confirm you've installed the tools, run:
xcode-select --versionThe command returns your current version of the tools.
-
Install Homebrew:
/bin/bash -c "$(curl -fsSL https://raw.githubusercontent.com/Homebrew/install/HEAD/install.sh)"Follow the prompts to complete the installation.
-
Add Homebrew to your shell's configuration file:
export PATH="/opt/homebrew/bin:$PATH" >> ~/.zshrc -
Verify Homebrew is installed and ready for use:
brew -vThe command returns your current Homebrew version.
-
Use Homebrew to install rbenv:
brew install rbenv -
Update your shell's configuration file to load rbenv:
echo 'eval "$(rbenv init - zsh)"' >> ~/.zshrc -
Reload your shell:
source ~/.zshrc -
Verify rbenv is installed and ready for use:
rbenv -vThe command returns your current rbenv version.
Next, install Ruby.
Setting up a Windows development environment for ZAT
The Windows installer for Ruby 2.6.9 and later has a dependency issue that prevents ZAT from running in Windows. If you use Windows 10 or 11, we recommend you use the Windows Terminal app and the Ubuntu terminal environment to install and run rbenv, Ruby, and ZAT.
To set up a Windows development environment for ZAT
-
Download and install Windows Terminal.
-
Install Windows Subsystem for Linux (WSL) and the Ubuntu terminal environment. Follow the Install Ubuntu on WSL2 tutorial on Ubuntu.com. The instructions work for Windows 10 and Windows 11.
-
In Windows Terminal, click the drop-down arrow and select the Ubuntu environment.

Ubuntu comes with the Advanced Packaging Tool (APT). You can use APT to install other applications.
-
To get the latest APT package lists, type the following in your Ubuntu terminal tab:
sudo apt updatePress Enter to run the command. If prompted, enter the Linux password you set when installing Ubuntu.
-
Upgrade or install the required dependencies for Ruby and ZAT:
sudo apt install git curl autoconf bison build-essential libssl-dev libyaml-dev libreadline6-dev zlib1g-dev libncurses5-dev libffi-dev libgdbm6 libgdbm-dev libdb-dev ruby-devThe command loads several packages. It may take a while.
-
Install rbenv:
curl -fsSL https://github.com/rbenv/rbenv-installer/raw/HEAD/bin/rbenv-installer | bash -
Update your shell's configuration file to load rbenv:
echo 'export PATH="$HOME/.rbenv/bin:$PATH"' >> ~/.bashrcecho 'eval "$(rbenv init -)"' >> ~/.bashrc -
Reload your shell:
source ~/.bashrc -
Verify rbenv is installed and ready for use:
rbenv -vThe command returns your current rbenv version.
Next, install Ruby.
Installing Ruby
Use rbenv to install a Ruby version that's compatible with ZAT.
-
List the Ruby versions available for installation:
rbenv install --list -
Install a compatible Ruby version:
rbenv install {version}Replace
{version}with a version from the list. For ZAT, we recommend Ruby 2.6.9:rbenv install 2.6.9The command builds and installs the Ruby version from source. This can take a long time.
Using a specific Ruby version
You can use rbenv to set a default Ruby version for your computer. Later, you can use the same commands to switch Ruby versions.
-
List your installed Ruby versions:
rbenv versionsTo use a Ruby version that's not in the list, install it first.
-
Set a default Ruby version for your computer:
rbenv global {version}Replace
{version}with a version from the list. For ZAT, we recommend Ruby 2.6.9:rbenv global 2.6.9 -
Verify you're running the Ruby version:
ruby -vThe command returns the Ruby version you set.
Installing ZAT
Once you're using a compatible version of Ruby, you can install ZAT.
-
Reload your shell.
In macOS, run
source ~/.zshrc.In the Ubuntu terminal environment for Windows, run
source ~/.bashrc. -
Install rake, a build automation tool for Ruby:
gem install rake -
Install Nokogiri 1.13.10:
gem install nokogiri -v 1.13.10Nokogiri is a Ruby gem for working with XML and HTML. ZAT requires Nokogiri to run. However, versions of Nokogiri later than 1.13.10 aren't compatible with Ruby 2.6.9.
-
Install ZAT:
gem install zendesk_apps_tools -
Reload your shell.
In macOS, run
source ~/.zshrc.In the Ubuntu terminal environment for Windows, run
source ~/.bashrc. -
Verify ZAT is installed and ready for use:
zat -vThe command returns your current ZAT version.
Updating ZAT
To update ZAT to the latest version, run:
gem update zendesk_apps_tools
Using ZAT
The ZAT tools let you do the following:
- Creating starter files for a new app
- Testing your app locally in a browser
- Validating your app
- Packaging and installing a private Zendesk app
- Updating a private Zendesk app
- Packaging a Zendesk app for manual upload
Creating starter files for a new app
You can automatically create basic starter files and folders for a new app.
To create the files
-
In the command-line interface, navigate to the folder where you want the app files to be saved in a subfolder.
Use the cd command (for change directory) to navigate to a child folder. Example:
$ cd zendesk_app_projectsTo back up one directory, use cd followed by a space and two periods. Example:
cd .. -
Run the following command:
$ zat newThe command creates a set of starter files to use with the Zendesk Apps framework (ZAF). To learn more, see the ZAF documentation.
Alternatively, you can start an app with the Zendesk React app scaffold with the
--scaffoldoption:$ zat new --scaffoldSee the React app scaffold readme on Github.
Note: The React app scaffold is for advanced web developers. Zendesk can't provide support for third-party technologies used in the scaffold, nor can Zendesk debug custom scaffold configurations or code.
-
At the prompts, enter your name and email, the app's name, the URL of the file to be iframed (if any), and a folder name for the app.
ZAF apps are iframe apps. If you don't specify the URL to an iframe file, ZAT will create a basic HTML file that you can use in an iframe.
The tool creates and lists the files. The window should look as follows in macOS:

Testing your app locally in a browser
You can start a local HTTP server and run your app locally. This ability is essential for testing and debugging your app. You don't have to package and upload the app to Zendesk Support first.
This feature is supported in Chrome and Firefox, but not Safari 9 or later. To test your app locally, ZAT runs a local http server and loads the app in the Zendesk Support https page. This results in mixed content. Chrome and Firefox block mixed content but provide a way to turn off the blocking. Starting with version 9, Safari also blocks mixed content but doesn't provide a way to turn off blocking.
Some features may not work locally. See ZAT server limitations.
To test your app locally
-
In the command-line interface, navigate to the folder containing the app files.
-
Start the local HTTP server with the following command:
$ zat serverIf you get an error, make sure you navigate to your app's folder using the command line. You can start the server from a different folder by specifying the relative path to the files:
$ zat server --path /tmp/test-appAfter a moment, a status message appears informing you that the server has started. Example:

Note: The command prompt is unavailable until you shut down the server later.
-
In your favorite browser, navigate to any ticket in Zendesk Support. The URL should look something like this:
https://subdomain.zendesk.com/agent/tickets/321 -
Append ?zat=true to the ticket URL, and reload the page.
The URL should look like this:
https://subdomain.zendesk.com/agent/tickets/321?zat=trueTip: Bookmark the modified URL for easy access in the future. You might also want to create a dummy ticket for app testing.
-
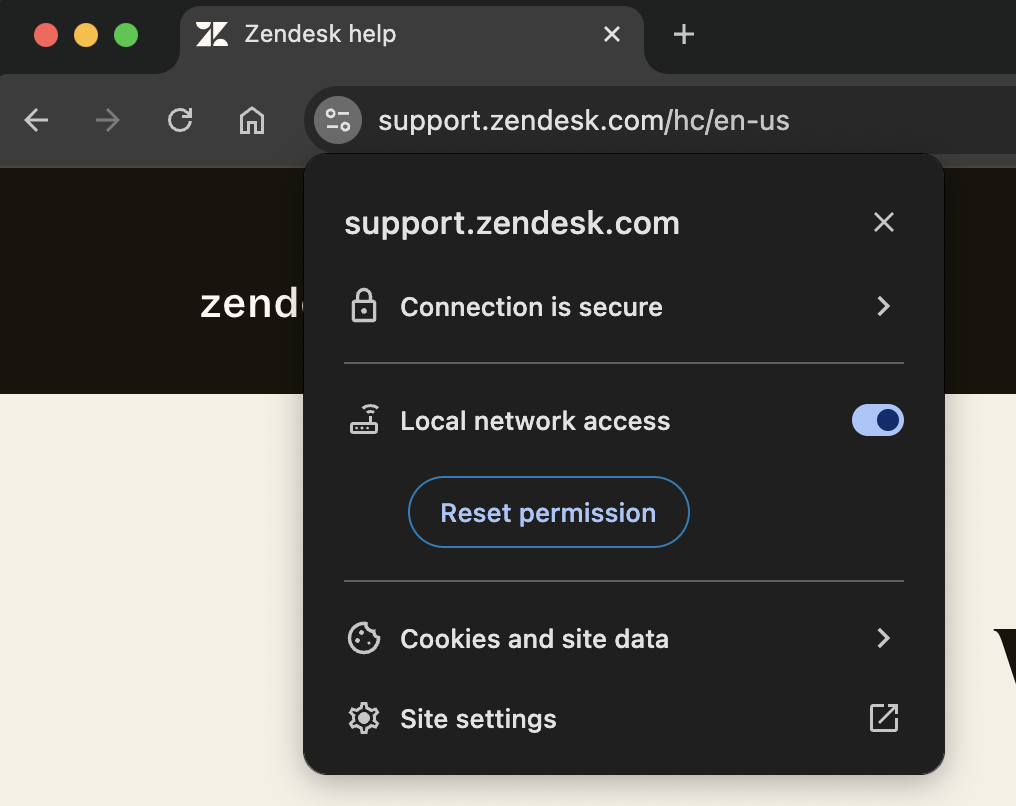
If you're using the Chrome browser, the content of your app may be blocked. A popup will appear requesting local network access the first time the page is loaded.
If access has been previously denied, allow access by clicking the site settings button in the URL bar and toggling the Local network access option.
You will also need to allow insecure content.
Click the lock icon on the left side of the address bar and select Site settings. On the Settings page, scroll to the Insecure Content section and select Allow.
Click the lock icon in the address bar:

Select Site Settings > Privacy and Security, then select Allow from the Insecure content menu:

Note: Firefox doesn't block app content but Safari does and has no option to disable blocking. You must use Chrome or Firefox to work with the local zat server.
-
Click the Reload Apps icon in the upper-right side of the Apps panel to load your local app into the panel.

Even if the app appears in a Zendesk Support page, it's actually running locally on your machine.
Note: If nothing happens, check for a shield icon in the Address bar. See step 5.
-
Work iteratively to develop and test features in your app. For example, make some changes to your app's source code, save the changes, then click Reload Apps on the ticket page to test the changes.

-
When you're done for the day, press Control+C to shut down the local server.
Packaging and installing a private Zendesk app
The ZAT server doesn't support some ZAF features. To preview an app that uses
these features, use the zat create command instead. The command packages
and installs the app as a private app in your Zendesk instance. Once installed,
you can use ZAT to update the app and test changes.
-
In the command-line interface, navigate to the folder containing the app files.
-
Run:
$ zat createIf prompted, enter your subdomain, email, and password.
The command:
-
Packages the app's files into a ZIP file. ZAT saves the ZIP file in a tmp folder in the app's root directory.
-
Uploads and installs the ZIP file as a private app in the Zendesk instance.
-
Creates a .zat file in the app's root directory. This file contains the app ID and other metadata. This app ID is unique within a Zendesk instance.
-
Updating a private Zendesk app
You can use the zat update command to update a private app. The command
requires a .zat file in the app's root directory. The file must
contain a valid app_id property.
If you uploaded the app manually, you must create and configure the .zat file first. Refer to Configuring updates. If you used the ZAT create command to upload the app, the configuration step is not necessary.
To update an installed app:
-
In the command-line interface, navigate to the app's root directory. This is the folder that contains your manifest.json file.
-
Run:
$ zat updateIf prompted, enter your subdomain, email, and password.
After the update is complete, refresh the apps in the user interface.
Configuring updates
To create and configure the .zat file:
-
Get the app ID. Sign in to the Zendesk product for the app as an admin. Then open the respective page for the product in the same browser:
- Support:
https://{subdomain}.zendesk.com/api/support/apps/installations.json - Chat:
https://{subdomain}.zendesk.com/api/chat/apps/installations.json - Sell:
https://{subdomain}.zendesk.com/api/sell/apps/installations.json
Replace
{subdomain}with your Zendesk subdomain. - Support:
-
Add a file named .zat to the app's root directory.
In macOS, open the command-line interface, navigate to the app's root directory, and run the following command:
$ touch .zatIn Windows, create the file in NotePad with File > Save As.
-
Add the following JSON to the .zat file:
{"subdomain": "your_subdomain","username": "your_username","app_id": 1234}Replace the property values with your own and save the file. The
usernamevalue is the email address you use to sign in.
Validating your app
When you're finished developing your app, you should run validation tests to catch any problems before uploading it to Zendesk Support. The ZAT validation tool runs the same tests that are run when an app is uploaded to the Zendesk App Market.
To validate your app
-
Run the following command in the folder containing the app files:
$ zat validateIf using the React app scaffold, run the command in the final build folder, which may be dist/ or the root folder depending on the folder structure. You can also specify the path to the final build folder with the
-poption. Example:$ zat validate -p ./dist -
When prompted, enter the URL of the Zendesk Support instance where you plan to install the app. The command doesn't actually install the app. Specify http instead of https in the URL. Example: http://yoursubdomain.zendesk.com.
-
Fix any problems reported by the tool.
Packaging a Zendesk app for manual upload
When you're ready to upload your app to your instance of Zendesk Support, use the ZAT tool to package the app for uploading.
-
Run the following command in the folder containing the app files:
$ zat package -
When prompted, enter the URL of the Zendesk Support instance where you plan to install the app. The command doesn't actually upload and install the app. Also, specify http instead of https in the URL.
Example: http://yoursubdomain.zendesk.com.
The ZAT tool packages the app and saves it in a tmp folder. Example:

-
Grab the zip file (app-20130110164906.zip in the example) and upload it to Zendesk Support. For instructions, see Uploading.
-
To clean up the tmp folder, run the following command:
$ zat clean
ZAT server limitations
A few things don't work when running an app locally on the ZAT server:
- secure settings - the ZAT server won't render the settings
- requirements - the requirements aren't installed, so the framework's
requirement()method won't work either
To get around these limitations, you can install the app as a private app and then use the zat update command to make updates to the installed app. Refer to Updating a private Zendesk app.
For other limitations, see also ZAT - Known issues.