Adding Tickets
Adding Tickets
The conversations your organization has with customers appear as tickets in Zendesk Support. The Support SDK allows customers to use your app to create tickets, update existing ones, or see when their tickets have been updated by the customer service team.
All four Support SDK activities, including the Help Center activities, let the user create tickets. The following activities also let the user view and update one or more of their tickets, and give you more control over tickets in your app:
- RequestActivity
- RequestListActivity
Note: Tickets in Zendesk are also known as support requests, or simply requests.
The RequestActivity lets you:
- show and configure a ticket screen that a user can use to submit tickets to your customer service team
- create an intent to show the ticket screen later
- configure the ticket screen of other SDK activities
- show one of the user's tickets
It's important to note that RequestActivity does not poll for updates to the ticket, as ticketing is an asynchronous communication pattern rather than a synchronous one such as chat.
The "Confirmation Message" setting in the Zendesk Support admin page should be customized and used
to set the user's expectations for when they will receive a reply.
A true chat-like experience can be achieved using push notifications to trigger refreshes of the conversation on-screen.
The RequestListActivity lets you show a list of the user's tickets. The user can review and update their tickets.
If you need to build your own ticket UIs, the SDK also has an API provider that gives you access to tickets in Zendesk Support. See RequestProvider in the Support SDK Javadocs.
Topics covered in this section:
- Prerequisites
- UI overview
- Show the submit ticket screen
- Configure a ticket screen
- Create an intent to show the ticket screen
- Configure the ticket screen of other SDK activities
- Show the user's tickets
- Show a ticket
- Check for ticket updates
Prerequisites
There is no prerequisite for letting users create tickets.
There is a prerequisite in order to let users view their tickets and update them.
A Zendesk admin must enable Conversations for your app setting in Zendesk Support. See Configuring the SDK in Zendesk Support in Zendesk help
UI overview
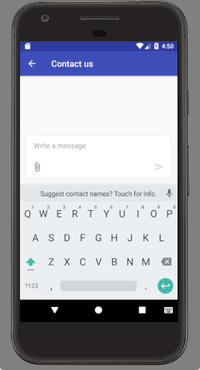
The default submit ticket screen of the RequestActivity looks as follows:
The default ticket list of the RequestListActivity looks as follows:

A bullet appears next to a ticket to alert the user when an agent has updated the ticket.
Tapping a ticket in the list shows the ticket conversation. The user can add a comment to the conversation.
You can change the look and feel of the activities' UIs. See Customizing the look.
Show the submit ticket screen
Use the show() method of the RequestActivity builder. Example:
RequestActivity.builder().show(MyActivity.this);
See show in RequestActivity builder.
If you prefer, you can use the ticket screen in the RequestListActivity, HelpCenterActivity, or ViewArticleActivity activities. The UI of each activity has a floating action button that lets the user open the ticket screen.
Configure a ticket screen
Use any of the following methods of the RequestActivity builder:
Example:
RequestActivity.builder().withRequestSubject("Android ticket").withTags("android", "mobile").show(MyActivity.this);
See the methods listed above in RequestActivity builder.
Create an intent to show the ticket screen
Use the intent() method of the RequestActivity builder. Example:
Intent requestActivityIntent = RequestActivity.builder().withRequestSubject("Android ticket").intent(MyActivity.this);
See intent in RequestActivity builder.
Configure the ticket screen of other SDK activities
Use the config() method of the RequestActivity builder. Example:
Configuration requestActivityConfig = RequestActivity.builder().withRequestSubject('Android ticket').withTags("android", "mobile").config();RequestListActivity.builder().show(MyActivity.this, requestActivityConfig);
See config in RequestActivity builder.
Show the user's tickets
Use the show() method of the RequestListActivity builder. Example:
RequestListActivity.builder().show(MyActivity.this);
If using an anonymous identity, RequestListActivity only shows tickets created on
that specific device, even if the user creates other tickets on other devices with the same email
address. This restriction doesn't apply to JWT identities. RequestListActivity shows tickets
created by a JWT user on any channel (such as on the web or on other mobile devices).
Any tickets that have new or unread comments are displayed in a highlighted state in the list to draw the user's attention.
The unread status is determined and tracked on the device, which means that
the read/unread state is not shared across multiple devices for JWT users. JWT tickets created in
other channels (such as other devices) are displayed as unread the first time they're retrieved from
the network and displayed in RequestListActivity.
Solved tickets are displayed in the list the same way as open tickets. A solved ticket can be viewed and updated just like an open ticket. A new comment from an end user on a solved ticket causes the ticket to be reopened in Zendesk.
Closed tickets are displayed in a greyed-out state with a message saying the ticket has been closed. The ticket can still be viewed by a user, but cannot be updated. You can disable the display of closed tickets in the Zendesk Support admin page.
If conversations are disabled in the Zendesk Support admin page, RequestListActivity logs a
message and closes as soon as it has been started. Viewing a list of tickets is disabled because
it's part of the conversations feature.
See show in RequestListActivity builder.
Show an existing ticket
Use the withRequestId() method of the RequestActivity builder. Example:
RequestActivity.builder().withRequestId("123").show(MyActivity.this);
If conversations are disabled in the Zendesk Support admin page, RequestActivity logs a
message and closes as soon as it has been started. Opening an existing ticket is disabled
because it's part of the conversations feature.
See withRequestId in RequestActivity builder.
Check for ticket updates
The RequestListActivity shows a bullet next to a ticket to alert the user that the ticket has been updated. However, if you don't use the RequestListActivity or if the user isn't checking their ticket list often, the user won't be aware of updates.
If you are using JWT authentication, the user's tickets submitted from other channels appear in their ticket list. They show as unread the first time the user views the ticket list, because the read/unread state is stored on the device. Viewing each ticket resets it to the read state, and any new updates after that cause the ticket to appear unread again.
Note: Identified users receive email notifications from Zendesk Support when their tickets are updated.
You can use an API provider to check if any of the user's tickets have been updated, and then alert the user based on the response. The RequestProvider has a getUpdatesForDevice() method that checks for ticket updates. If any are found, you can alert the user elsewhere in your app and perhaps use the RequestActivity to show each ticket.
Example:
final RequestProvider requestProvider = Support.INSTANCE.provider().requestProvider();requestProvider.getUpdatesForDevice(new ZendeskCallback<RequestUpdates>() {@Overridepublic void onSuccess(RequestUpdates requestUpdates) {if (requestUpdates.hasUpdatedRequests()) {Set<String> updatedRequestIds = requestUpdates.getRequestUpdates().keySet();for (String id: updatedRequestIds) {Log.d(LOG_TAG, String.format("Request %s has %d updates",id, requestUpdates.getRequestUpdates().get(id)));}}}@Overridepublic void onError(ErrorResponse errorResponse) {// handle error}});
The method caches requestUpdates for up to an hour. Any subsequent API call in that timeframe returns the cached object rather than making the API call.
Viewing a ticket removes it from the cached RequestUpdates object. The event occurs when the ticket's comments load in RequestActivity.
If you implement a custom UI, you can mark a ticket as seen by calling the following method with the ticket's ID and the number of comments that have been read (usually the total number of comments):
Support.INSTANCE.provider().requestProvider().markRequestAsRead("123", 4);
If you've integrated push notifications for request updates, but have implemented a custom request UI and aren't using Support.INSTANCE.refreshRequest(), you can mark a ticket as unread when a push update is received:
Support.INSTANCE.provider().requestProvider().markRequestAsUnread("123");