Quickstart – Creating a launcher for the Web Widget (Classic)
The launcher is a button on a web page that is used to open the Web Widget (Classic). Whilst some launcher customization is available, there may be instances where you want to create your own launcher and define how it behaves. This quickstart tutorial shows how to do this using HTML, CSS, and Web Widget (Classic) JavaScript APIs.
Related information:
In this tutorial, you’ll replace the default launcher with a custom launcher with a “Click to chat with me!” label.

Requirements
- CodePen, a free online code editor. While this tutorial uses CodePen, you can use other code editors such as JSFiddle and JS Bin.
- A Zendesk Support account or a trial account.
- Supported web browsers for the Web Widget, as described in Using Web Widget (Classic) to embed customer service in your website.
Creating a sample web page
In this section, we’ll create a “Hello World” web page using CodePen, an online code editor.
To create a “Hello World!” web page
-
In your web browser, go to https://codepen.io/pen/.
-
In the top UI pane, click Change View, and select the left view option.
-
In the HTML editor on the top right side, click the dropdown menu, and select Maximize HTML Editor.
-
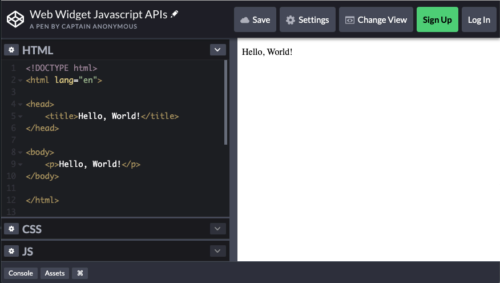
Copy and paste the following HTML code into the HTML editor.
<!DOCTYPE html><html lang="en"><head><title>Hello, World!</title></head><body><p>Hello, World!</p></body></html>
The web page is displayed in the window on the right side.
Adding the widget on your web page
To add the widget on your web page, you need to copy and paste the Web Widget (Classic) script in Zendesk Support.
- In Admin Center, click the Channels icon (
 ) in the sidebar, then select Classic > Web Widget. If you don't have admin access, ask a Zendesk admin to get the information for you.
 - Click the Setup tab if it is not already selected.
- Under the code box, click Copy to clipboard.
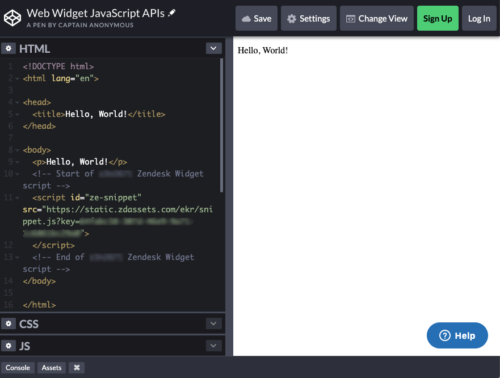
- In your HTML editor, paste the script before the closing tag. For example:
<!DOCTYPE html><html lang="en"><head><title>Hello, World!</title></head><body><p>Hello, World!</p><!-- Start of Zendesk Widget script --><script id="ze-snippet" src="https://static.zdassets.com/ekr/snippet.js?key=YOUR_SNIPPET_KEY"></script><!-- End of Zendesk Widget script --></body></html>
By default, the widget is displayed on the bottom right of your web page.
Building a custom launcher
After adding the widget to your web page, creating your custom launcher requires three steps:
- Adding the div element to the web page for your custom launcher.
- Using HTML and CSS to customize your launcher style and format.
- Using client-side Web Widget (Classic) APIs to define how you want the launcher and widget to behave.
In this part of the tutorial, you’ll create a launcher that opens the widget, and when the widget is closed, will revert back to the custom launcher.
Adding the launcher <div> element to your web page
The <div> element you’ll add to the web page contains the following launcher-related content:
- A
<div>element with an id of “myLauncher” - An onclick event handler to open the widget when the launcher button is clicked
- Custom launcher button text: “Click to chat with me!”
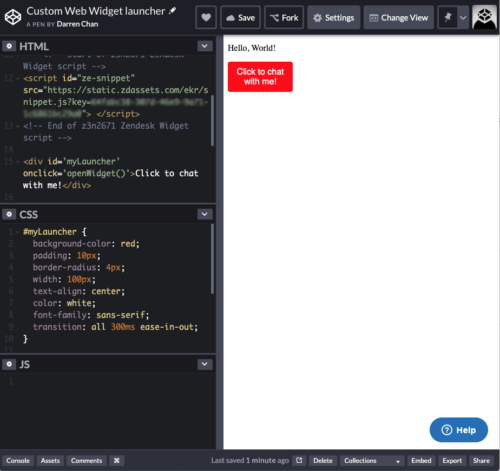
In the HTML editor, copy and paste the following code between the
tags after the Web Widget (Classic) snippet:<div id='myLauncher' onclick='openWidget()'>Click to chat with me!</div>
Next, you’ll add the CSS.
Creating the launcher
You'll create custom launcher with the following design parameters:
- Red background color
- 10px padding
- 4px border
- 100px width
- Launcher text to be center aligned
- Text to be a sans-serif font
- Text color to be white
- 300ms for the launcher to transition in and out
The “myLauncher” CSS rule sets the format and layout for the launcher. It contains the properties and values for the launcher that we have defined above:
#myLauncher {background-color: red;padding: 10px;border-radius: 4px;width: 100px;text-align: center;color: white;font-family: sans-serif;}
To add the custom launcher CSS
- Copy and paste the CSS element into the CSS window editor.
- Refresh your web page. The custom launcher is displayed.
You can experiment modifying CSS properties and values to observe what happens to the custom launcher format and styling. To learn more about what CSS options are available, see the MDN docs Learn to style HTML using CSS.
Defining the custom launcher and Web Widget (Classic) behaviour
The custom launcher and widget behaviour are configured using Web Widget (Classic) API commands. You access the API settings using JavaScript in the source code of your website. For the purposes of this tutorial, a script is added directly to the web page.
Note: API commands must be placed after the Web Widget (Classic) snippet in your web page source code.
Hide the launcher on page load
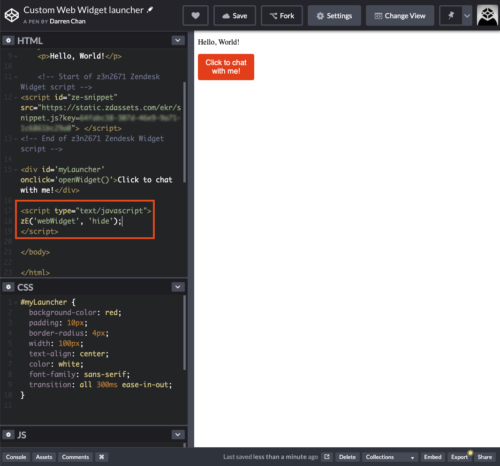
In the HTML editor, add the hide command between script tags after the widget snippet:
<script type="text/javascript">zE('webWidget', 'hide');</script>
The hide command prevents the Web Widget launcher displaying when the custom launcher is loaded.
When clicking the custom launcher, hide the launcher, and open the widget
The behaviour of the openWidget() function needs to be configured, which is referenced in the myLauncher
<script type="text/javascript">zE("webWidget", "hide")function openWidget() {zE("webWidget", "show")zE("webWidget", "open")document.querySelector("#myLauncher").style.opacity = 0}</script>
The openWidget() function is called when the user clicks your launcher. The following is added to the function:
- the show command to show the widget since the hide command is used to suppress the Web Widget (Classic) launcher on page load
- the open command to force the widget to appear
- the document.querySelector() method to select the ‘myLauncher’ element and set its opacity to 0. This hides the custom launcher
If you don't want to hide the custom launcher when the widget is open, you can leave out document querySelector() line.
When the Web Widget (Classic) is closed, hide the widget, and show the custom launcher
Next, you’ll use the Web Widget (Classic) on close command to call a function when the user closes the widget. Copy and paste the highlighted code snippet between the script tags in your HTML editor:
<script type="text/javascript">zE('webWidget', 'hide');function openWidget() {zE('webWidget', 'show');zE('webWidget', 'open');document.querySelector('#myLauncher').style.opacity = 0;};zE('webWidget:on', 'close', function() {zE('webWidget', 'hide');document.querySelector('#myLauncher').style.opacity = 1;})</script>
For the on close command, the:
- hide command is called to hide the widget
- Document method
querySelector()is used to show the custom launcher by setting the opacity to 1.
Now try out your custom launcher!

Join the discussion about this article in the community.